|
|
Gunsumer Reports TM Providing Detailed Objective Reviews for Firearms and Firearm Accessories |
Ruger Precision Rifle Review
Part 5 - Range Testing
September 19, 2015
In this part of my Ruger Precision Rifle Review, I show my final configuration of the rifle for range testing along with my range test results. Since the rifle is intended to be used with a riflescope, my first order of business was to select a riflescope and rings which wasn't too hard for a couple of reasons. The first is that I have been waiting for the right opportunity to try out one of the Burris XTR II™ Riflescopes. I feel Burris makes some great riflescopes and the XTR II™ would be a perfect match for the Ruger Precision Rifle. Second, the Burris XTR II™ Riflescope happens to be the same riflescope that Ruger uses when advertising their new rifle which gives you a good idea on what your final configuration may resemble, but I feel it is also a good endorsement from Ruger on their thoughts about an appropriately matched riflescope for their new rifle.
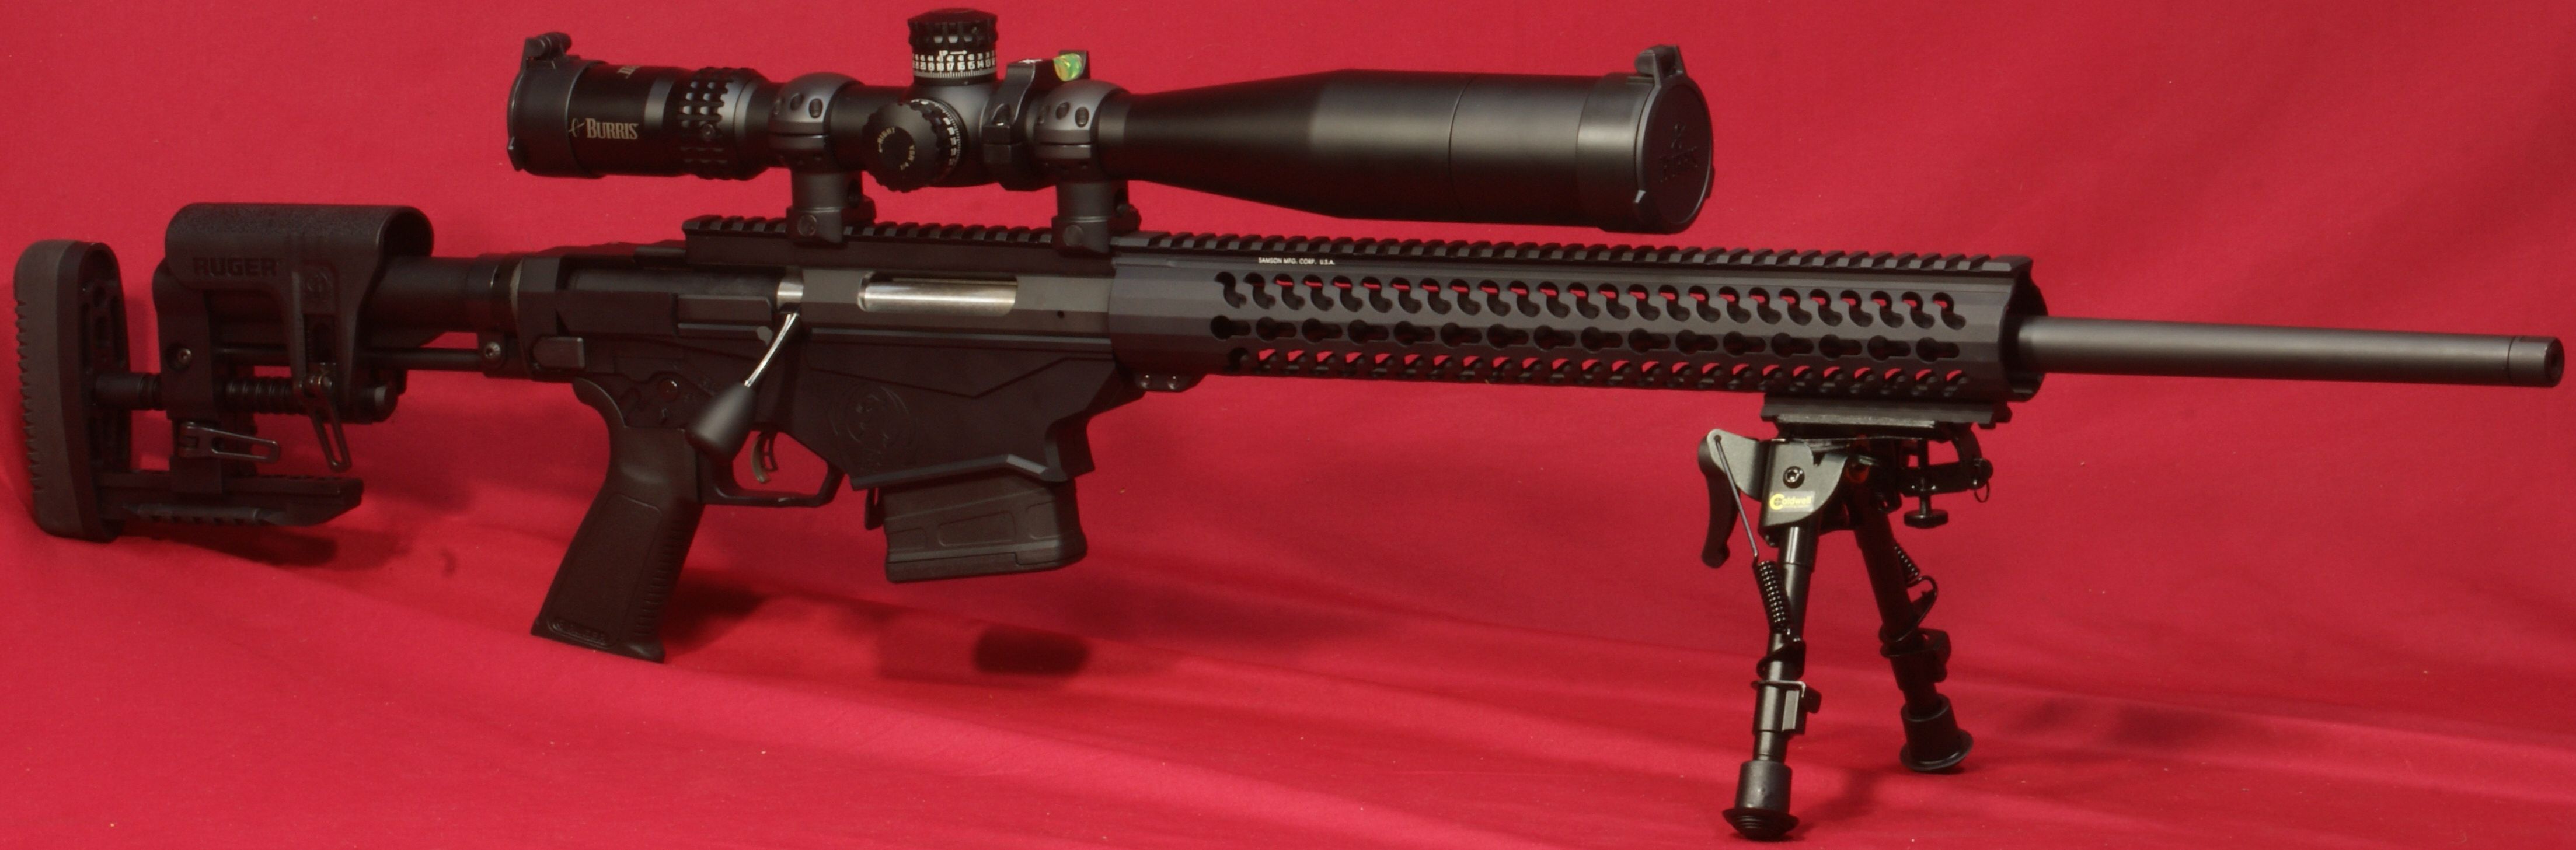
This next photo shows the final setup of my rifle for range testing and this setup is a combination of the following components.
- Ruger Precision Rifle in 6.5 Creedmoor
- Burris XTR II 5-25x50mm Riflescope with a SCR™ MOA reticle
- Burris Xtreme Tactical™ Rings (No. 420192, High, Wide, 34mm)
- Vortex Bubble Level
- Caldwell XLA 6" to 9" Bipod
- Caldwell Bipod Pivot Lock
It is not often that I have such a fondness for hardware, but once it got this sleek beauty put together I knew I had to give her a name. I call her "Lola." Don't ask me why, it just seemed to fit.
Figure 1 - I call her "Lola"
My next order of business was to decide on a barrel break-in process (if any) and then perform the break-in. If you spend some time researching barrel break-in procedures on the internet, you will find that there are a wide range of opinions on whether it is needed and if so, what is the correct technique. I contacted Ruger to get their recommendation which was, "Ruger does not have a recommended barrel break in procedure for any of its firearms other than the normal cleaning that would be done to any gun recently purchased." I thought that would probably be their reply, but I checked anyway. My general thoughts are that spending a little time trying to ensure that any potential manufacturing imperfection in the barrel doesn't negatively effect your barrel's performance is probably a good idea on a precision rifle which is intended for long range shooting and costs over $1000. Also, I feel the break-in process does have the potential to make a barrel easier to clean. I know first hand that the resistance it took sending the first solvent soaked patch down the rifle during my first cleaning was significantly less on my last cleaning during break-in. In full disclosure, most of the rifles I shoot which are intended for hunting only get Ruger's recommendation when it comes to break-in, but in the case of this rifle I decided to do a little more.
I chose a method referred to as a copper equilibrium method for breaking-in the barrel which is intended to allow copper to build up more quickly until it achieves an equilibrium state where the presence of copper improves the barrel dimensions to better seal the bullet. This method consists of cleaning the barrel initially and then after every shot for the first five shots and then after every five shots for an additional five more times. This gives a total of 10 cleanings (not counting the initial cleaning) and 30 shots fired. The solvent used should be only a powder solvent and not an aggressive copper remover. My cleaning regiment used Hoppe's #9 with an initial soaked patch sent down the barrel followed by ten one directional strokes (bore to muzzle then remove the brush) using a brass brush dipped in #9 and then followed by 3 clean dry patches at the end. I show this break-in process in this next video.
During the break-in process, I took the time to get an initial zero on my riflescope along with some chronograph data on some hand loads at different powder charge weights. I know that this velocity data may be only of marginal value during this break-in period, but since it took little effort, I recorded it anyway.
After break-in, it was time to shoot some 5-shot groups at 100 yards to see what type of accuracy I could get out of the rifle. I decided to keep the same shooting configuration used during break-in for the bench testing because I had great success with some of my initial groups during the break-in procedure. The photo below shows my setup. Normally I bench test using my Caldwell Rock BR front rest because I feel it minimizes potential harmonic vibrations, but knowing that I would shoot this rifle mainly from a bipod in the future, I decided to go ahead and bench test it in my intended configuration. I was able to detect some slight vertical dispersion in my groups based on the amount of forward pressure applied to the bipod, but once I got more consistent with the pressure the groups tightened up slightly.
Figure 2
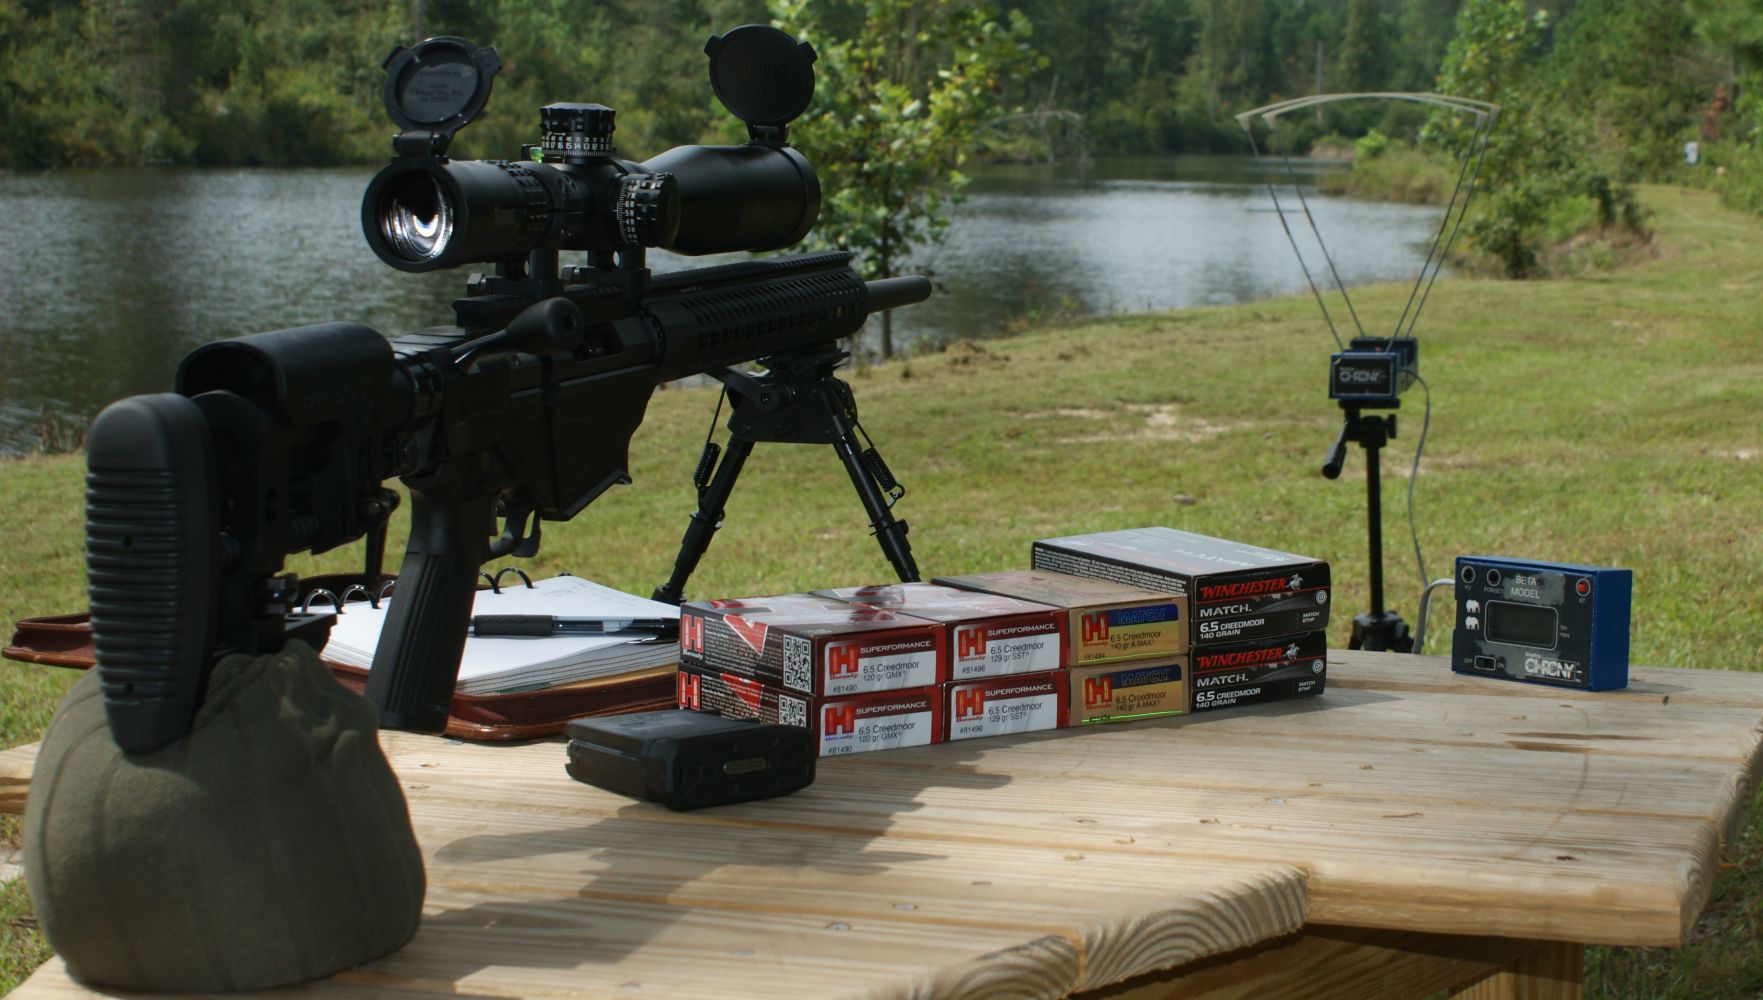
I used an assortment of premium Hornady ammunition in varying bullet types (A-Max, GMX, SST) and weights (120gr, 129gr, 140gr), along with a couple of boxes of Winchester 140gr BTHP Match ammunition. The chronograph was setup approximately 10 feet from the muzzle. The table below summarizes four 5-shot groups for each type of ammunition. In my opinion, the rifle shot great with nearly all of the ammunition. There was a clear difference in group size using the 120gr GMX Superformance and I could feel there was a recoil difference when shooting the rifle. Most likely, I would attribute this larger group size to some type of harmonic issue with this particular load (bullet weight, powder burn rate, velocity) when shooting this particular setup (rifle and rest combination). If I ignore the GMX groups, then I had sixteen 5-shot groups that averaged 0.81" having a minimum group size of 0.50" and a maximum group size of 1.14". From my perspective, this demonstrates that the new Ruger Precision Rifle is an extremely capable rifle when it comes to precision and clearly this rifle is sub-MOA.
| Ammunition | Ballistic Coefficient (G1) |
Velocity1 | 5-Shot Groups3 | ||||
| On Box2 | Average | Standard Deviation |
Minimum | Maximum | Average | ||
| Hornady 120gr A-Max® | 0.465 | 2910 | 2864 | 24 | 0.56 | 0.76 | 0.70 |
| Hornady 120gr GMX® Superformance® | 0.450 | 3010 | 3000 | 35 | 0.94 | 1.71 | 1.45 |
| Hornady 129gr SST® Superformance® | 0.485 | 2950 | 3006 | 7 | 0.65 | 0.94 | 0.79 |
| Hornady 140gr A-Max® | 0.585 | 2710 | 2669 | 21 | 0.50 | 1.14 | 0.95 |
| Winchester 140gr BTHP Match | 0.580 | 2710 | 2658 | 24 | 0.70 | 0.88 | 0.81 |
| Sixteen 5-shot Groups Average (minus GMX) | 0.81 | ||||||
| 1 - Velocity measured ~10 feet
from muzzle. Average based on 10 shots. 2 - "On Box" value is manufacture's advertised velocity 3 - Four 5-shot groups shot at 100 yards were used 4 - Range conditions were between 80° and 83° F with minimal cross wind |
|||||||
You can see my range test video below showing my setup at the range along with my first eight 5-shot groups while at my range. This video also comments on this part of my review and specifically the table above.
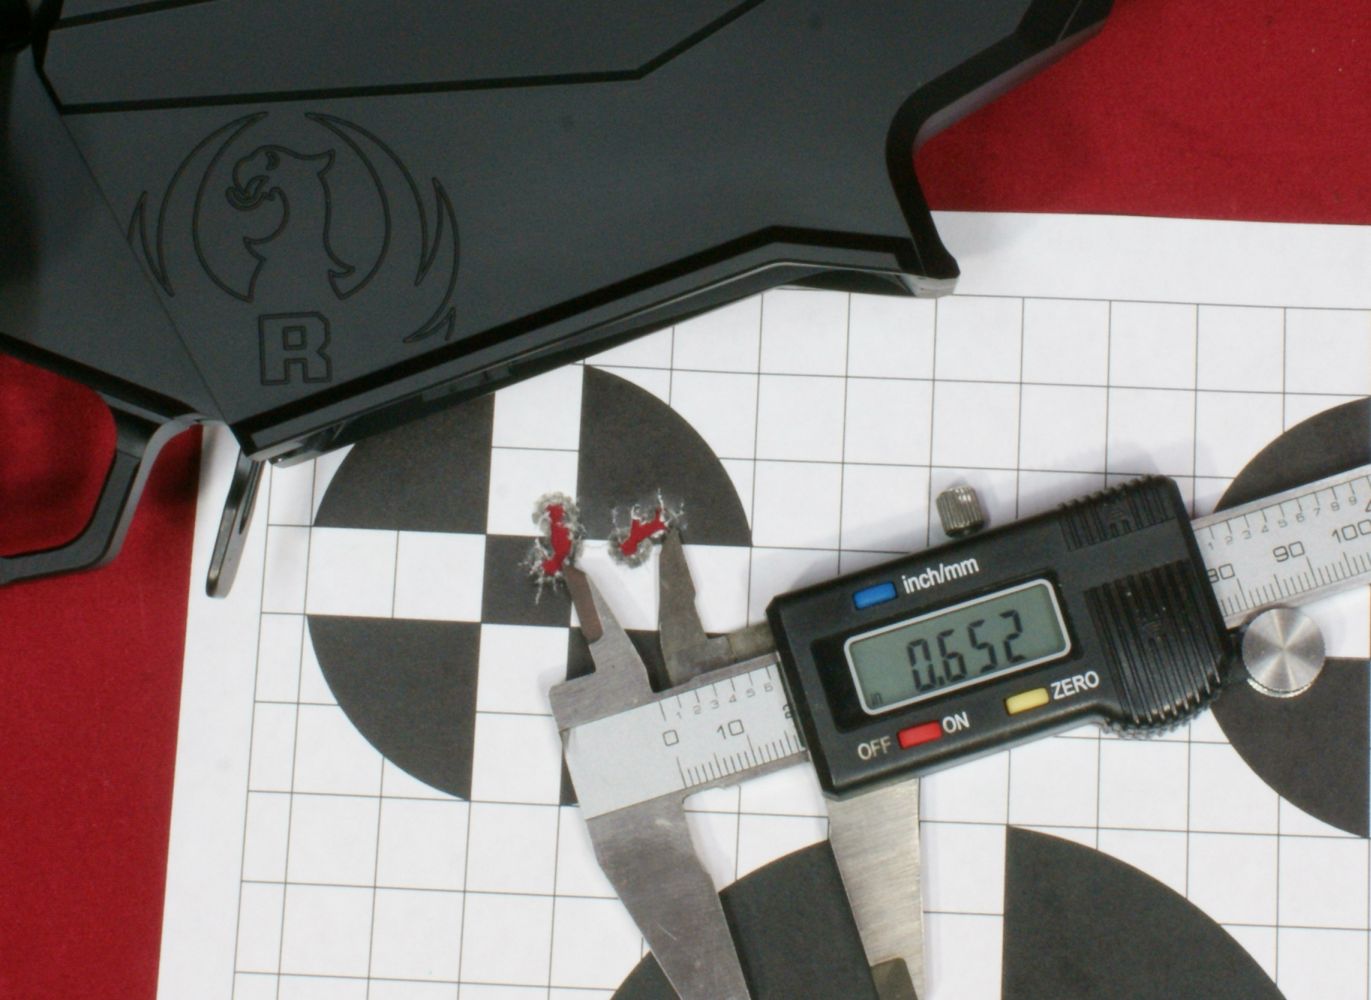
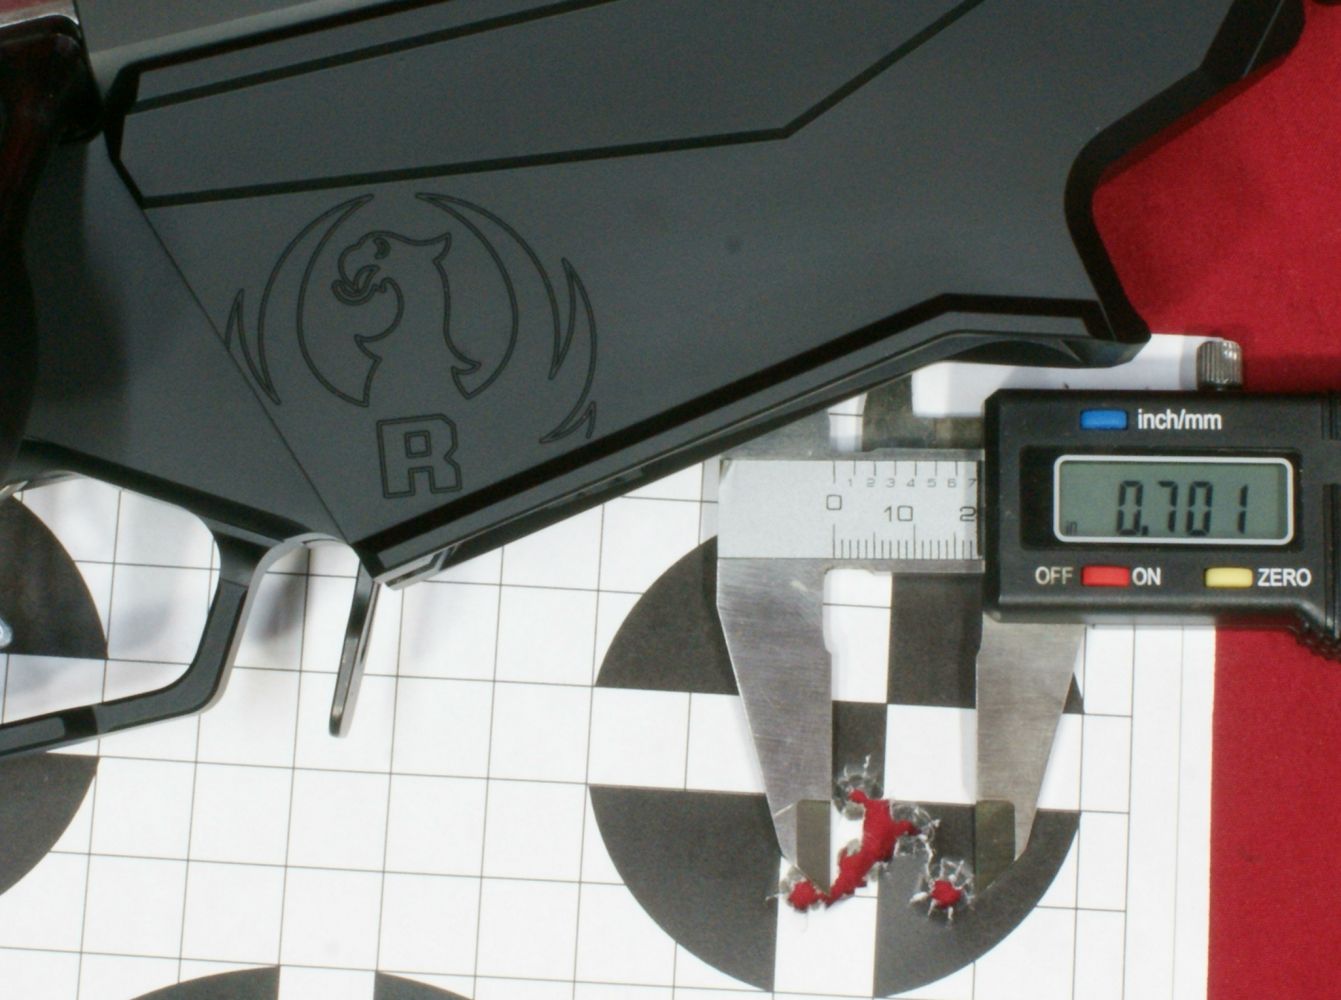
These next photos show some of the best groups for each type of ammunition as proof of the rifle's capability. I plan to submit some of them to the Ruger Precision Rifle Challenge. If you haven't already checked out the Standings page, then you need to. There are some amazing group sizes being submitted and Ruger is trying to show group data out to 600 yards and plate sizes being hit out to 1600 yards. These Challenge and Standings pages are another example of how the folks marketing Ruger products are thinking out of the box when it comes to creating interest in their products.
Figure 3
Figure 4
Hornady 140gr A-Max 0.50"
Hornady 120gr A-Max 0.56"
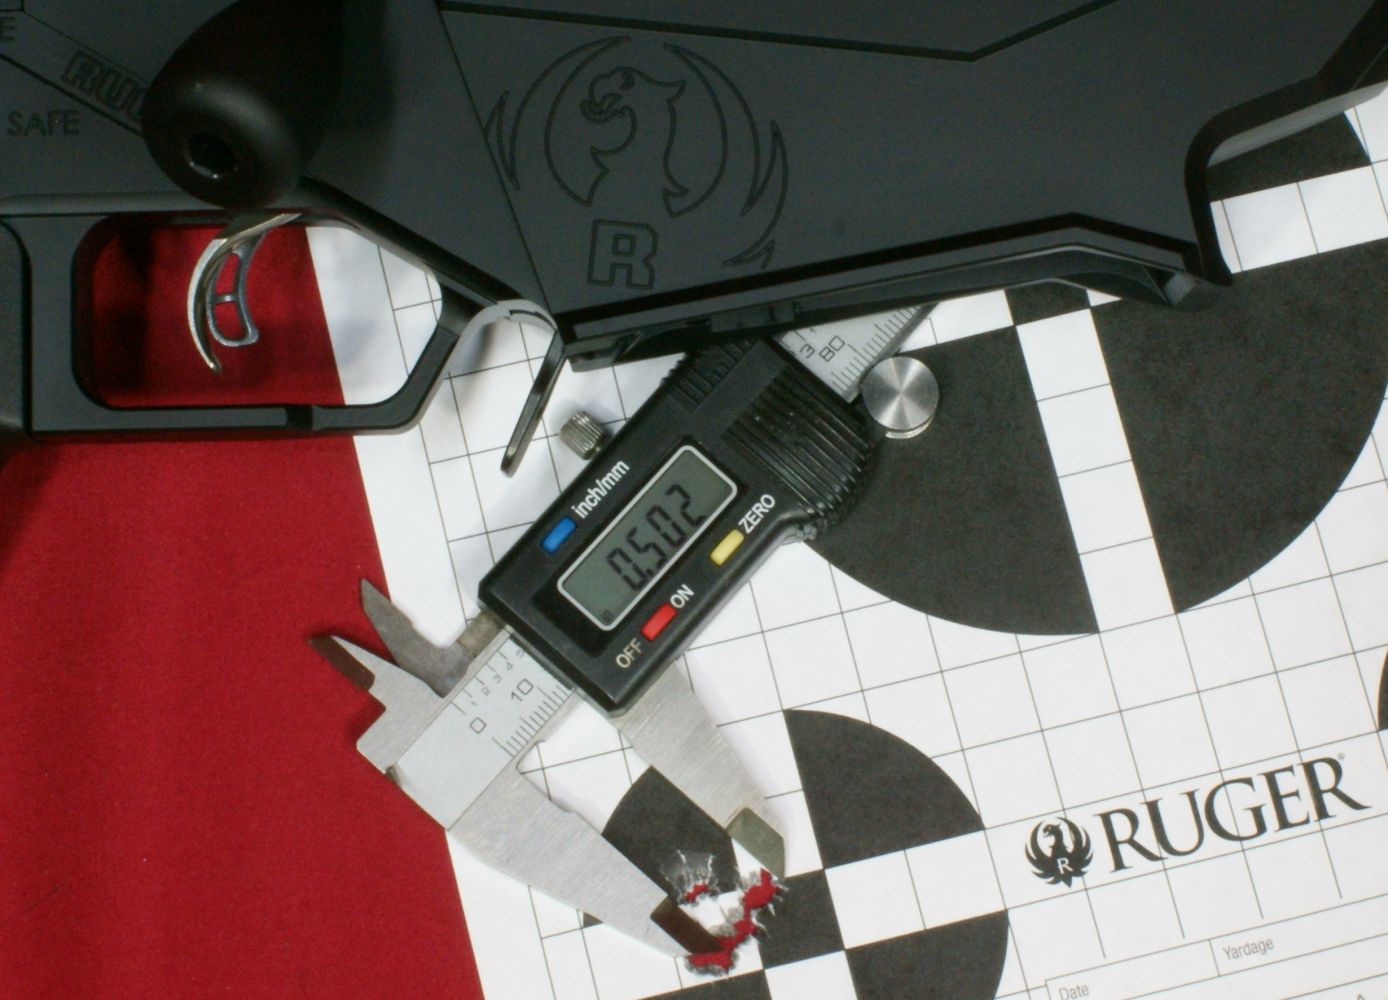
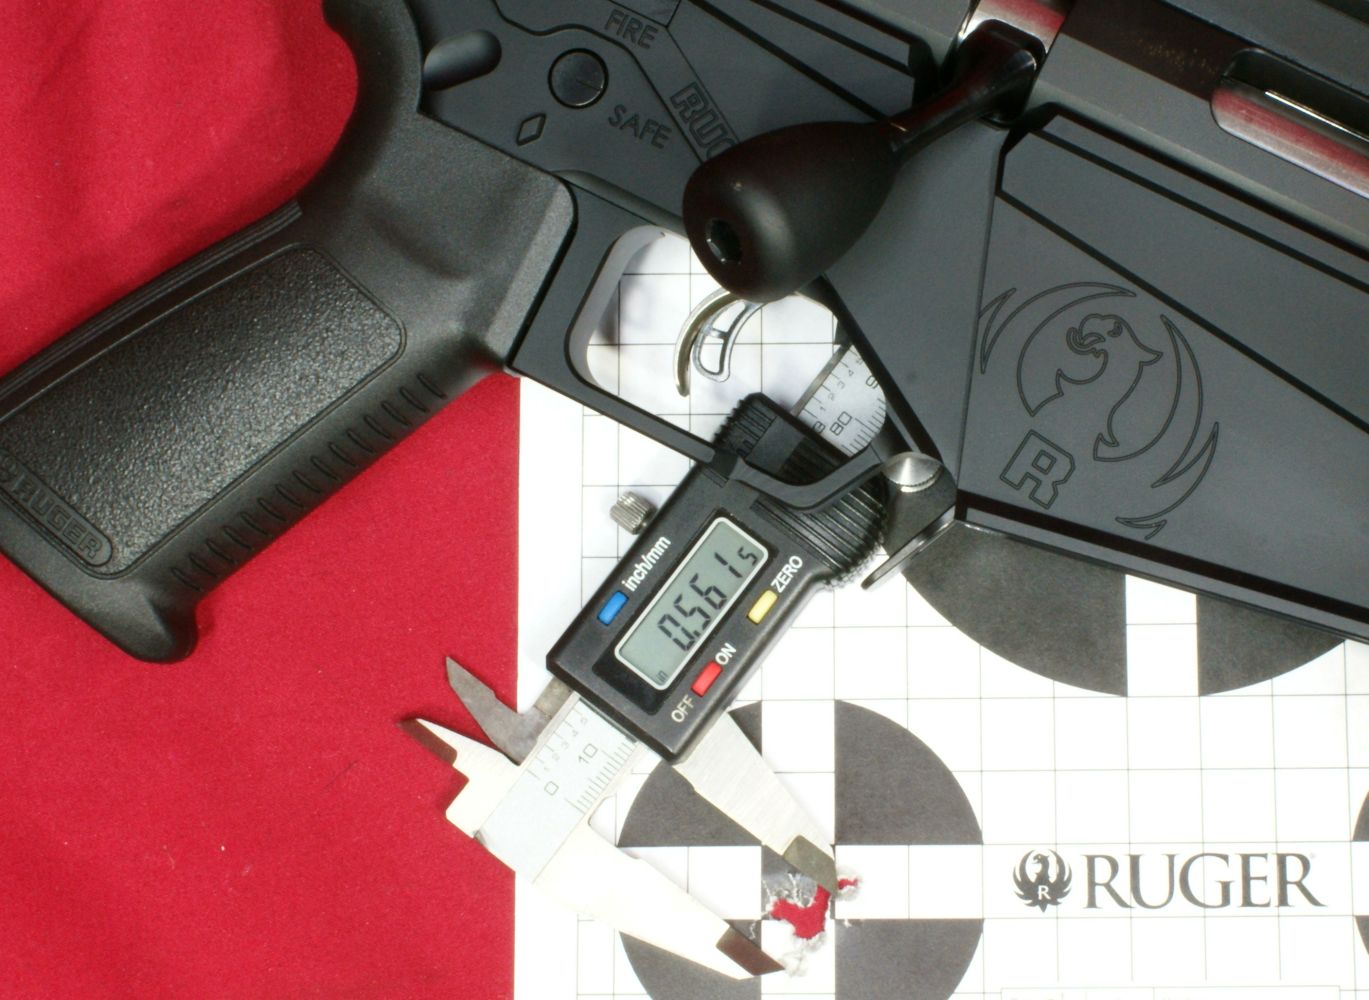
Figure 5
Figure 6
Hornady 129gr SST 0.65"
Winchester 140gr BTHP 0.70"
Once I finished bench testing at 100 yards, it was time to see how the rifle performed in a real long range shooting situation. Unfortunately my range is only capable of 500 yards at this time, but I think that is more than enough to have some fun. This next video shows my first 6 shots at the range. I dialed in 10 MOA into the rifle scope and hit the steel Grizzly IPSC Zones A, B & C Target on the first shot. That was extremely satisfying, but what was even more satisfying was sending another 5 shots down range and them also making contact on the target. I finished up some of the ammo I had on hand and was wishing I had brought more. I enjoyed my day a the range and on my next trip I can start working up a sweet load for Lola.
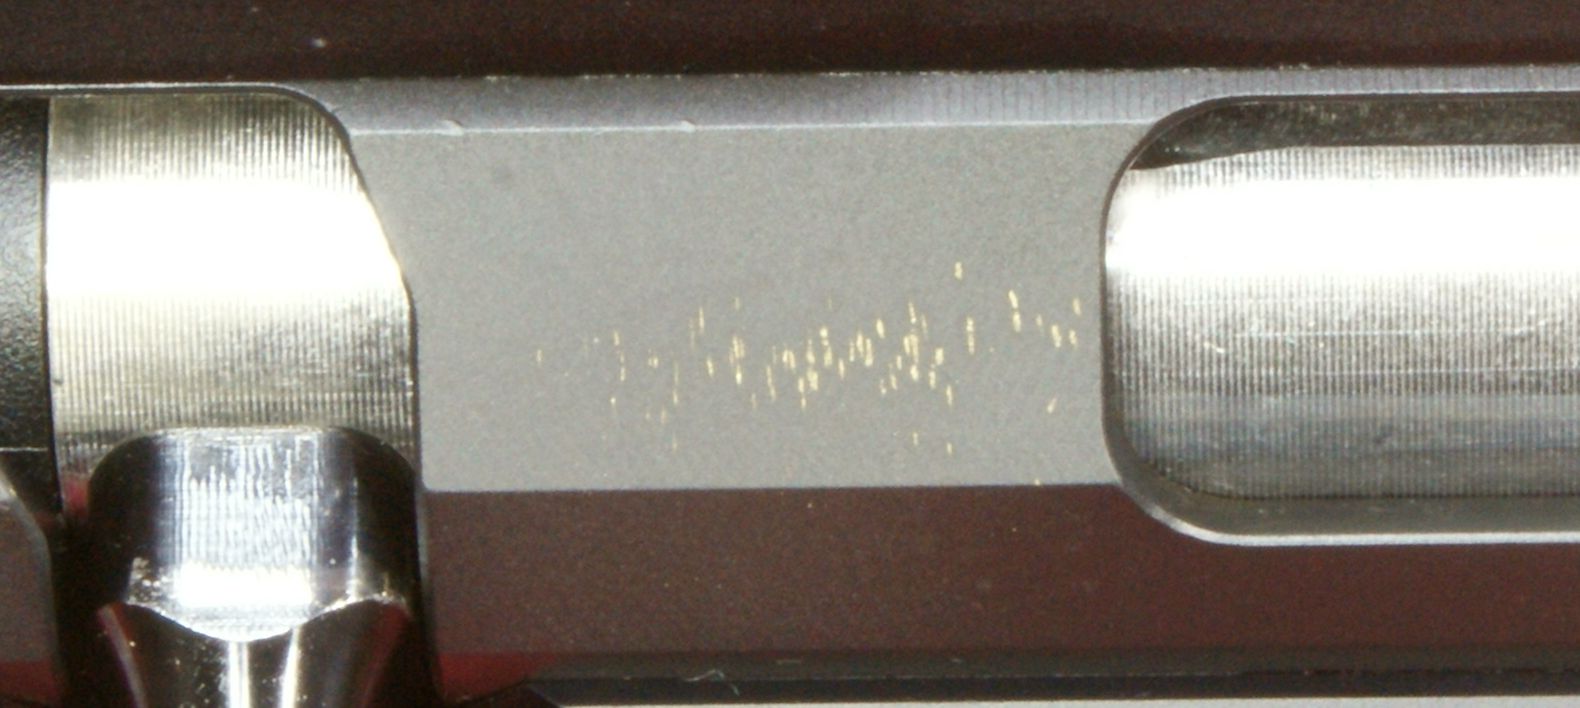
At the completion of my range testing, the only indication that the rifle had been shot other than some slight wear marks on the bolt handle were the marks on the upper receiver behind the ejection port where the cases put a small brass colored mark when ejecting.
Figure 7
During my range tests, I used the PMAG magazines about half the time and the other half I used an AICS style magazine. Both styles would feed without issue, but I think I prefer the AICS style because it would allow the bolt to close with an empty magazine still in the rifle. It was possible to close the bolt on the PMAG magazines, but first you had to reach into the injection port and push the follower down with your fingers.
Thoughts
Ruger has produced a great precision shooting platform at a great price with their new Ruger Precision Rifle! This is an off-the-shelf solution that has clearly proved it is capable of shooting sub-MOA and also proved it can be a long range shooting rifle. If you were on the fence on the capability of this rifle, it should now be clear this rifle is a shooter. I'm extremely pleased with my selection of the 6.5 Creedmoor caliber, but I feel that the .243 Win and .308 Win rifles would be shooters also.
For more detailed photos and commentary, make sure you check out the other parts of this review and feel free to leave comments below. The following links are provided to help you see other parts of this review.
- Ruger Precision Rifle Review: Part 1 - Introduction, Specifications and Summary
- Ruger Precision Rifle Review: Part 2 - What's in the Box
- Ruger Precision Rifle Review: Part 3 - External & Operational Features
- Ruger Precision Rifle Review: Part 4 - Disassembly & Internal Features
- Ruger Precision Rifle Review: Part 5 - Range Test (this page)
Or
If you would like to be notified about future Gunsumer Reports reviews via Facebook, make sure "You Like This" by clicking the Facebook "Like" button at the bottom or top of this page. If it already says "You Like This" beside the button, clicking it again will uncheck the "Like" status and you will not be notified.
| Share on Facebook | |
© 2010, 2011, 2012, 2013, 2014, 2015, 2016, 2017, 2018, 2019, 2020, 2021, 2022, 2023 & 2024 Gunsumer Reports™, All rights reserved.
FTC Disclosure