|
|
Gunsumer Reports TM Providing Detailed Objective Reviews for Firearms and Firearm Accessories |
Burris Scout Scope Review
May 22,
2011
Recently I reviewed the Ruger Gunsite Scout Rifle, and that review wouldn't have been thorough if I didn't evaluate the "scout" rifle using a "scout" scope. Maybe I should back up a little and explain the whole concept of the scout rifle. A scout rifle is designed as a general purpose rifle and allows a forward mounted long eye relief scope with low power magnification. The main reason for the scout configuration is to give you a clear field of view of the target area around the sides of the scope and also to allow you fast target acquisition. Thus, the basic criteria for a scout scope is low magnification and long eye relief. Having studied Burris products over the years, I remembered that they made a scope that meets these basic criteria. It just so happens that the name of the scope is Burris Scout Scope. The Burris list price (MSRP) on this scope is $399, but you can get it online for about $225, so make sure you shop around. Two of the other factors that led me into getting the Burris Scout Scope was that Burris makes quality scopes and provides a "Forever Warranty."
The following text in
colored italics was taken directly from the
Burris website
on 5/18/11 and gives an Overview, Features, Specifications and
Dimensions
for the Burris Scout Scope. The
![]() ,
,
![]() and
and
![]() are my way to keep up with details that I have covered in this
review with either photos, commentary or both. I may also add
commentary after these marks as necessary to explain some items if
needed.
are my way to keep up with details that I have covered in this
review with either photos, commentary or both. I may also add
commentary after these marks as necessary to explain some items if
needed.
Overview
- Burris invented and perfected Scout Scopes, so it’s no wonder they set the standard for optical excellence, durability and low mounting capabilities.
-
High quality glass and index-matched multi-coatings keep
Burris on the leading edge of Scout Scope technology.

Features
- The adjustment system is repeatable, steel on steel and with
audible clicks.
- Double internal spring force.
- Each scope is filled and purged at least 24 times with high quality, laboratory grade dry nitrogen. Each nitrogen cycle absorbs airborne and residual surface moisture that is evacuated from the scope
- Every scope is individually recoil, water and fog proof tested
- Burris uses specially made quad seals to provide double insurance against leakage.
Specifications
- Item Number: 200269
- Magnification: 2.75x
- Reticle: Heavy Plex
- Finish: Matte
- Field of View (in feet @ 100 yards): 15
- Exit Pupil (mm): 7.3
this is 20mm objective divided by 2.75x
magnification
- Click Value (inches at 100 yards): 0.5
 My measurements indicated this to be 5/8"
at 100 yards, not 1/2"
My measurements indicated this to be 5/8"
at 100 yards, not 1/2" - Maximum Adjustment (inches at 100 yards): 140
- Eye Relief (inches): 8.5-14
- Length (in.): 9.2
9.18"
- Weight (ounces): 7
 7.46 ounces
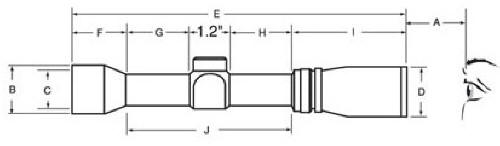
Dimensions (see Figure 1 below)
- A - Optimum Eye Relief: 8.5-14"
-
B - Objective End Diameter: 27mm
27.6mm
-
C - Clear Objective Diameter: 20mm
-
D - Ocular End Diameter: 35mm
-
E - Overall Length: 9.2"
9.18"
-
F: 0.79"
-
G: 2.7"
-
H: 2.2"
2.14"
-
I: 2.3"
-
J: 6"
6.07"
-
Turret Housing: 1.2"
1.25"
Figure 1
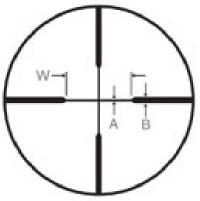
Reticle Subtensions (Dimensions represent inches at 100 yards)
- A: 0.70"
- B: 3.4"
-
W: 22"
my measurements show this to be closer to
17"
Figure 2
What's In The Box
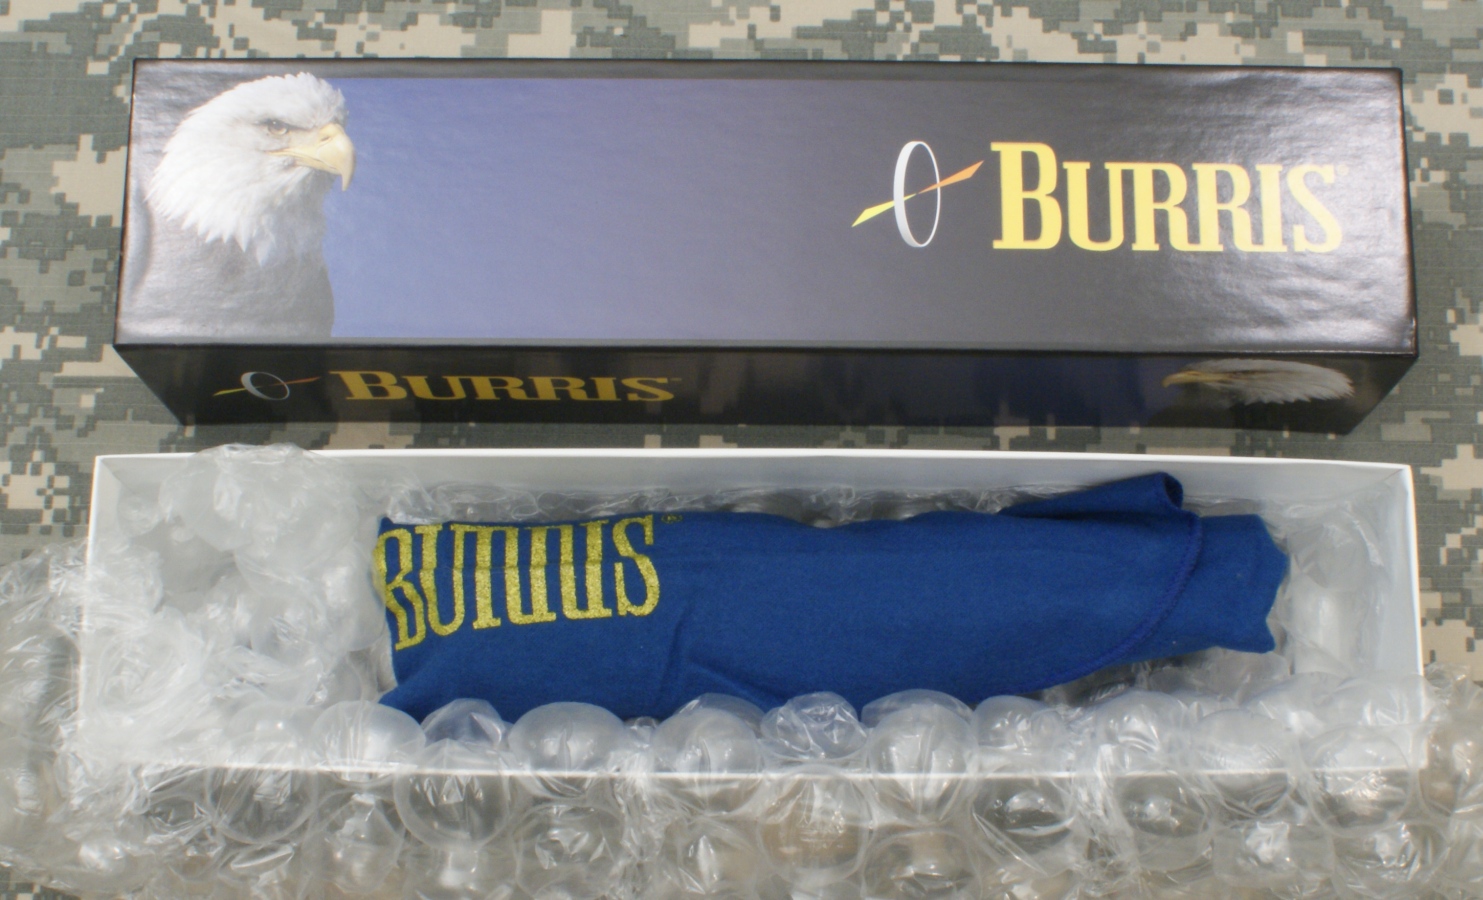
When the scope arrived, it was packaged as shown below.
Figure 3
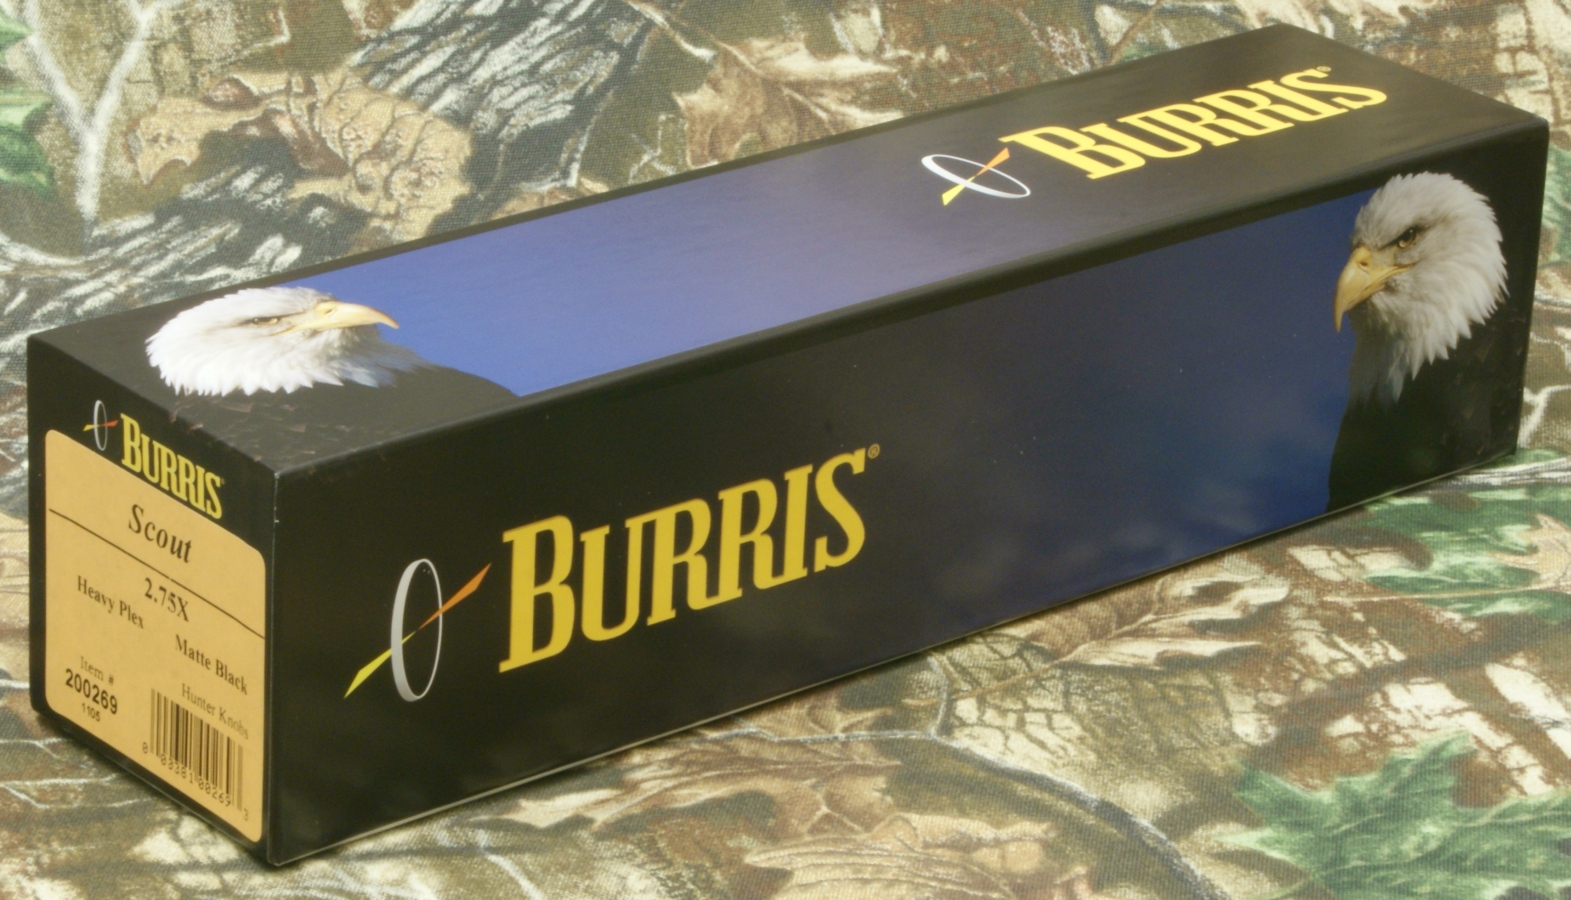
Both ends of the box had a sticker applied showing the details of the scope: Scout, 2.75X, Heavy Plex, Matte Black, Hunter Knobs, and Item # 200269.
Figure 4

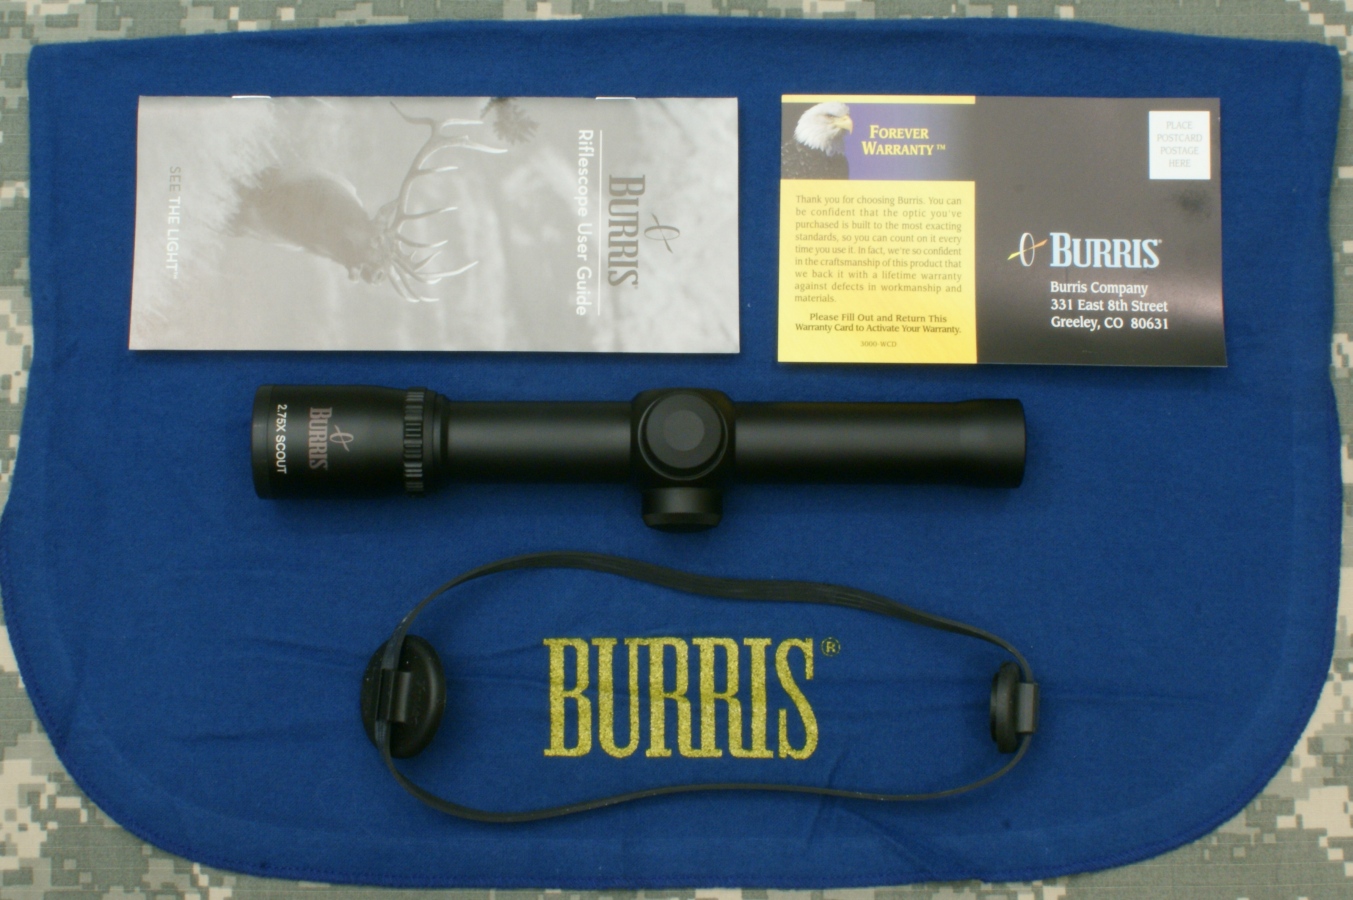
When you remove the box lid, you quickly realize this must be a standard box used for many Burris scopes because the Scout Scope only utilizes about 60% of the box volume. The scope was wrapped in a soft cloth and then bubble wrapped.
Figure 5
The photo below shows the contents of the box which were the scope, lens caps, Users Guide, Warranty Card and cloth.
Figure 6
The Scope
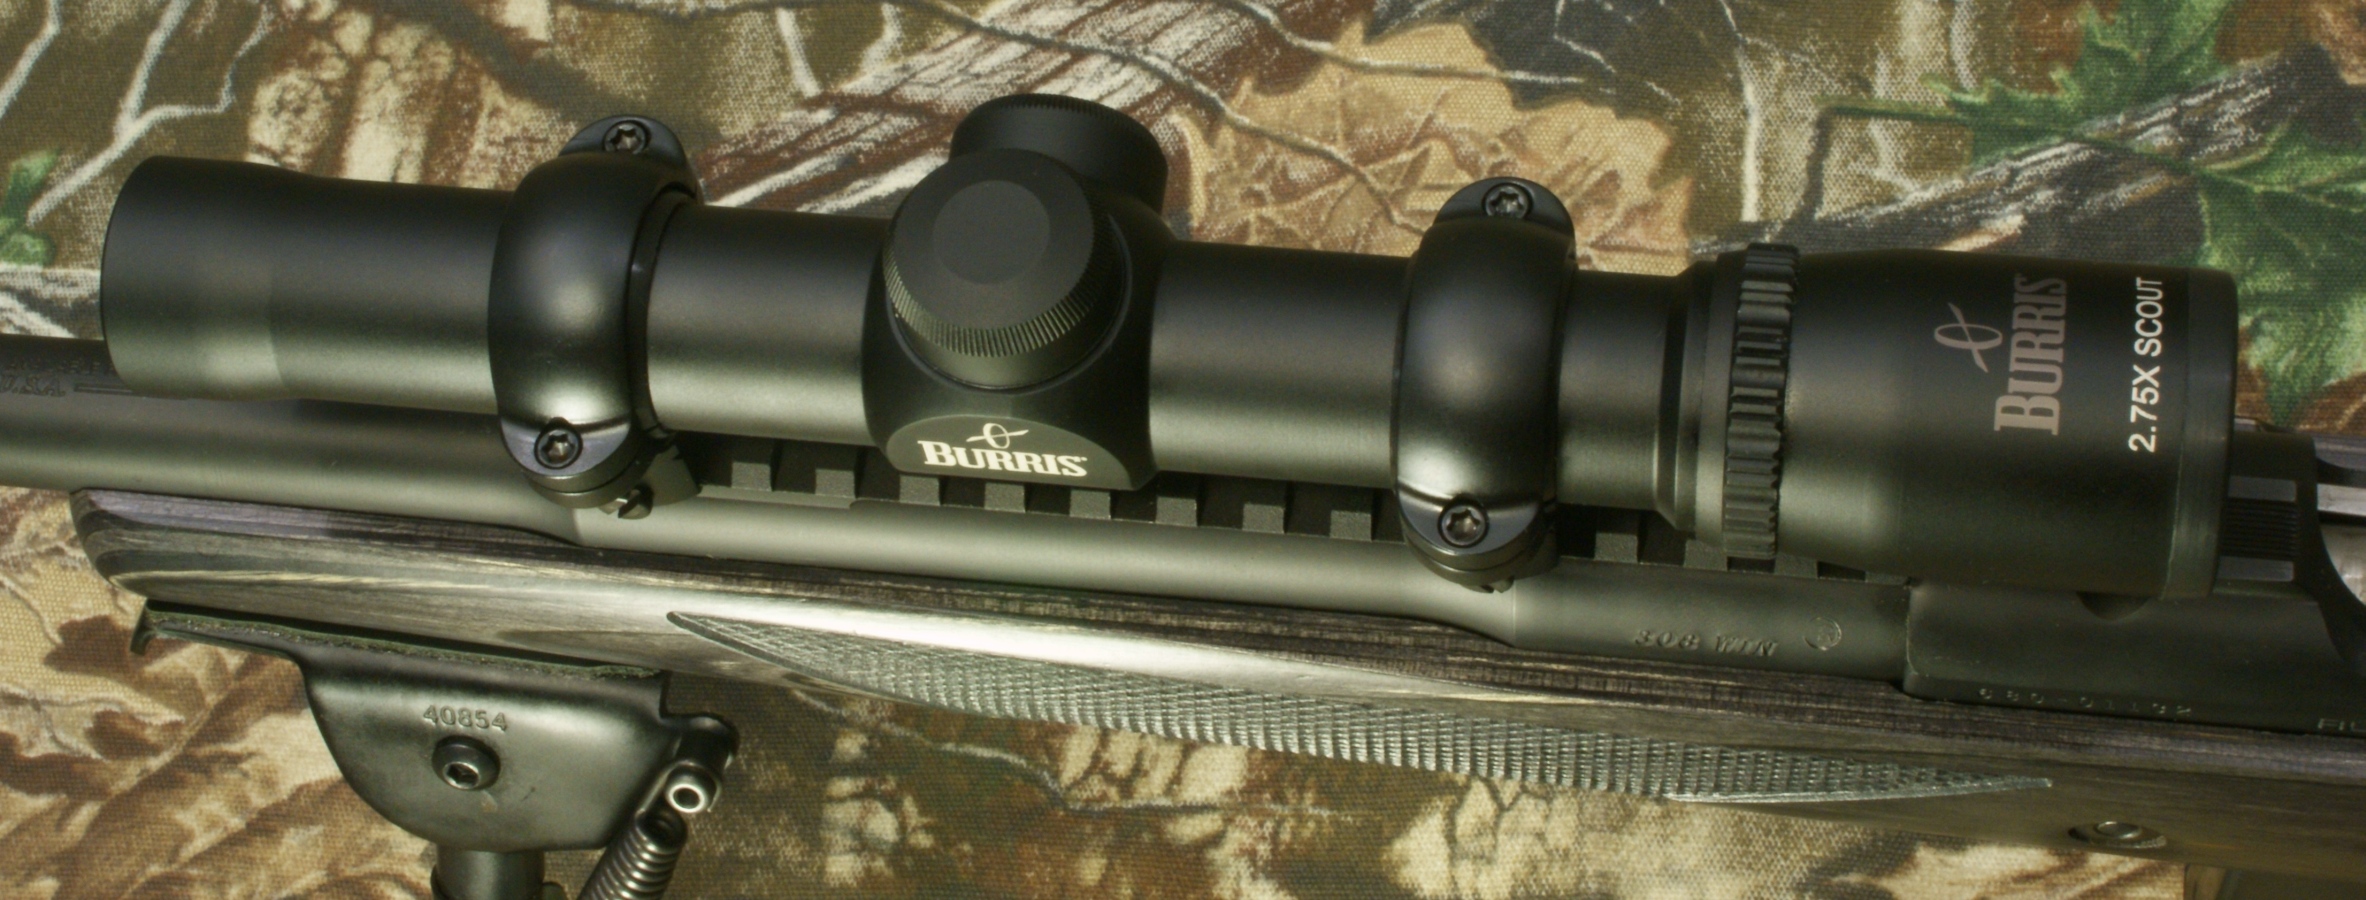
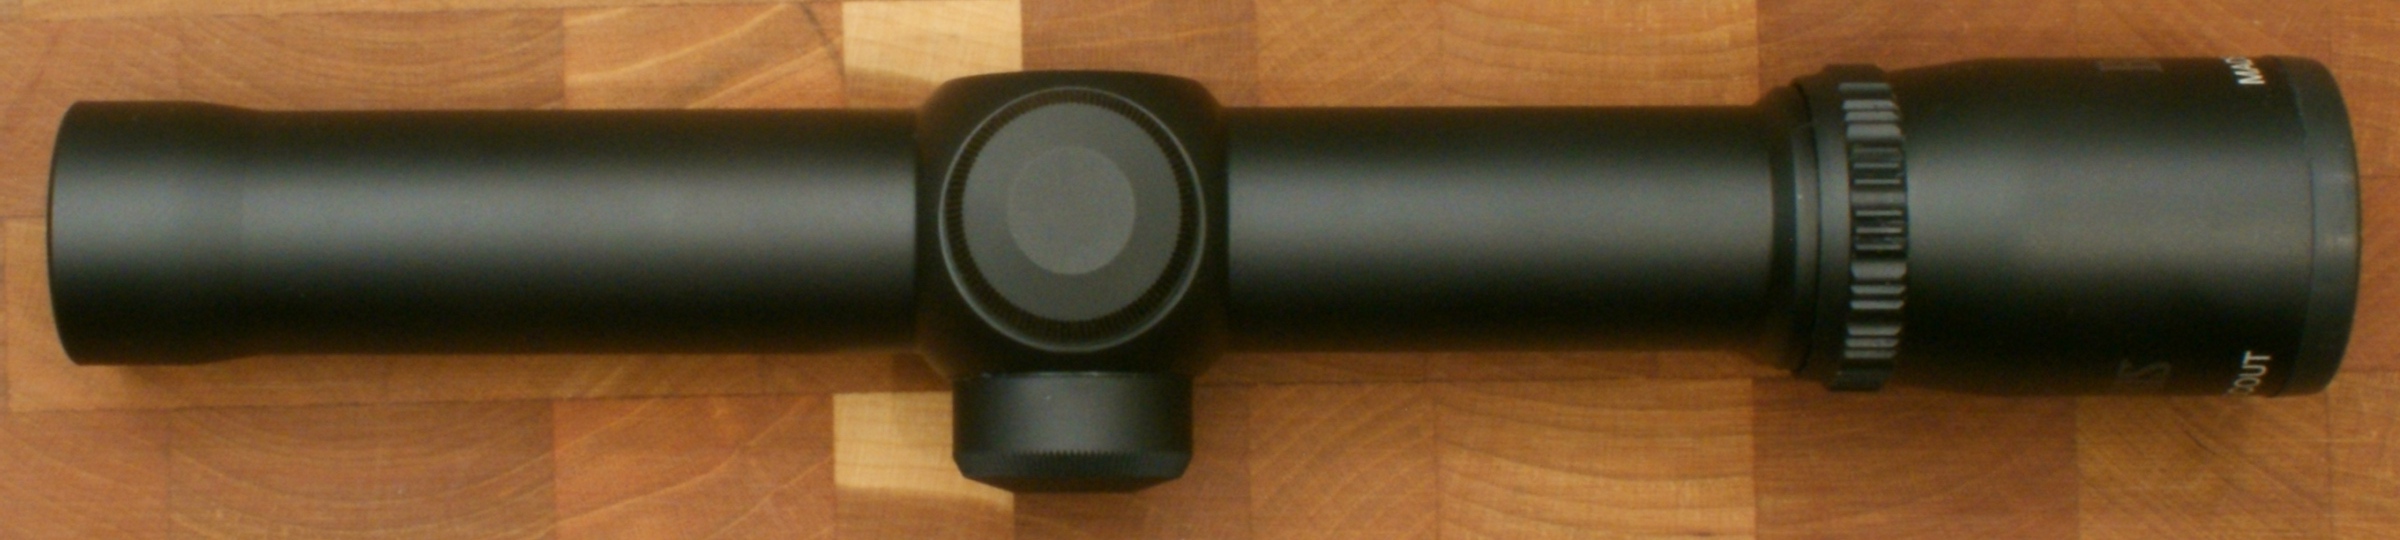
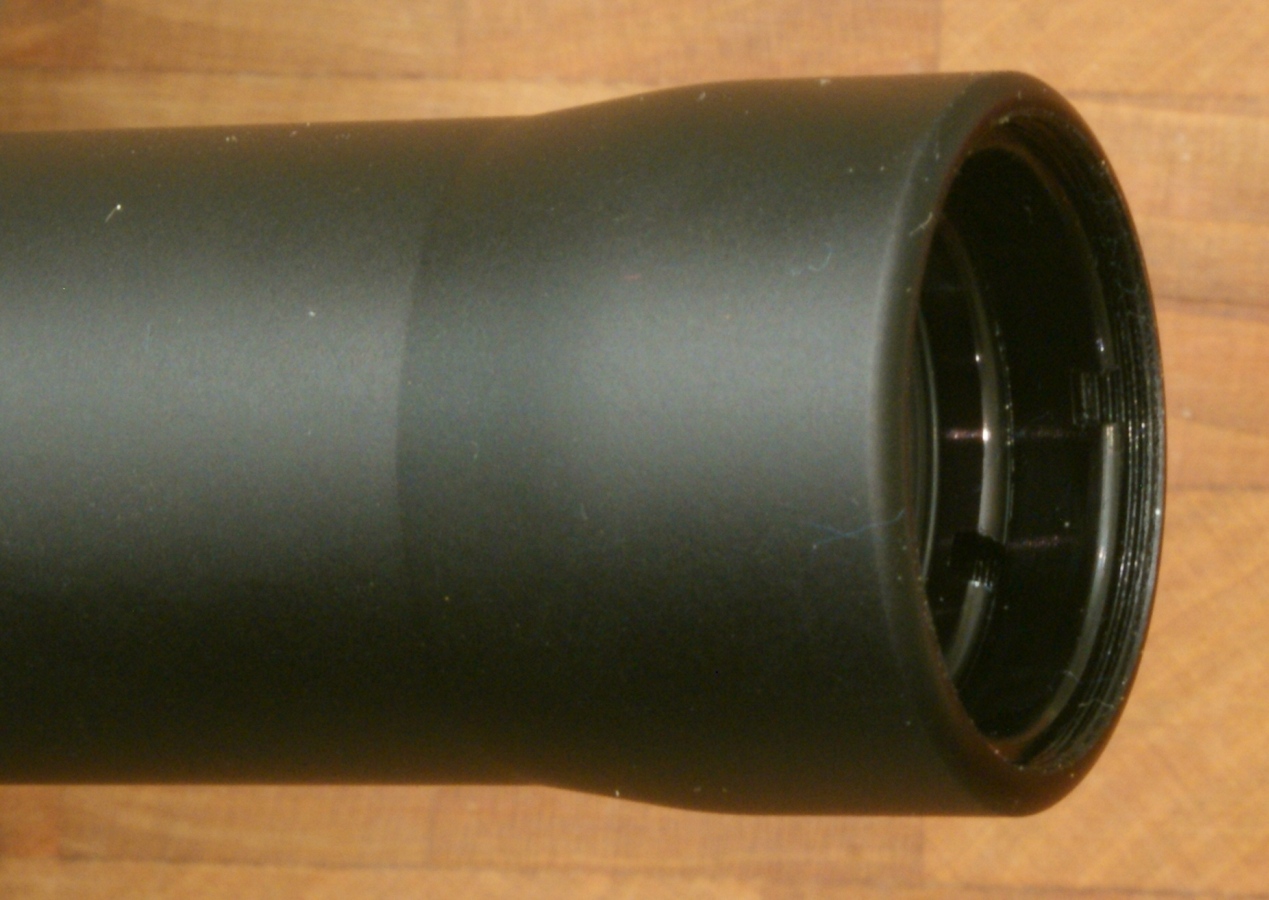
The next four photos show the scope from all sides. The scope was in perfect condition with no blemishes and had a very good finish.
Figure 7 - Left Side
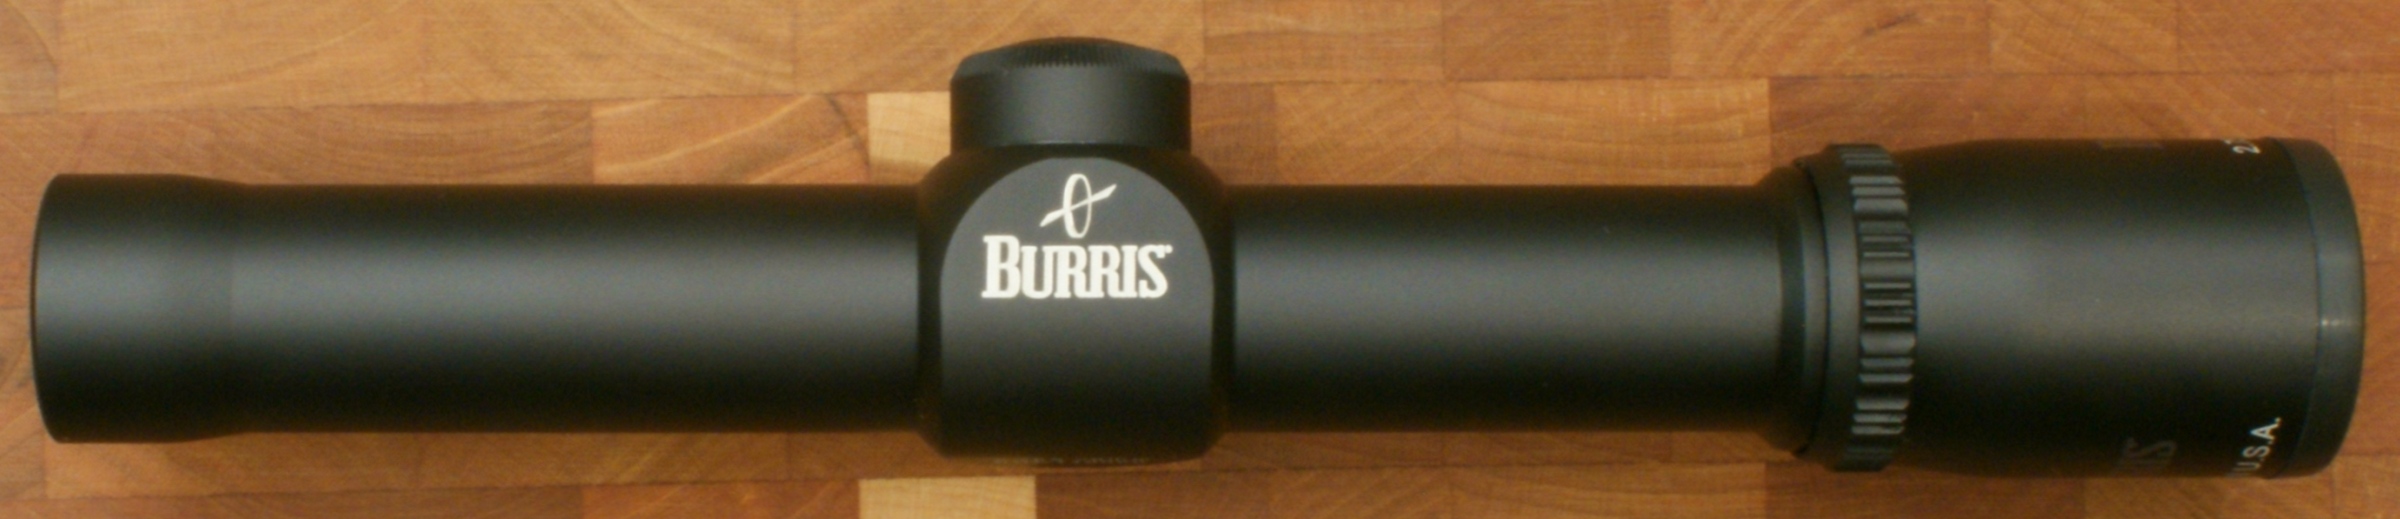
Figure 8 - Top Side
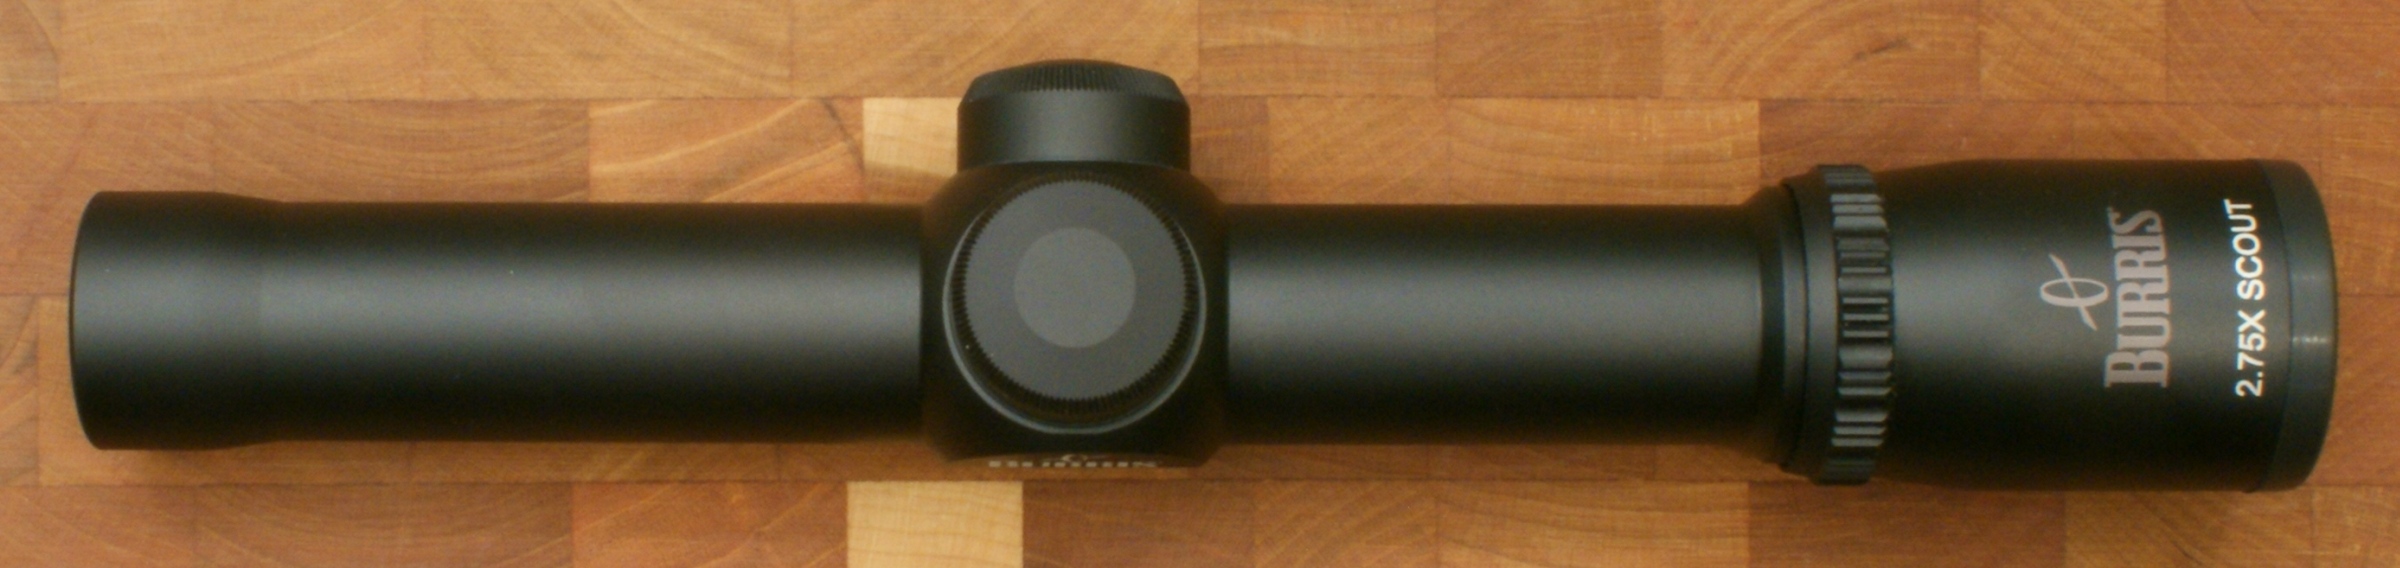
Figure 9 - Bottom Side
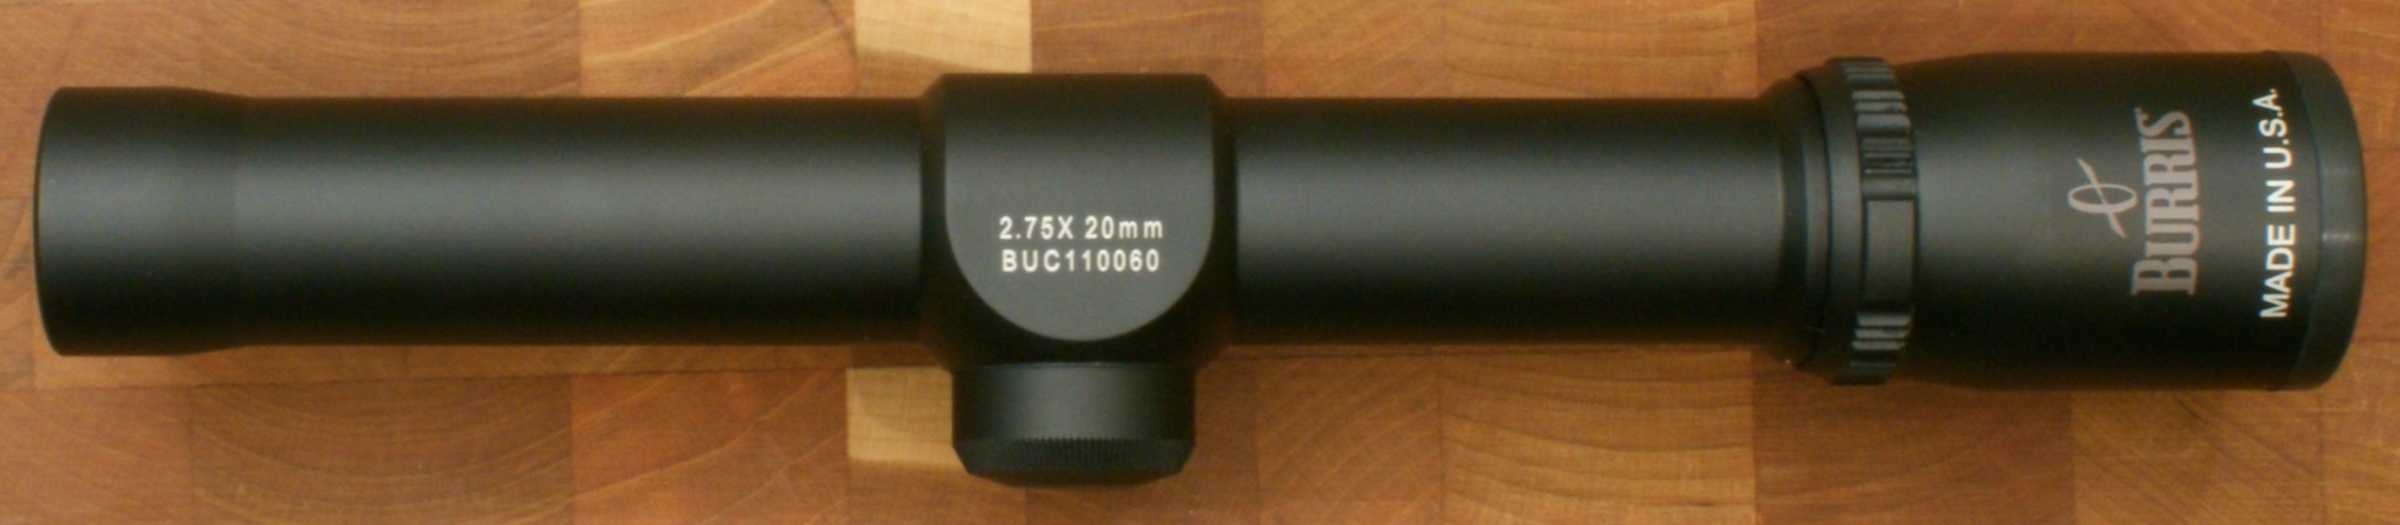
Figure 10 - Right Side
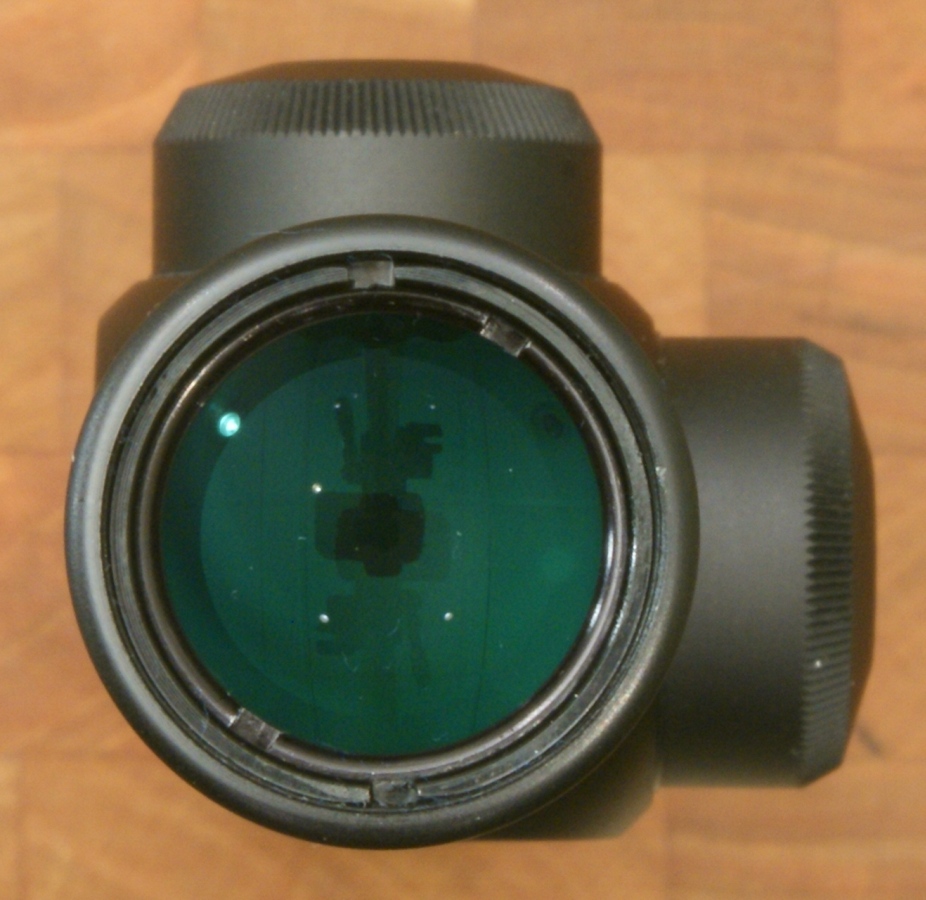
The ocular (eyepiece) end of the scope is very simple with a lock ring to adjust focus on the scope. The instructions from Burris for making this adjustment are below. You can also see a greenish tint on the lenses which indicates a coating.
- Grasp the knurled eyepiece lock ring and loosen by turning the eyepiece counter-clockwise.
- Turn the lock ring clockwise away from the eyepiece
- Look through the scope at a white wall.
- Turn the eye piece until the reticle is sharp for your vision.
- Look away from the scope. Now look through the scope again. If the reticle is still in focus, the process is complete. If it is not in focus, repeat steps and 3 and 4 until the scope is in focus.
- When satisfied with your focus, tighten the lock ring against the eyepiece firmly.
Figure 11
Figure 12
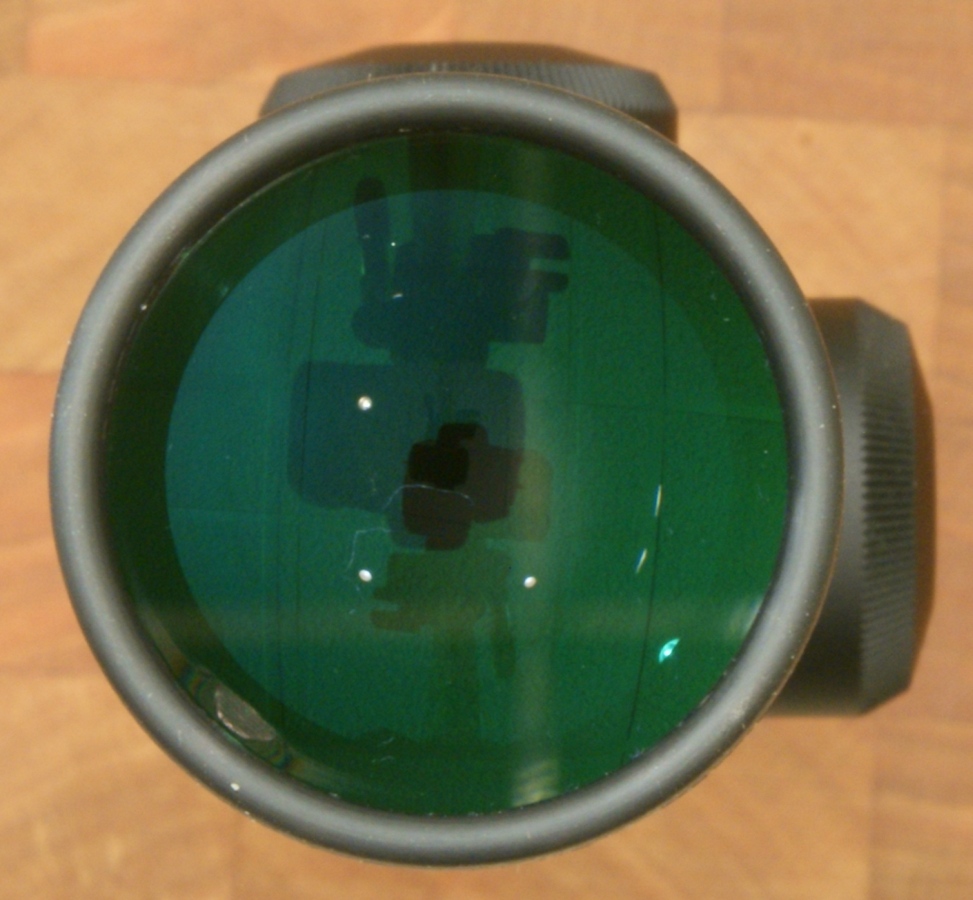
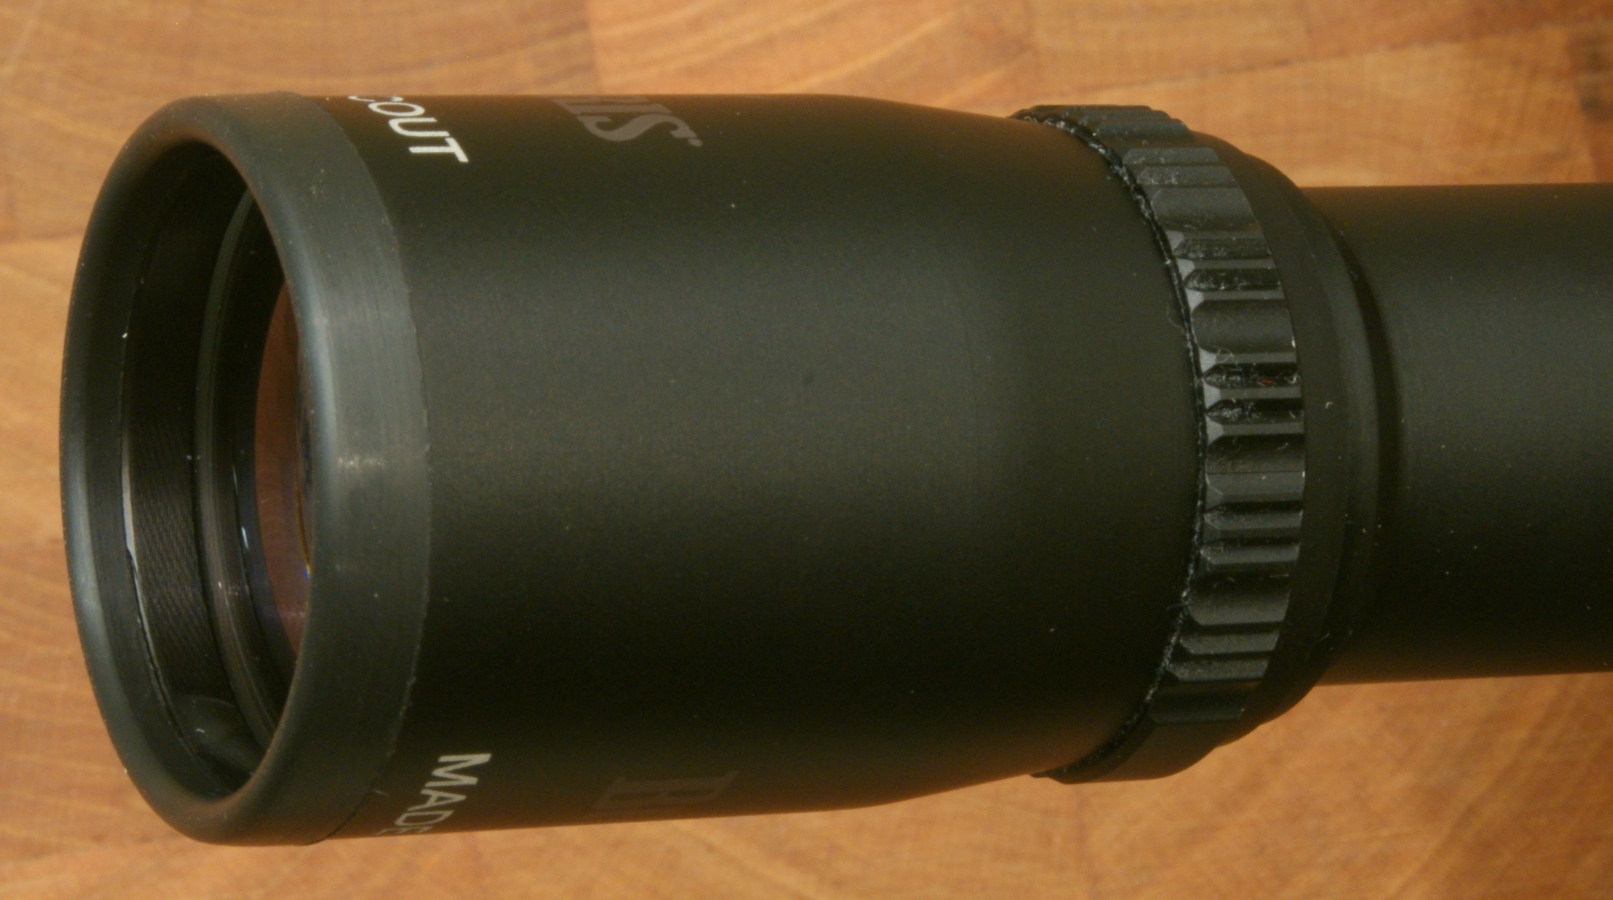
The objective end of the scope is only 27mm with a 20mm clear objective lens. This is very small, but since it is only a 2.75x power scope, you still have a bright 7.3mm exit pupil diameter. Again, you can see a greenish tint indicating coatings.
Figure 13
Figure 14
When you remove the turret covers, you can see the adjustment knobs. Inside one of the covers was a sticker stating "Click is 1/2 inch at 100 yards". The covers are some type of aluminum alloy.
Figure 15
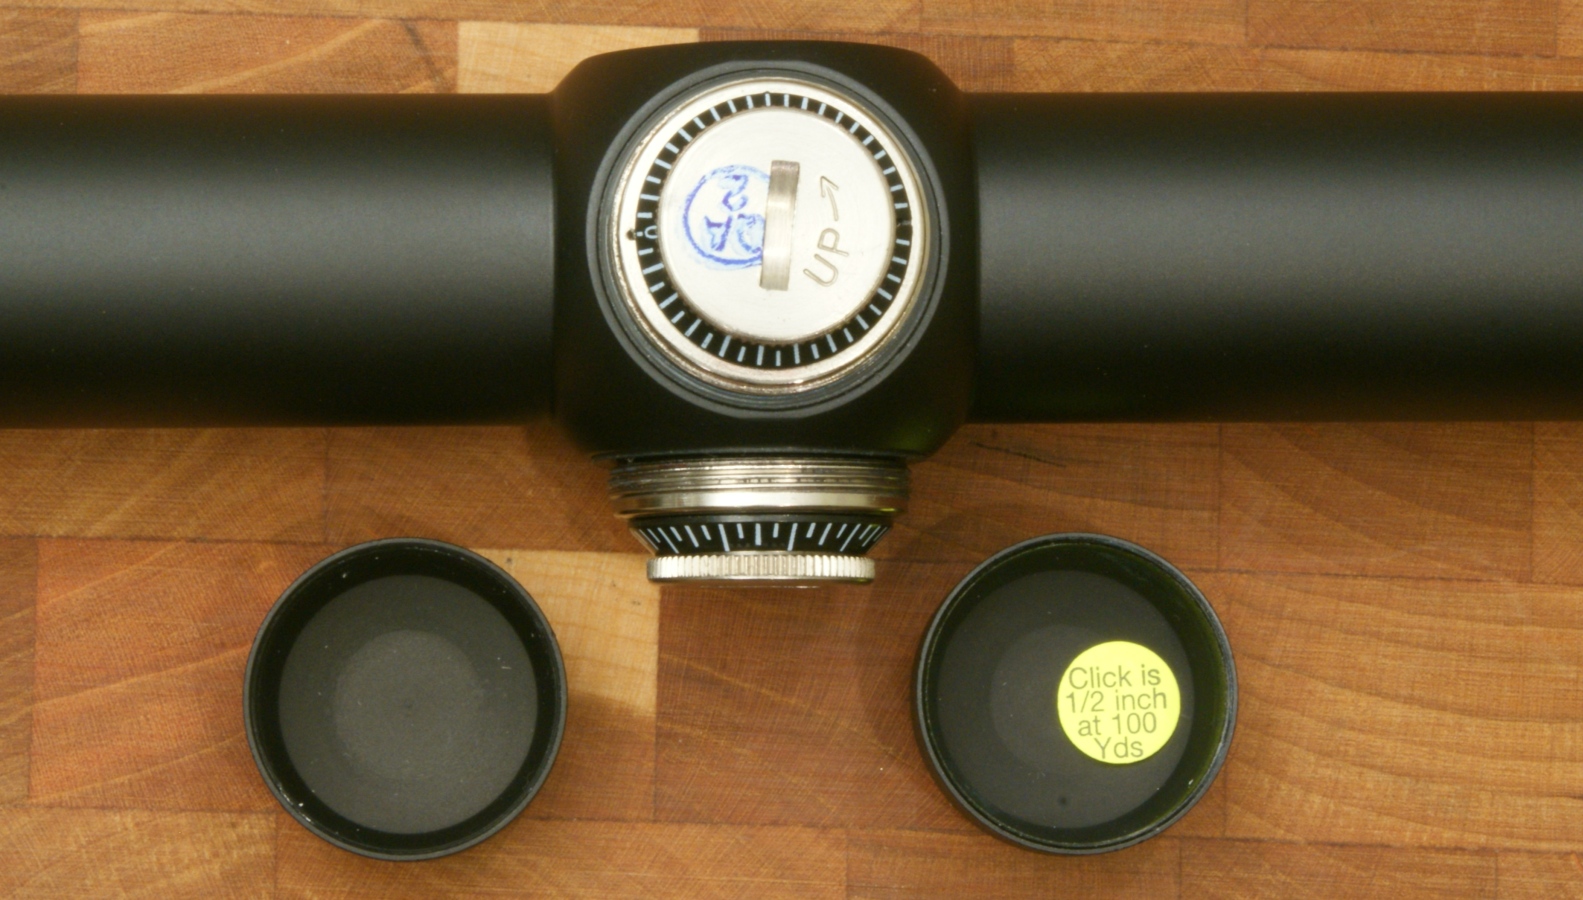
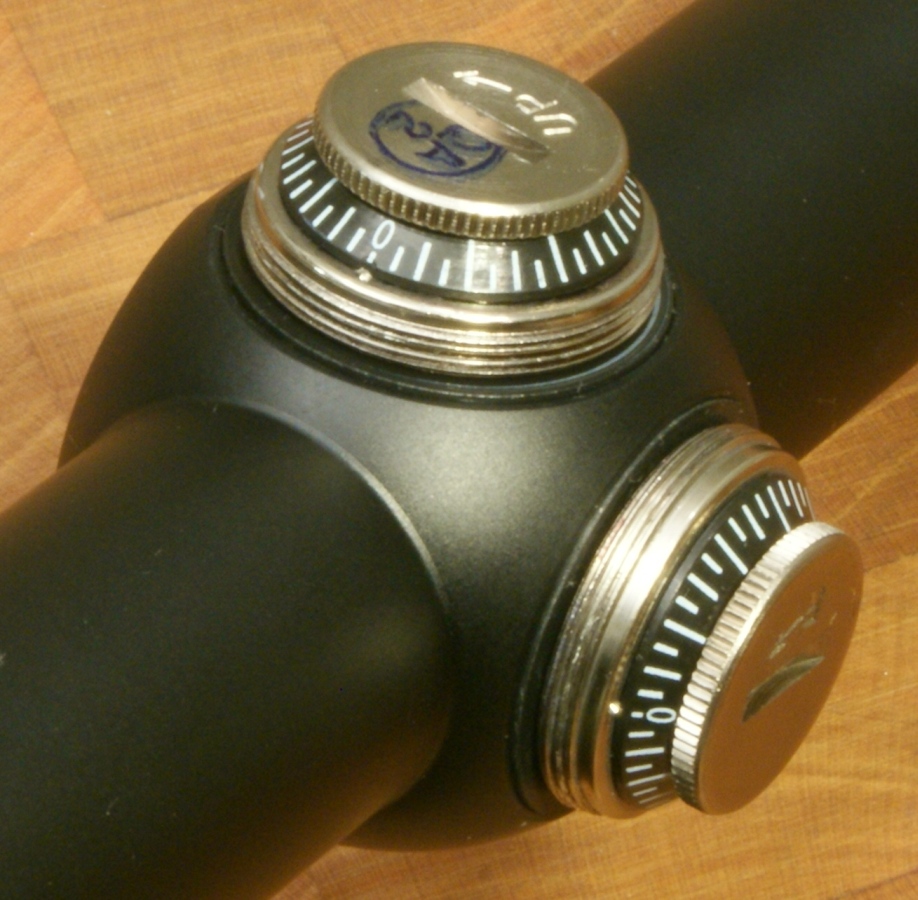
You should also notice that each knob is labeled with the direction of "Up" or "R" (right). This indicates the direction you should rotate the knob to move the bullet impact up or to the right. The knobs included a knurled area so that you can make adjustments by hand. Rotating the knob was firm with no free play and had very distinctive clicks when making adjustments. The knobs included a 0 indicated position and the turret housing has index marks. I doubt you would be making adjustments in the field, but the capability is there if needed. Also notice the rubber seal at the base of the turret cover threads so that when the covers are installed the scope is waterproof.
Figure 16
Lens Caps
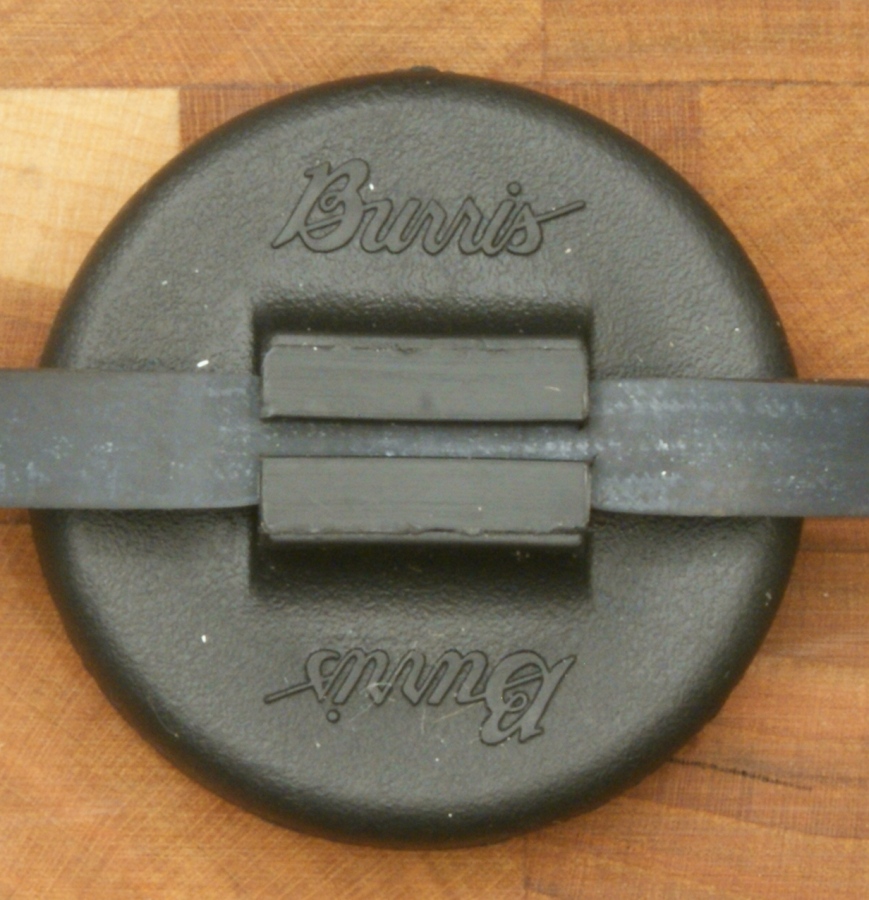
The lens caps are plug type caps on a large black rubber band.
Figure 17
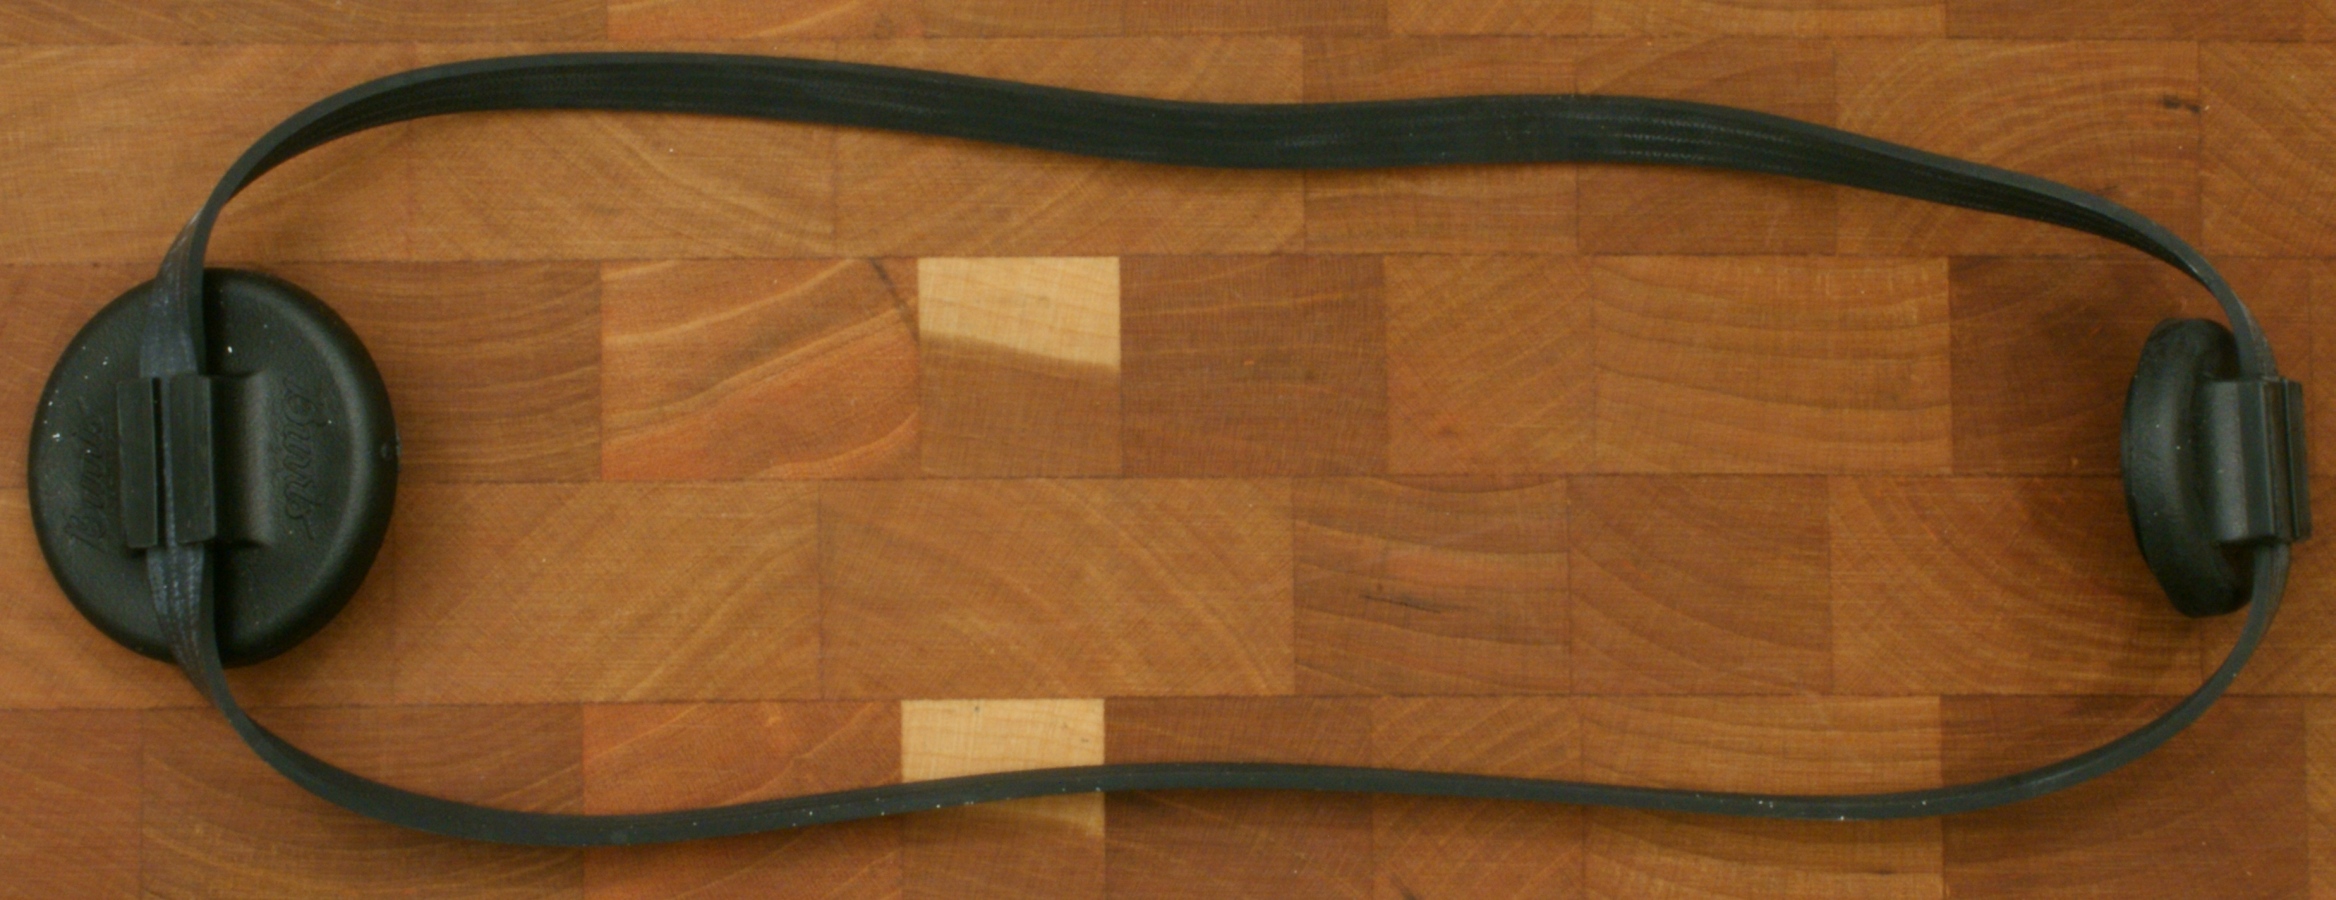
Figure 18
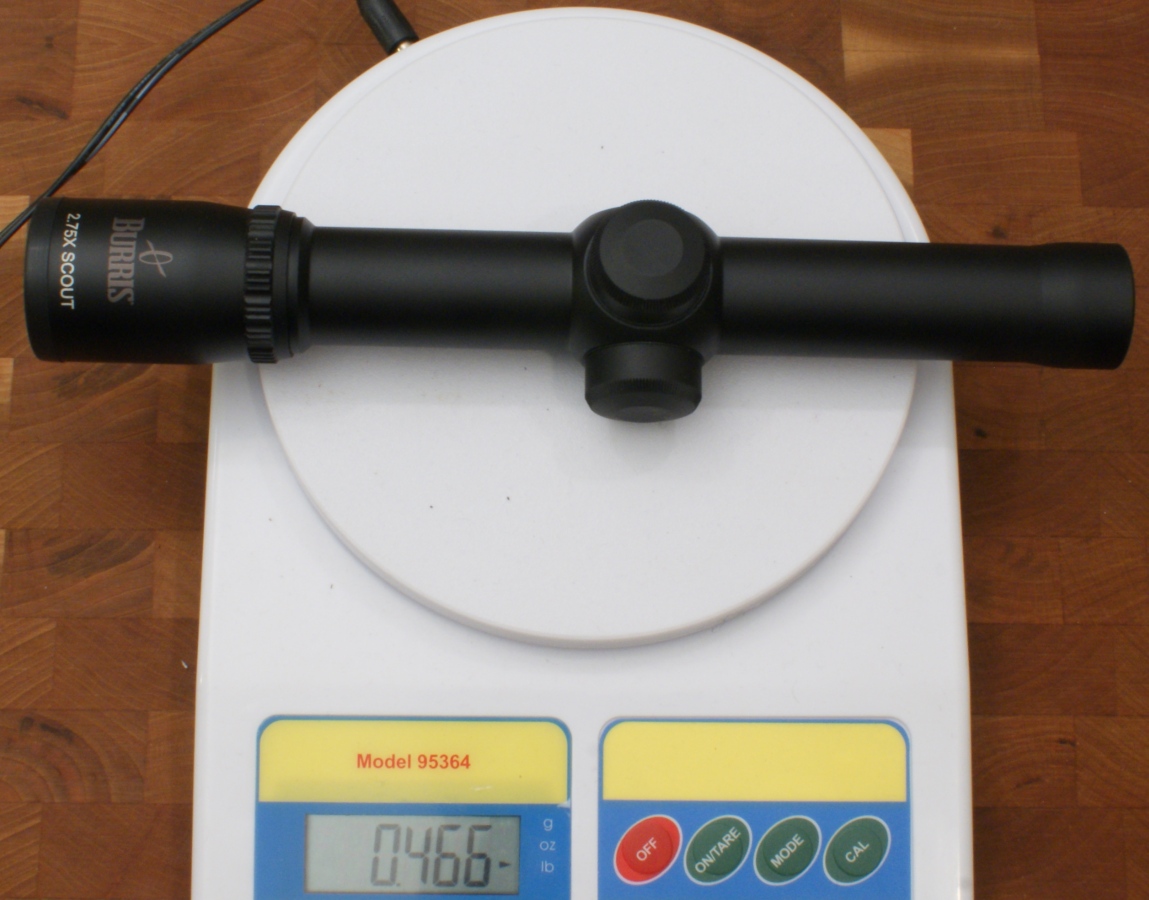
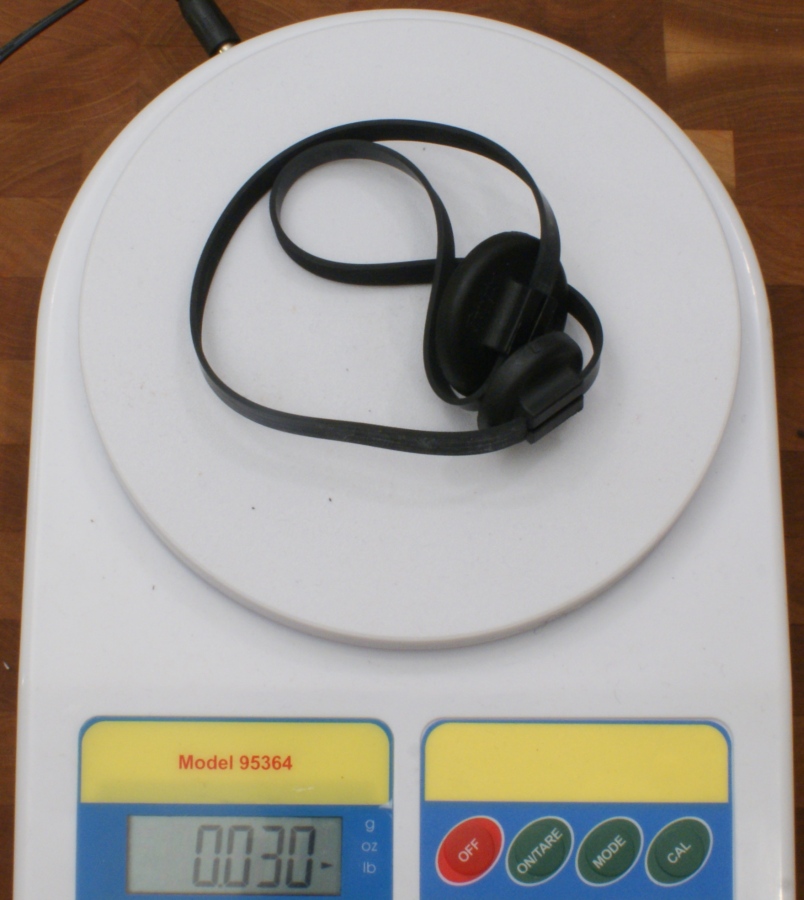
Weight
The scope weighed in at 0.47 pounds (7.46 ounces) which is about 1/2 ounce more than the specifications. The lens caps weighed in 0.48 ounces.
Figure 19
Figure 20
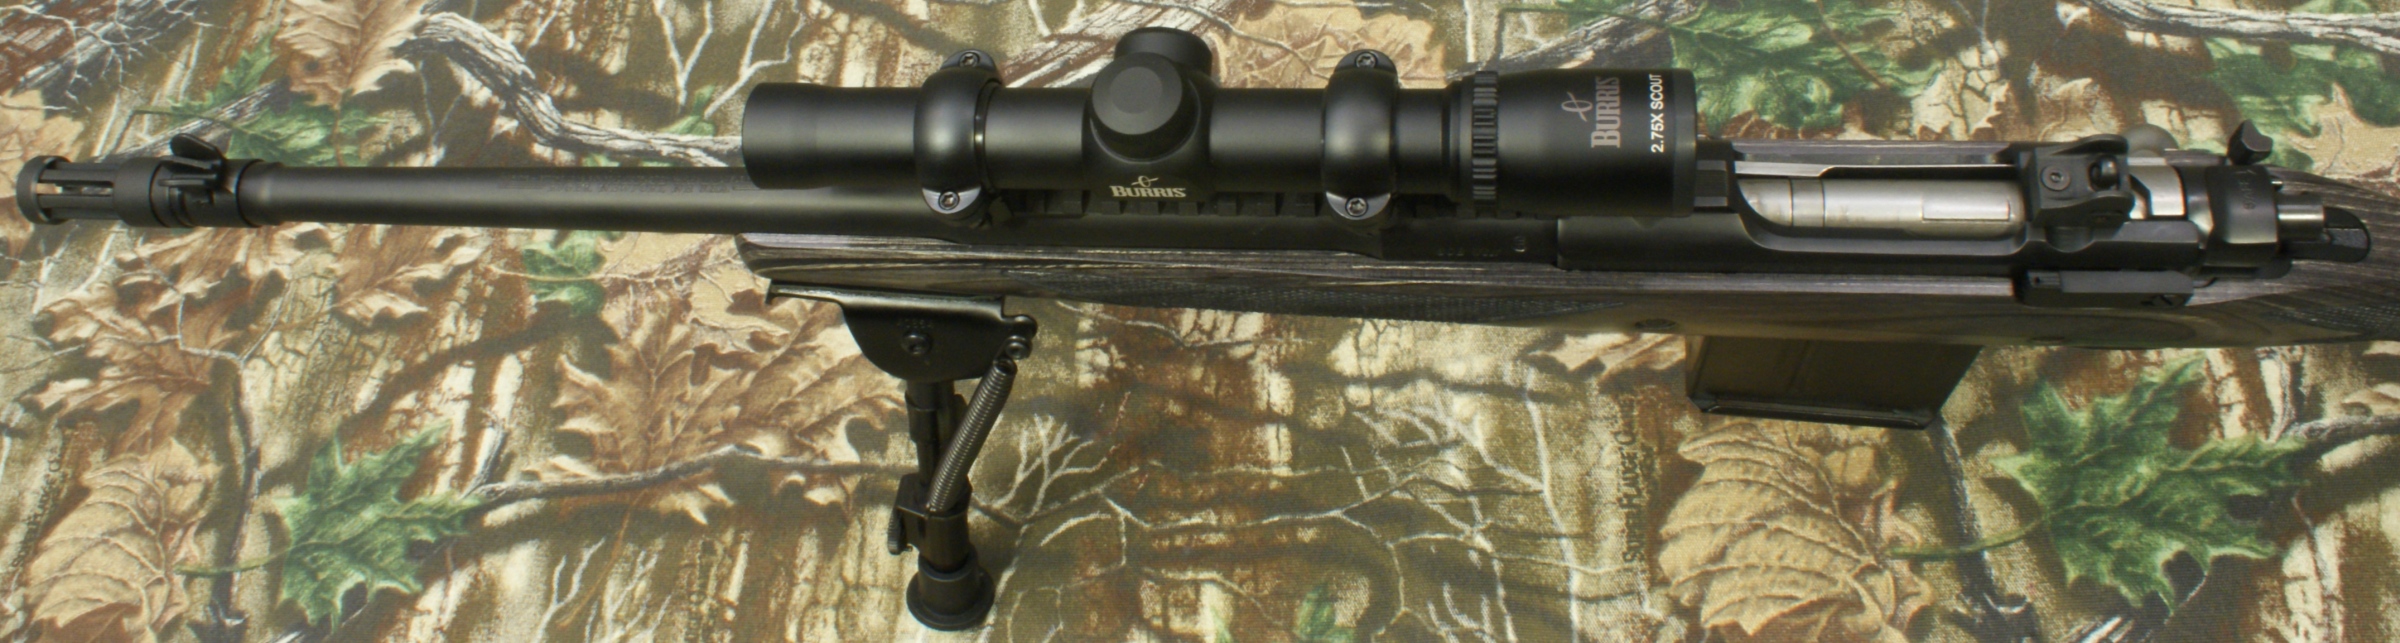
Installed on Ruger Gunsite Rifle
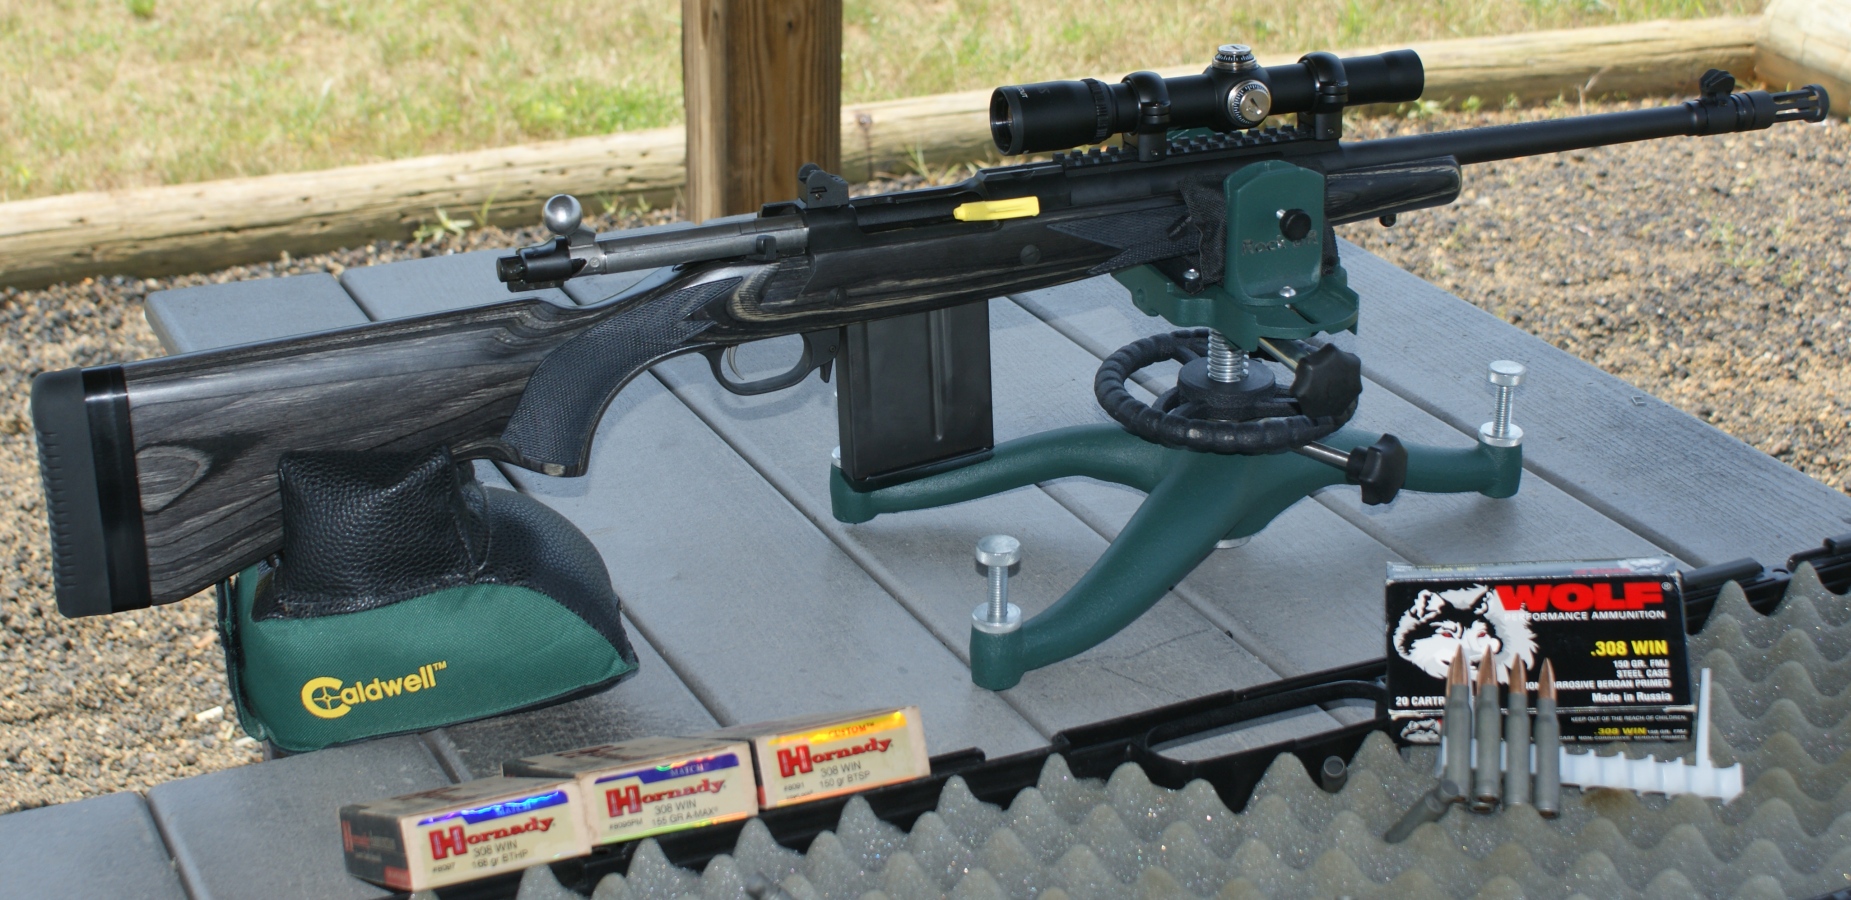
I mounted the scope on the Ruger Gunsite Scout Rifle using a set of Burris Signature Zee Rings (Weaver Style, medium height) as shown below. I was very pleased with the look and height of the scope on the rifle.
Figure 21
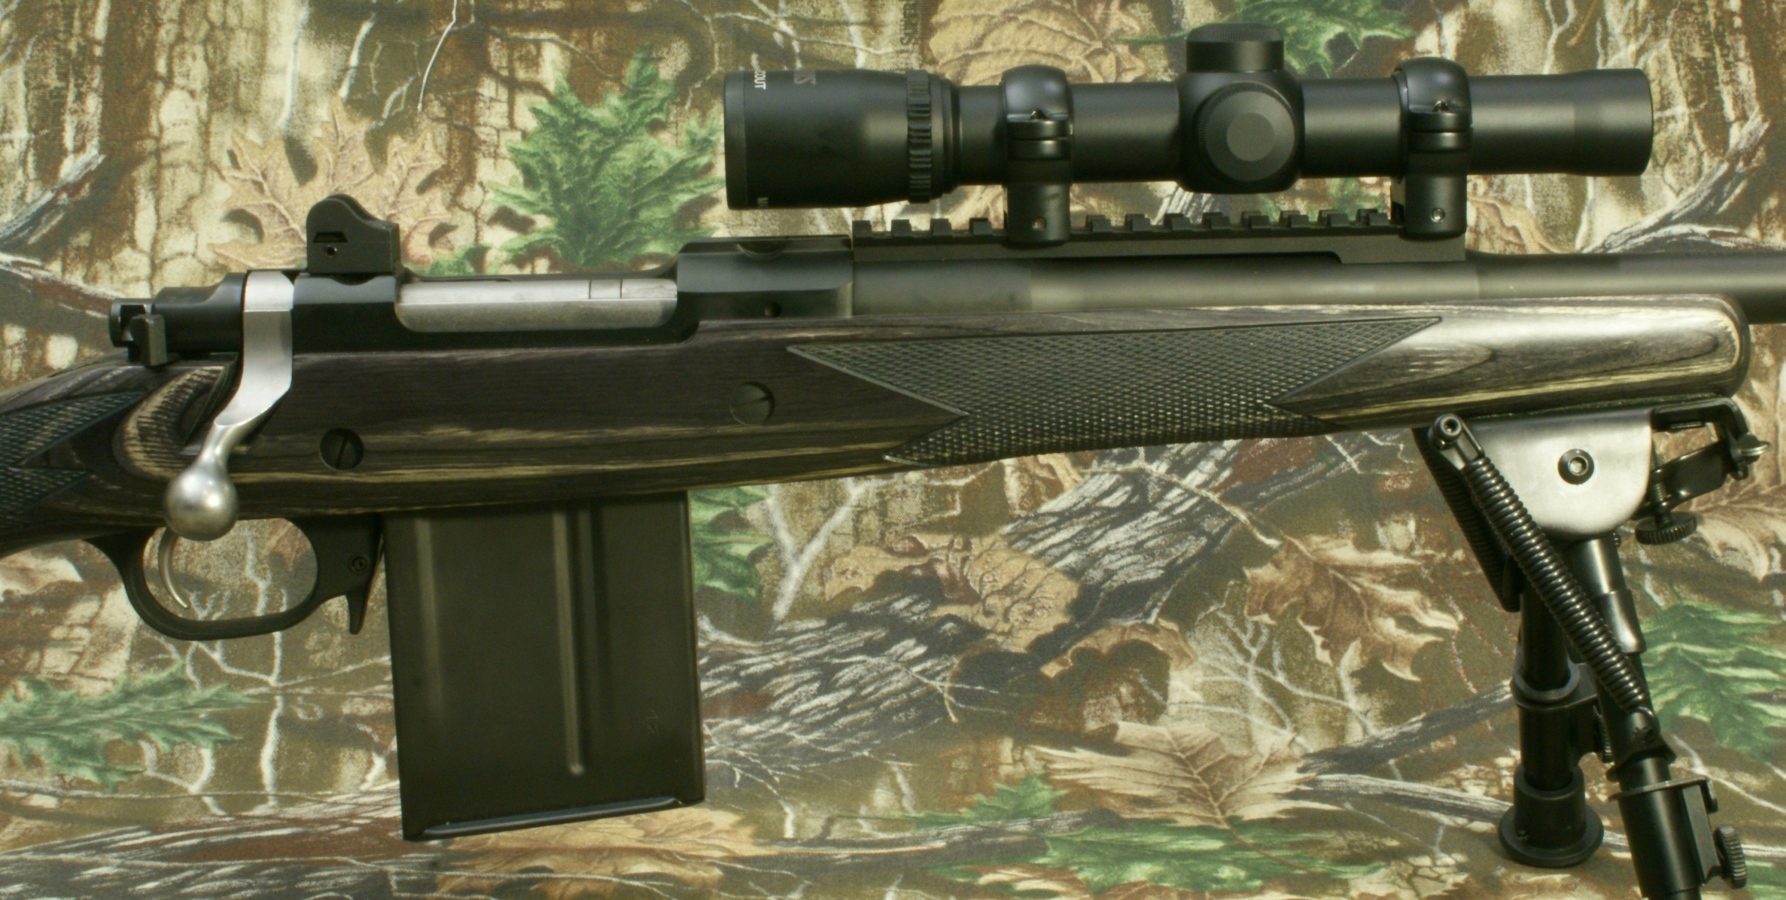
Figure 22
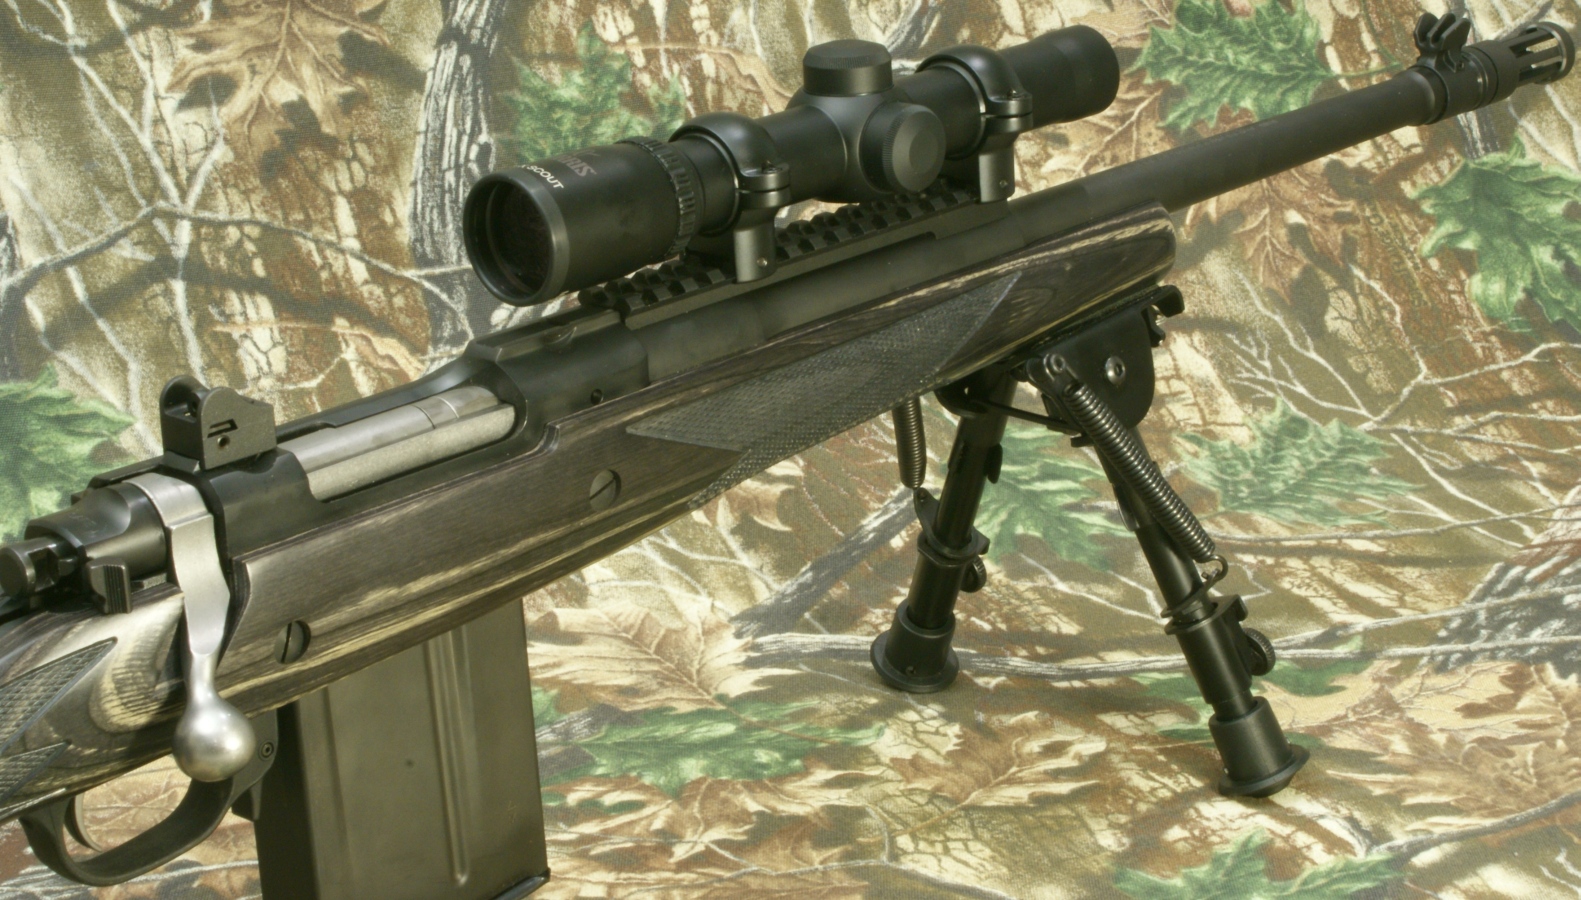
Figure 23
Scope Tracking and Reticle Subtension
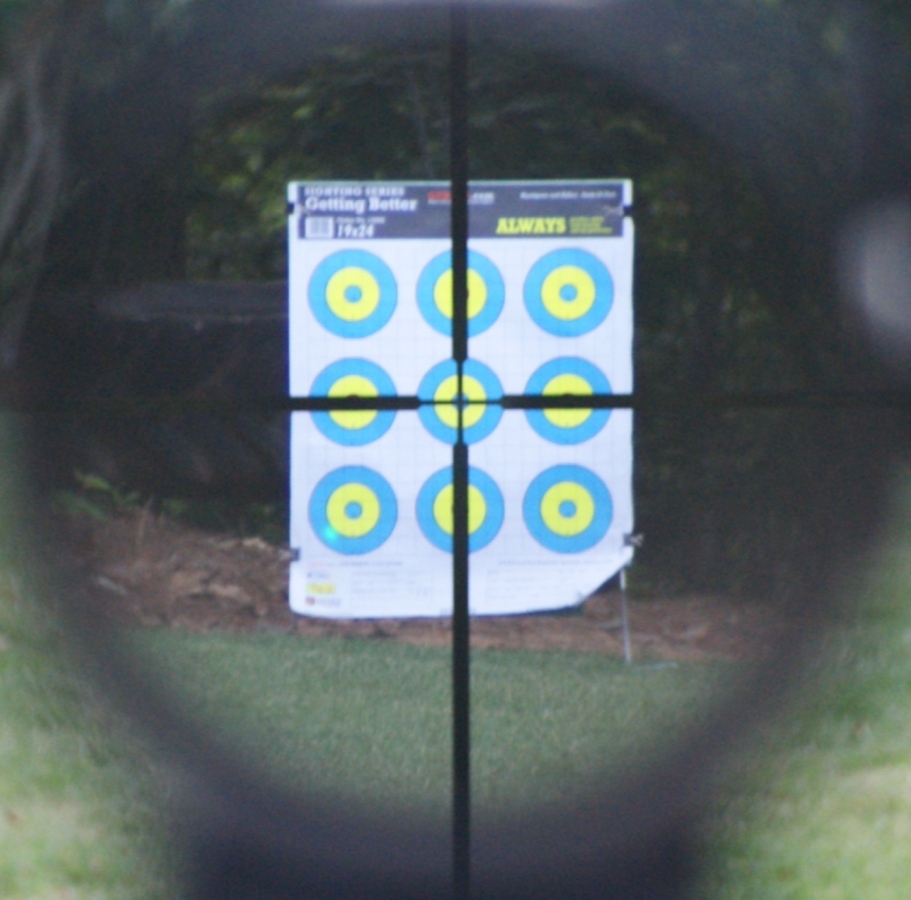
I wanted to do a very basic evaluation of how the scope tracked away from the zero position and back to the zero position for a known number of clicks (distance). I also wanted to evaluate the "W" dimension of the reticle subtension. Since the sticker under the turret cover states "Click is 1/2 inch at 100 yards" and reticle subtension values were given "inches at 100 yards", I don' t have to worry with any MOA to inches conversions. I setup a target exactly 25 yards from the center of the erector on the scope so I only had to deal with the conversion factor of 4 to correlate 25 yards to 100 yards. I installed the scope on my Ruger SR-22 which has a green laser. I adjusted the scope until the green laser and the center of the reticle were the identical aim points. Throughout this evaluation, the green laser would represent the bullet impact location.
Figure 24
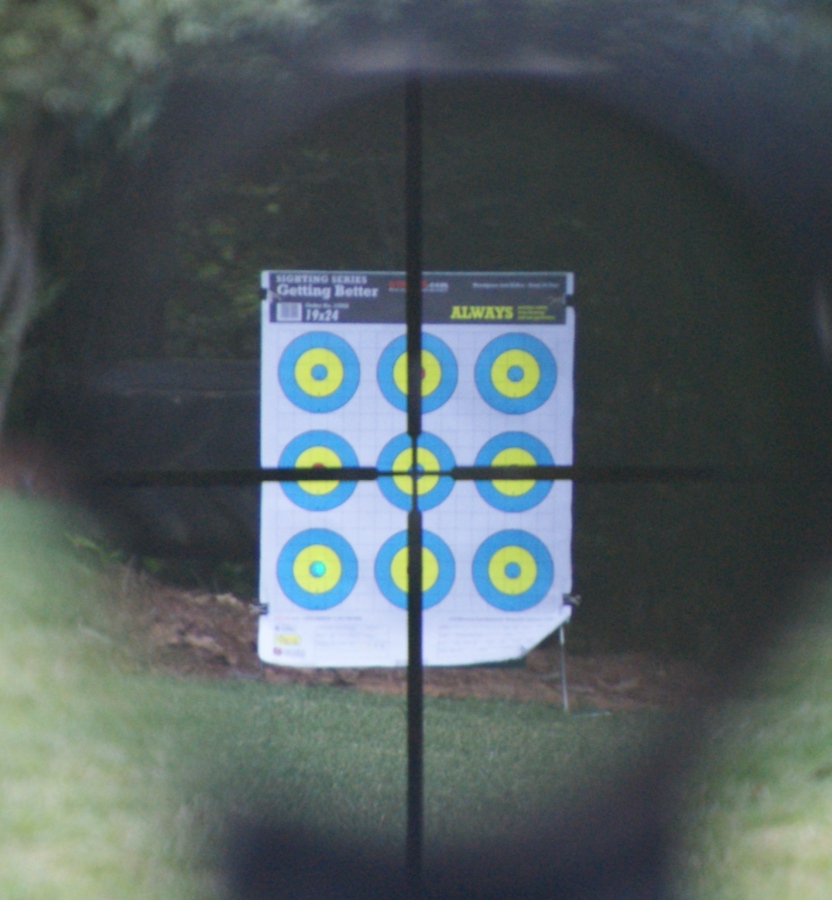
Next I decided to dial in an amount of clicks on the turret knobs to move my bullet impact 6" down and 6" left at 25 yards. The aiming circles are exactly 6" apart. At 100 yards, I would be making an adjustment of 24" down and 24" left. Since the scope states 1/2 inch per click at 100 yards, I dialed in 48 clicks of adjustment in both elevation and windage. The photo on the left below shows the green laser location (bottom left aiming circle) that identifies where my bullet impact would be for this adjustment. In theory it should be the center of the circle for the 6" of adjustment. The 48 clicks of adjustment actually produced an approximate 7.5" of adjustment. This means that the click values are not 1/2", but instead about 5/8" at 100 yards. If this is true, then the correct number of clicks to make the 6" of movement would be 38.4 and the photo below on the right shows a 38 click adjustment which does cause the point of impact to fall in the center of the lower left aiming circle. Do I think this difference is a big deal? No. This is not a sniper scope and once the scope is zeroed you may never remove the turret covers or make any further adjustments. It might make the zeroing in effort a little confusing. At the end of this exercise, I made the 38 clicks back to my zero position for the scope and it did return to zero.
Figure 25
Figure 26
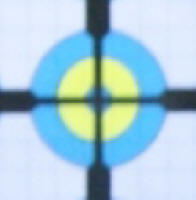
To evaluate the reticle subtension value "W", I used the photo above on the left and zoomed in on the center aiming circle as shown in the photo below on the right. According to Burris, the "W" dimension should represent 22 inches at 100 yards. Therefore, at 25 yards, this should equal 5.5" (22/4). Based on scaling the image below, I come up with 4.3" as the distance between the pointed tips of the thick portions of the reticle. This means that at 100 yards, "W" actually represents about 17". Again, do I think this is a big deal? No. I suggest that anyone planning to rely on subtension values for bullet drop compensation should verify their reticle configuration. It is not uncommon for slight differences to exist.
Figure 27
Figure 28
Clarity and Brightness
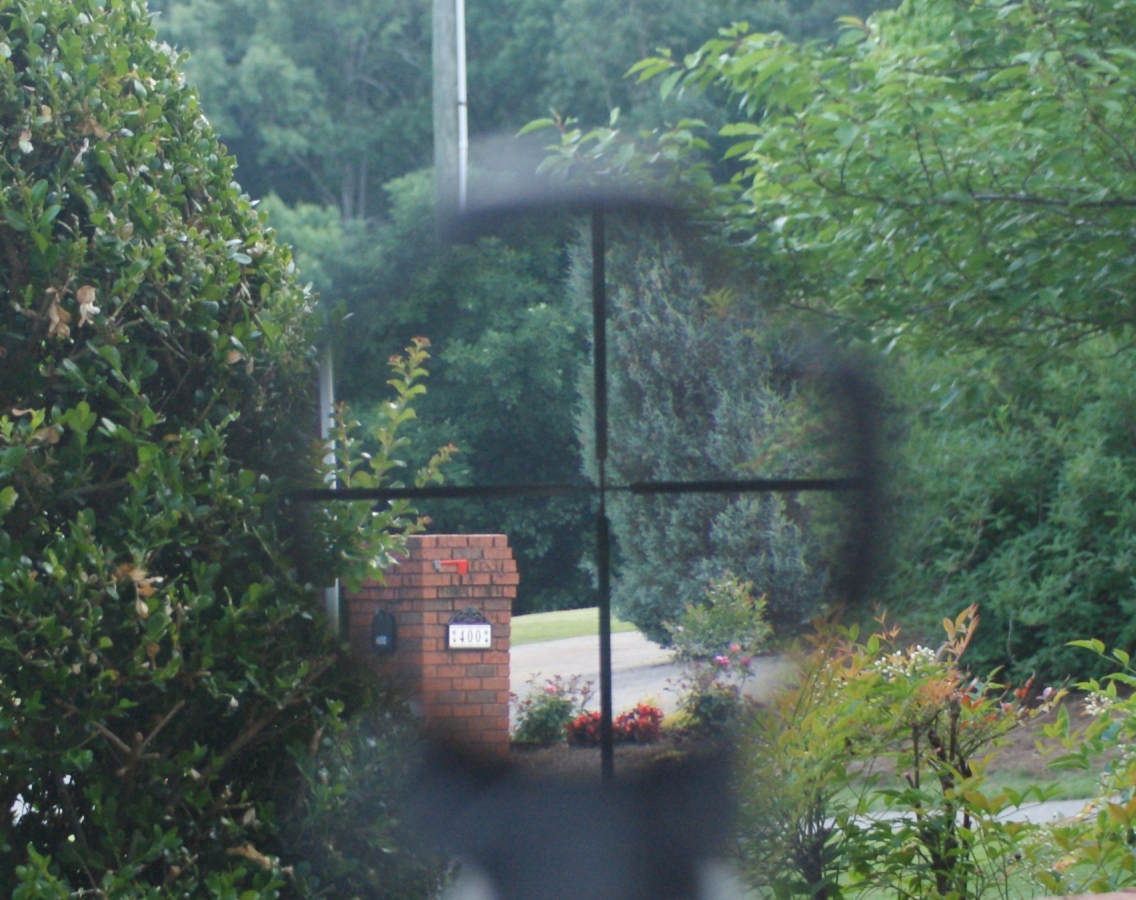
These are some of the hardest features to evaluate on a scope because they become my perception of clarity and brightness and in my case they become relative evaluations because I compare the scope against other similar scopes I have on hand. The closest scope I had to compare the Burris Scout Scope was a NcStar 2-7x32 Handgun Scope. Considering the cost difference between these two scopes, the Burris should be both brighter and sharper than the NcStar. After looking through both of the scopes in a side by side comparison, I believe the Burris Scout Scope to be both brighter and more clear. The photo below is an attempt to give you an idea on the brightness and clarity of the scope. You can click on this photo (and typically any other in this review) to bring up a higher resolution photo showing finer detail. Since this was my attempt of taking a photo through the scope, it is not nearly as clear as looking through the scope with your eye, but does give you a good idea on brightness.
Figure 29
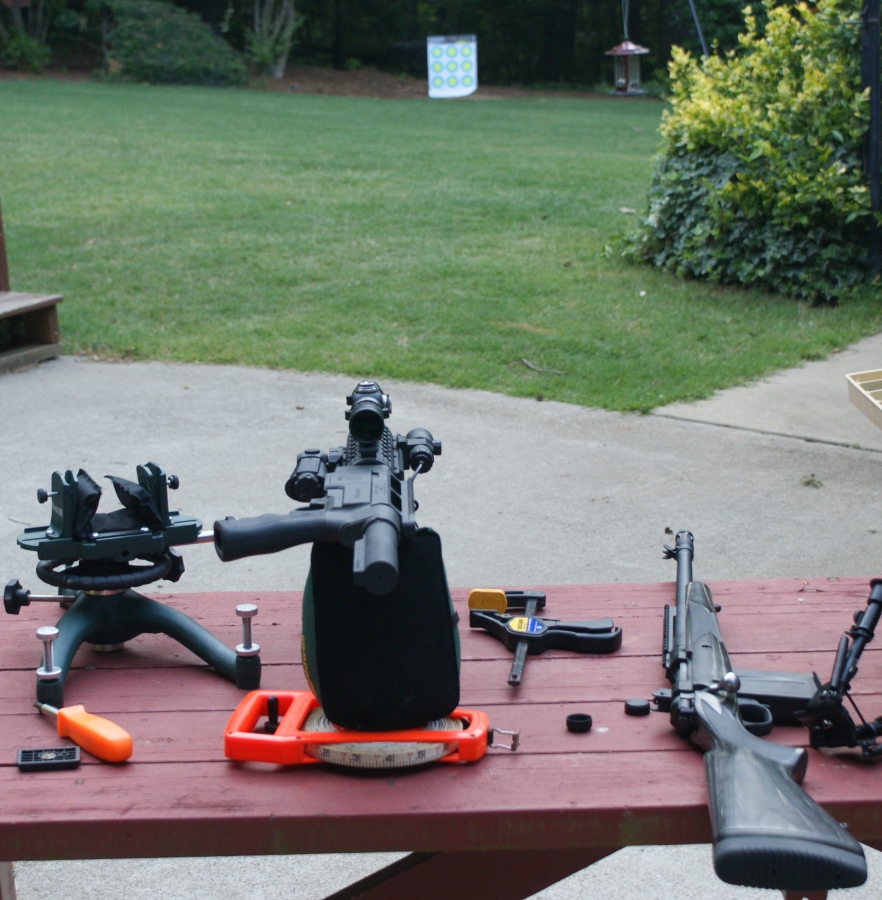
Range Testing
My goal for range testing this scope was not focused on accuracy, but instead focused on getting a feel for using a long eye relief forward mounted scope along with forming an idea on the quickness of target acquisition using this type of scope. I performed my evaluation in two phases. The first phase was a backyard evaluation where I picked out a random point of aim, (pine cone, leaves, bush, ball, etc.) and quickly shouldered the rifle, aimed and pulled the trigger (unloaded and on safety). I'm sure that at this point I have simulated this aiming exercise hundreds of times. In the beginning, it took time to get used to the forward mounted scope. Some of this "getting used to" is the same thing you go through with any new rifle/scope combination (length of pull, scope height, and cheek weld). The other portion that you must get used to is the eye relief on the scope because a long eye relief scope doesn't give you the same feel for scope proximity as a standard scope (distance from eye to eye piece which becomes your front to back cheek weld location). After spending some time training my muscle movements and locating the perfect cheek weld position, I felt very good about my quick target acquisition capability. Now what I REALLY liked was the clear field of view you get from a forward mounted extended eye relief scope. Just by cutting your eyes slightly while maintaining your cheek weld, you are able to keep up with any action that may be taking place outside of the field of view of the scope. This is basically getting the benefit of shooting iron sights coupled with shooting a scope (some magnification and no front/rear sight alignment necessary).
For my next phase, I headed to the range to zero the scope and then perform my same shooting exercise while making real shots. I felt optimistic so I visually bore sighted the rifle at 100 yards by removing the bolt and looking through the barrel and aligning the scope. This put me within 4" of zero on my first shot and I made the remaining adjustments. Once zeroed, I finished shooting up a box of shells from the bench. Afterwards, I made my remaining shots (about another box) from a standing position and focused on quick shot placement. There was very little difference from this exercise versus the one done in my back yard except actually sending a bullet down range. As before, I was pleased with the clear field of view.
Figure 30
Warranty
Considering the amount of testing (recoil, water and fog) that Burris does on each of their scopes before it leaves the factory, it is a pretty safe bet on their part when they offer a "Forever" Warranty. Quality control and testing every scope is not cheap and is reflected in the price of the Burris scopes. These are points to consider when purchasing a scope. If you are looking for a scope that you can count on during those critical moments in the field, then you should have some comfort that Burris believes they can provide a "Forever" warranty.
Bottom Line
The Burris Scout Scope is clearly a quality scope. The finish of the scope was good and I was pleased with the clarity and brightness of the scope. Obviously, you need the ability to mount a forward mounted scope on a rifle to take advantage of this type of scope and I think the Ruger Gunsite Scout Rifle is a good match. I did find that the stated 1/2" click adjustment to be more like 5/8" and that the reticle subtension value appears to be 17" instead of 22". Personally I wouldn't consider these differences significant in making the decision to purchase this scope. For most people using this scout scope, they will zero the scope and probably never adjust the elevation or windage during real shooting exercises because that wasn't what the intentions were for this type of scope. If you are going to use the reticle subtension values for making shot placement, I recommend you always verify any scope first before making your critical shots in the field. I struggle with an MSRP of $399 for the scope, but luckily the street price is around $225 if you are willing to shop online. Considering the quality, "Forever" warranty and street price, the Burris Scout Scope should definitely be considered if your are looking to purchase this type of scope.
Or
If you would like to be notified about future Gunsumer Reports reviews via Facebook, make sure "You Like This" by clicking the Facebook "Like" button at the bottom or top of this page. If it already says "You Like This" beside the button, clicking it again will uncheck the "Like" status and you will not be notified.
| Share on Facebook | |
© 2010, 2011, 2012, 2013, 2014, 2015, 2016, 2017, 2018, 2019, 2020, 2021, 2022, 2023 & 2024 Gunsumer Reports™, All rights reserved.
FTC Disclosure