|
|
Gunsumer Reports TM Providing Detailed Objective Reviews for Firearms and Firearm Accessories |
Ruger Precision Rifle Review
Part 3 - External & Operational Features
September 7, 2015
In this part of my Ruger Precision Rifle Review, I 'm going to try to show and discuss all of the external and operational features of the new Ruger Precision Rifle. Although lengthy, like most of my reviews, this YouTube video below shows many of these details using a video format.
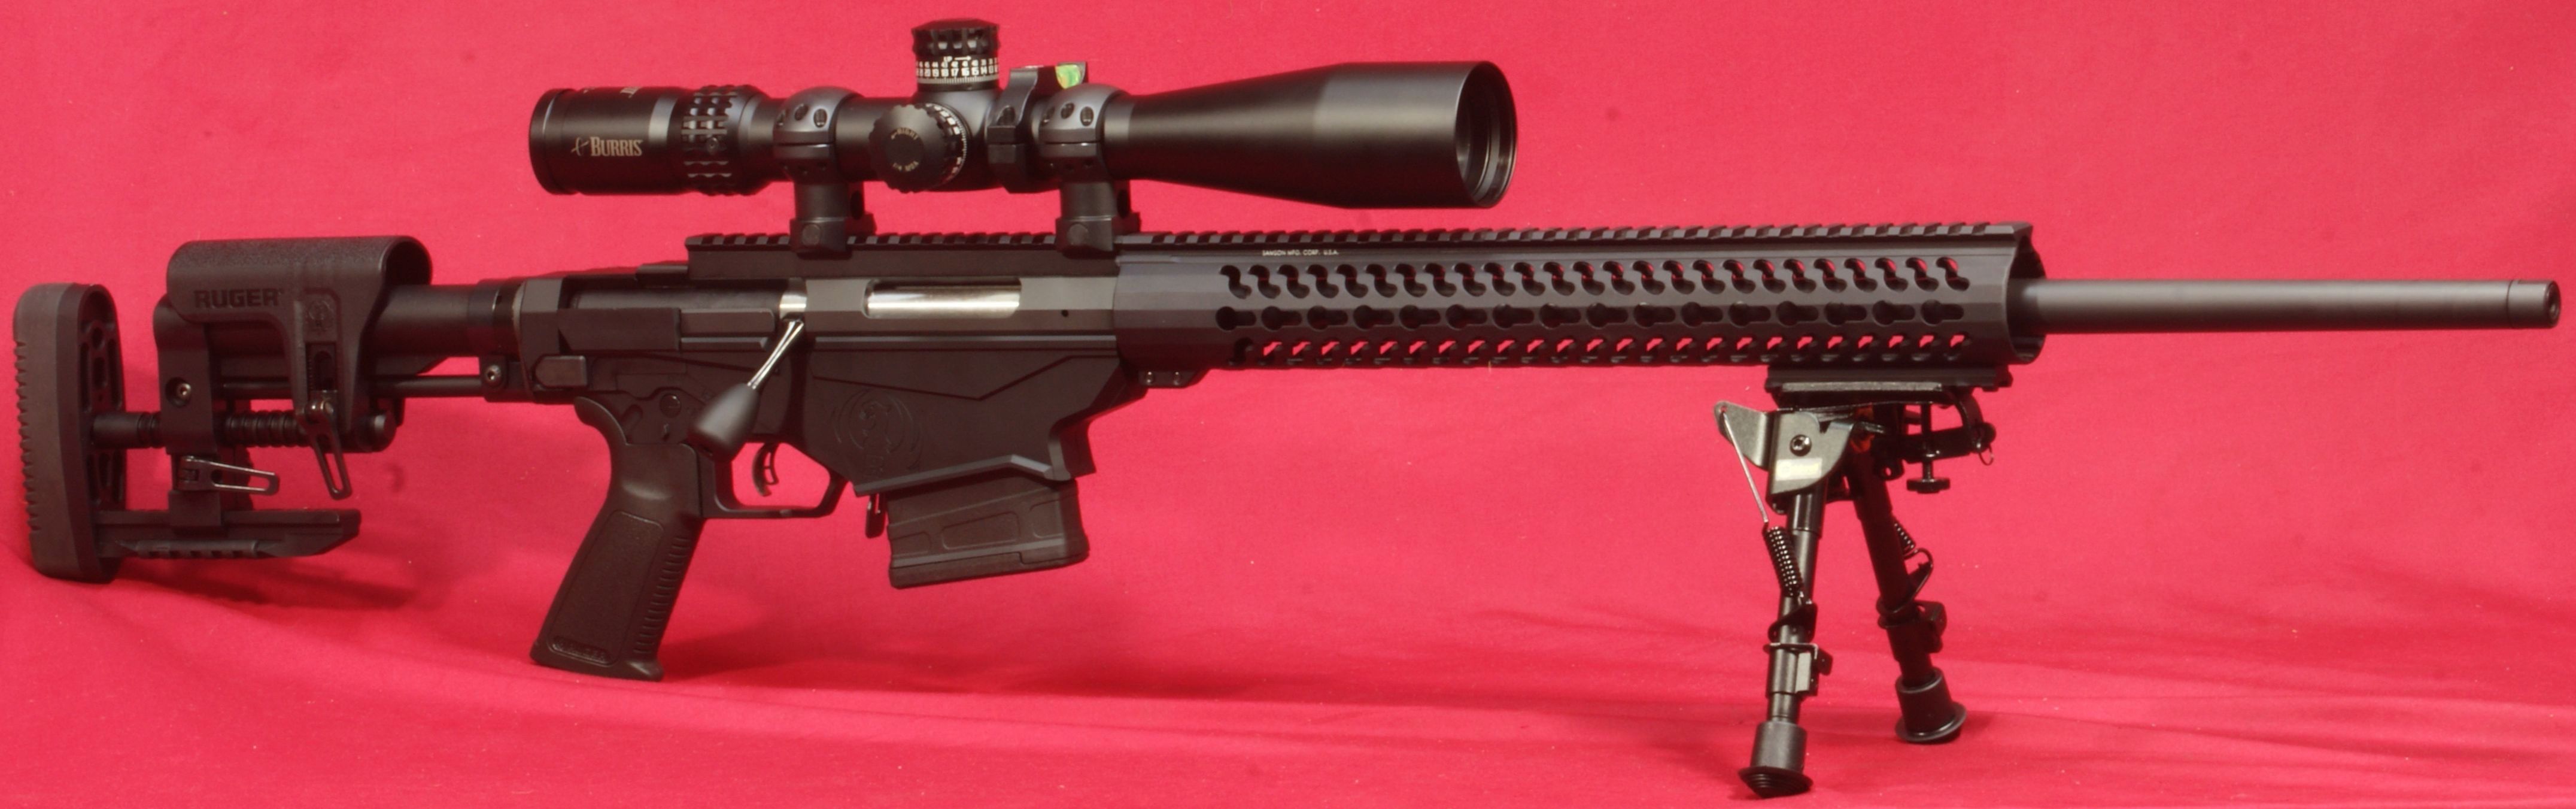
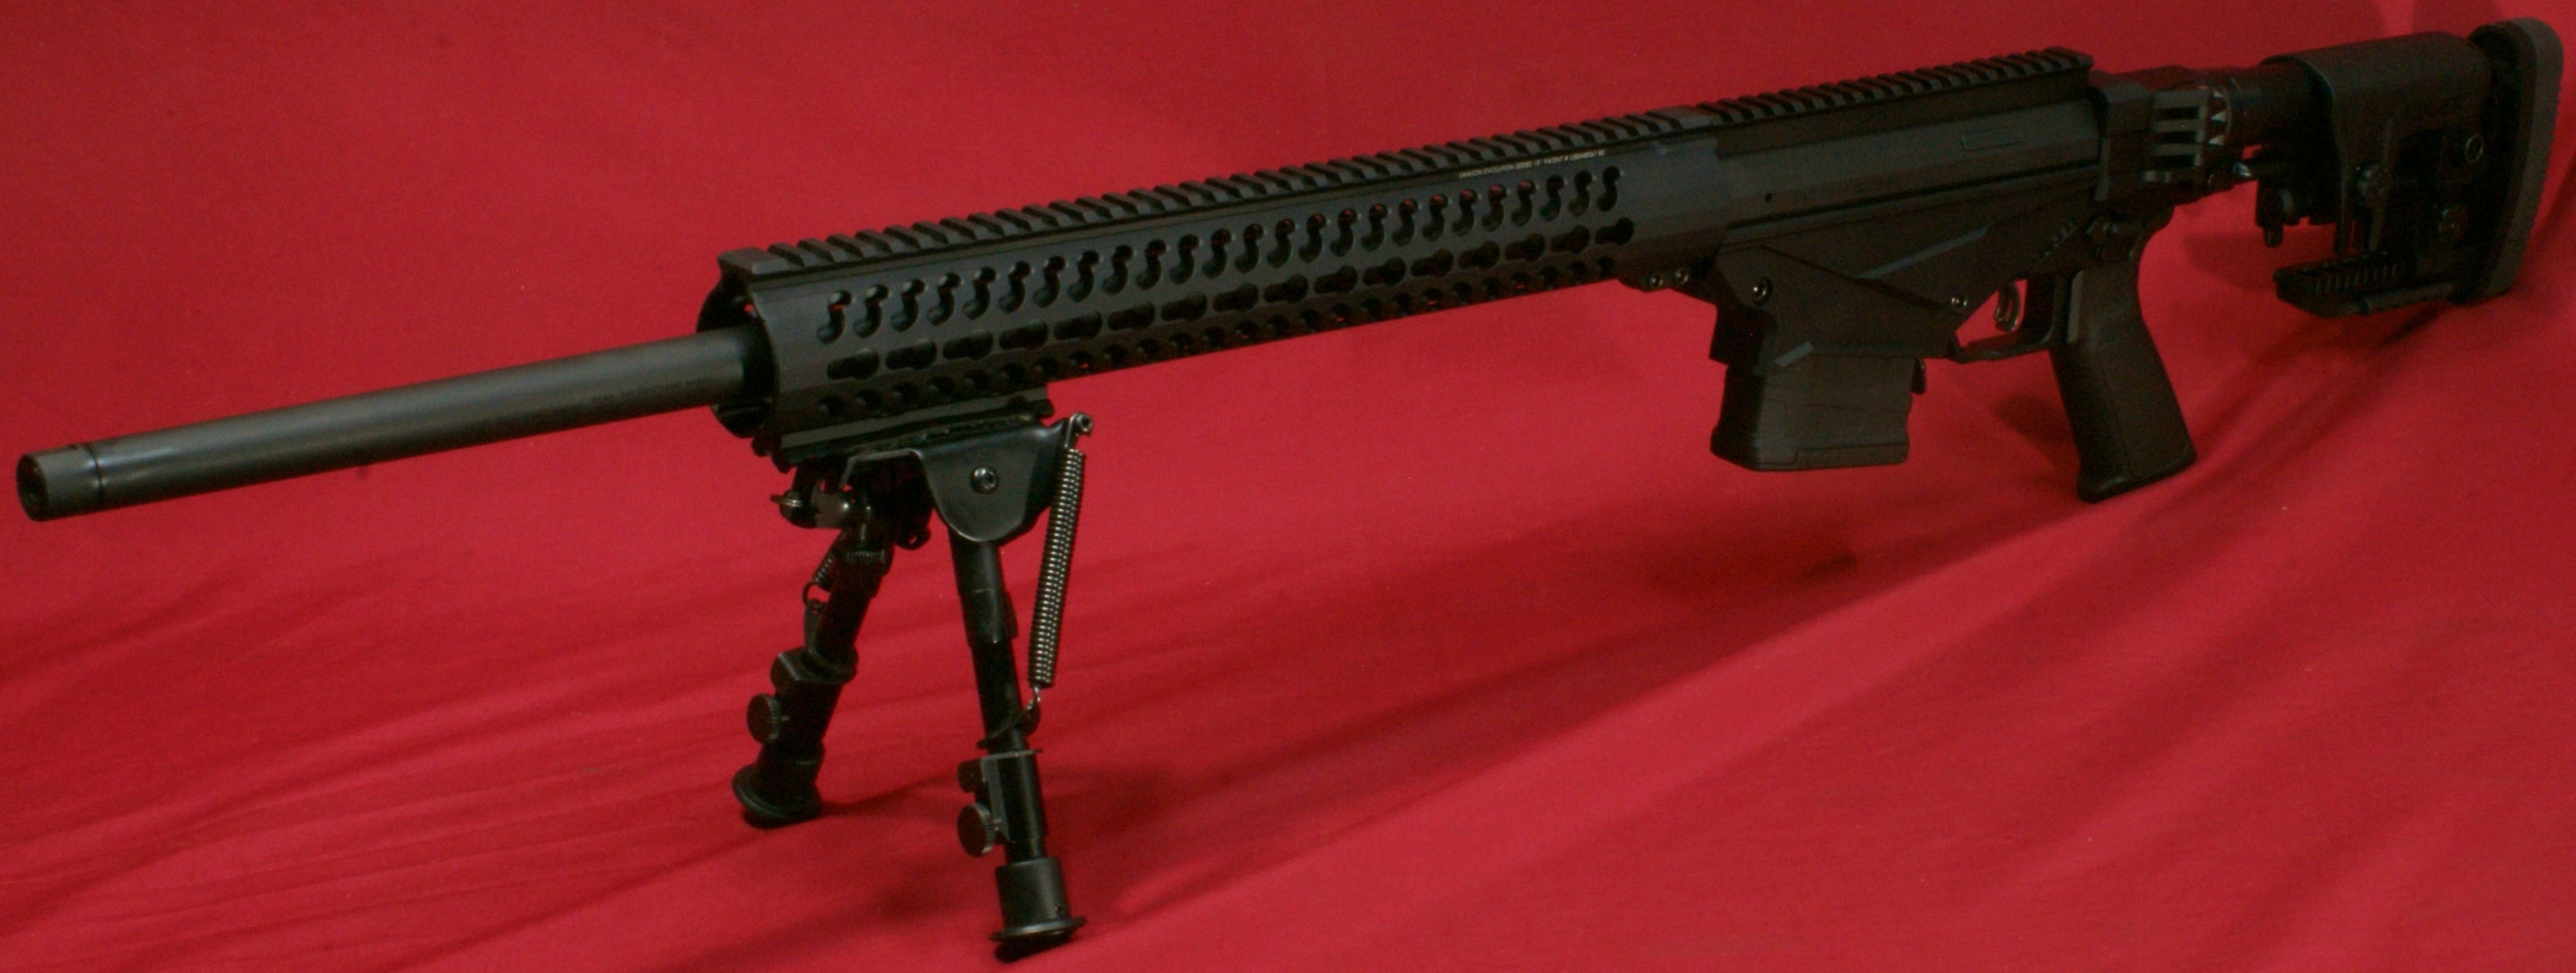
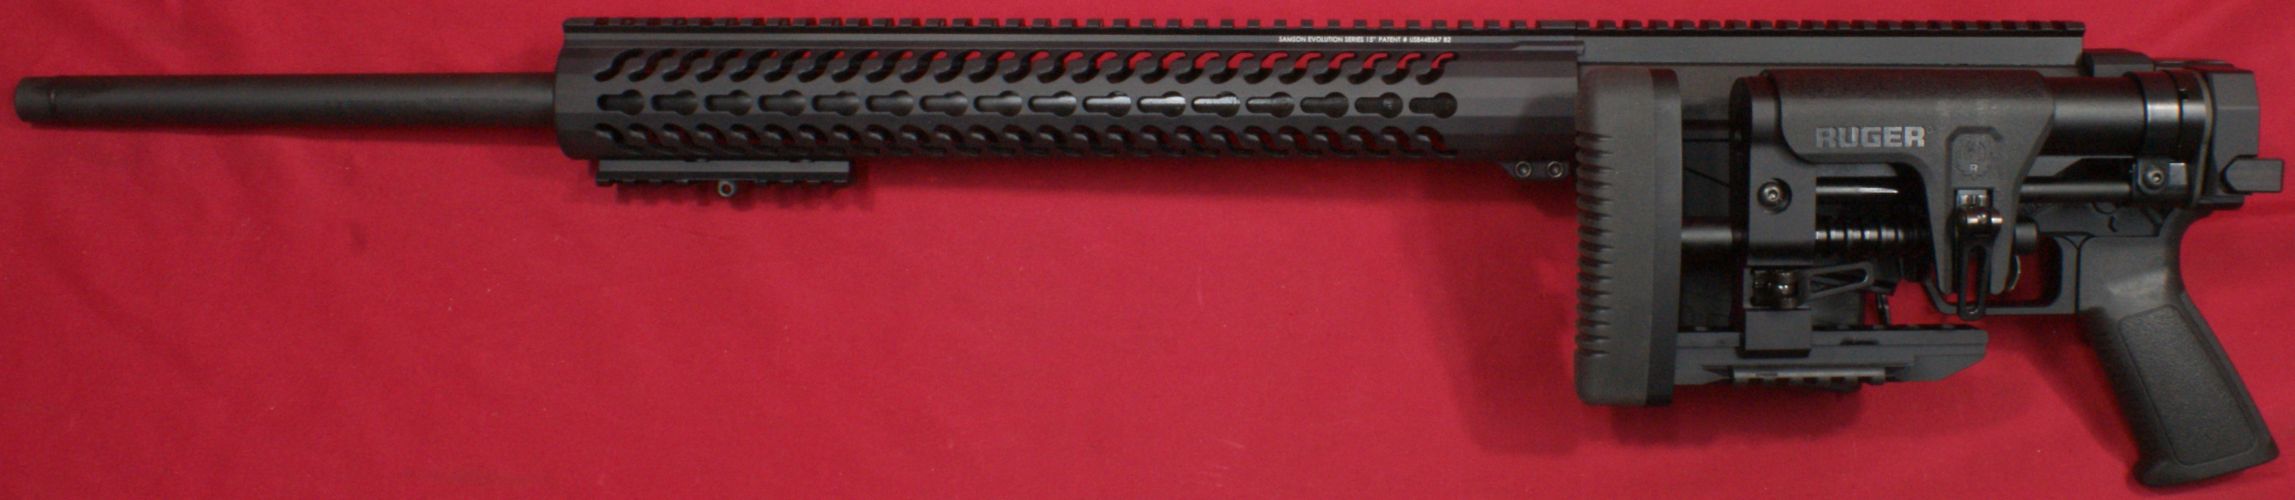
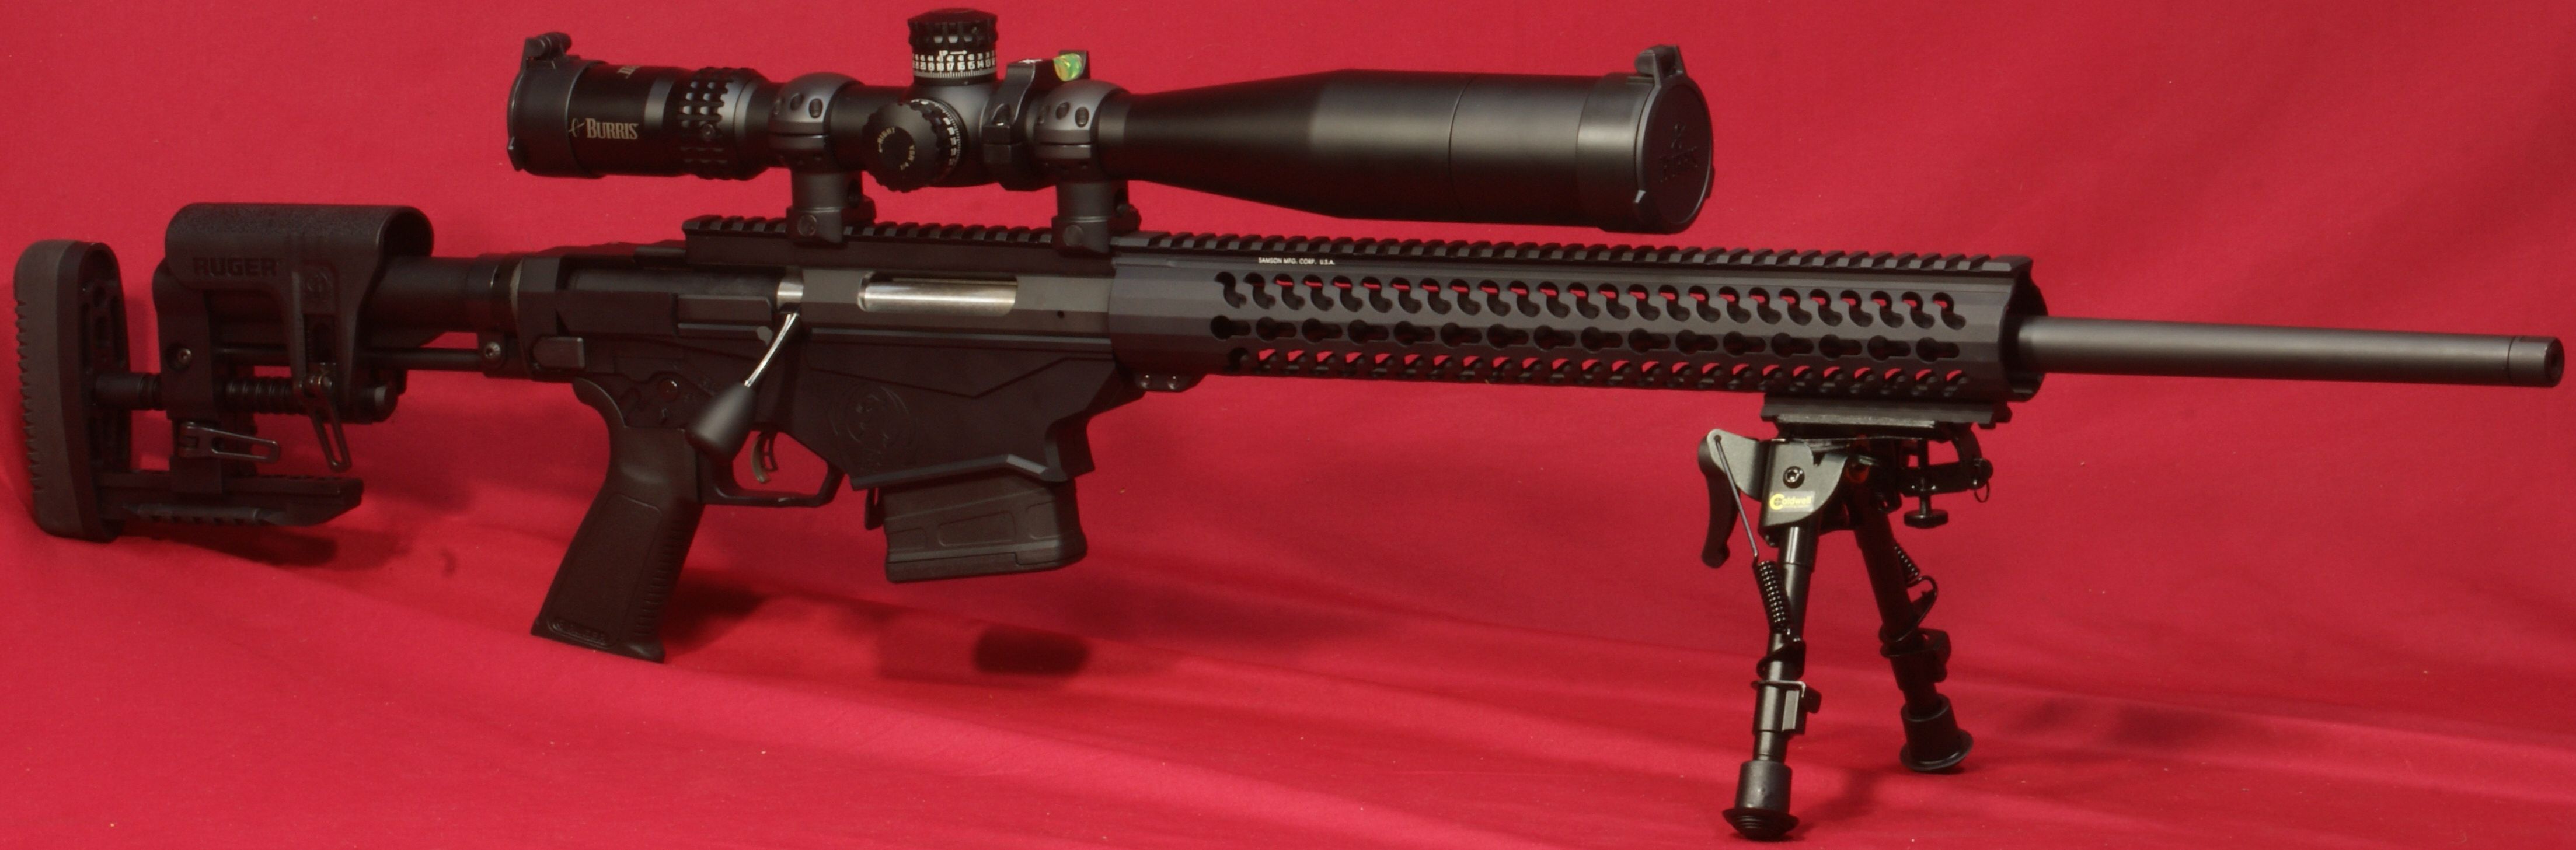
This particular rifle is chambered in 6.5 Creedmoor and comes with a 24" barrel. At first glance, this rifle looks more like a precision AR styled rifle, but once you see the bolt handle sticking out of the right side of the receiver, it's clear this is a precision bolt action rifle. Keep in mind that the rifle does not come with the bipod which I used in these photos.
Figure 1
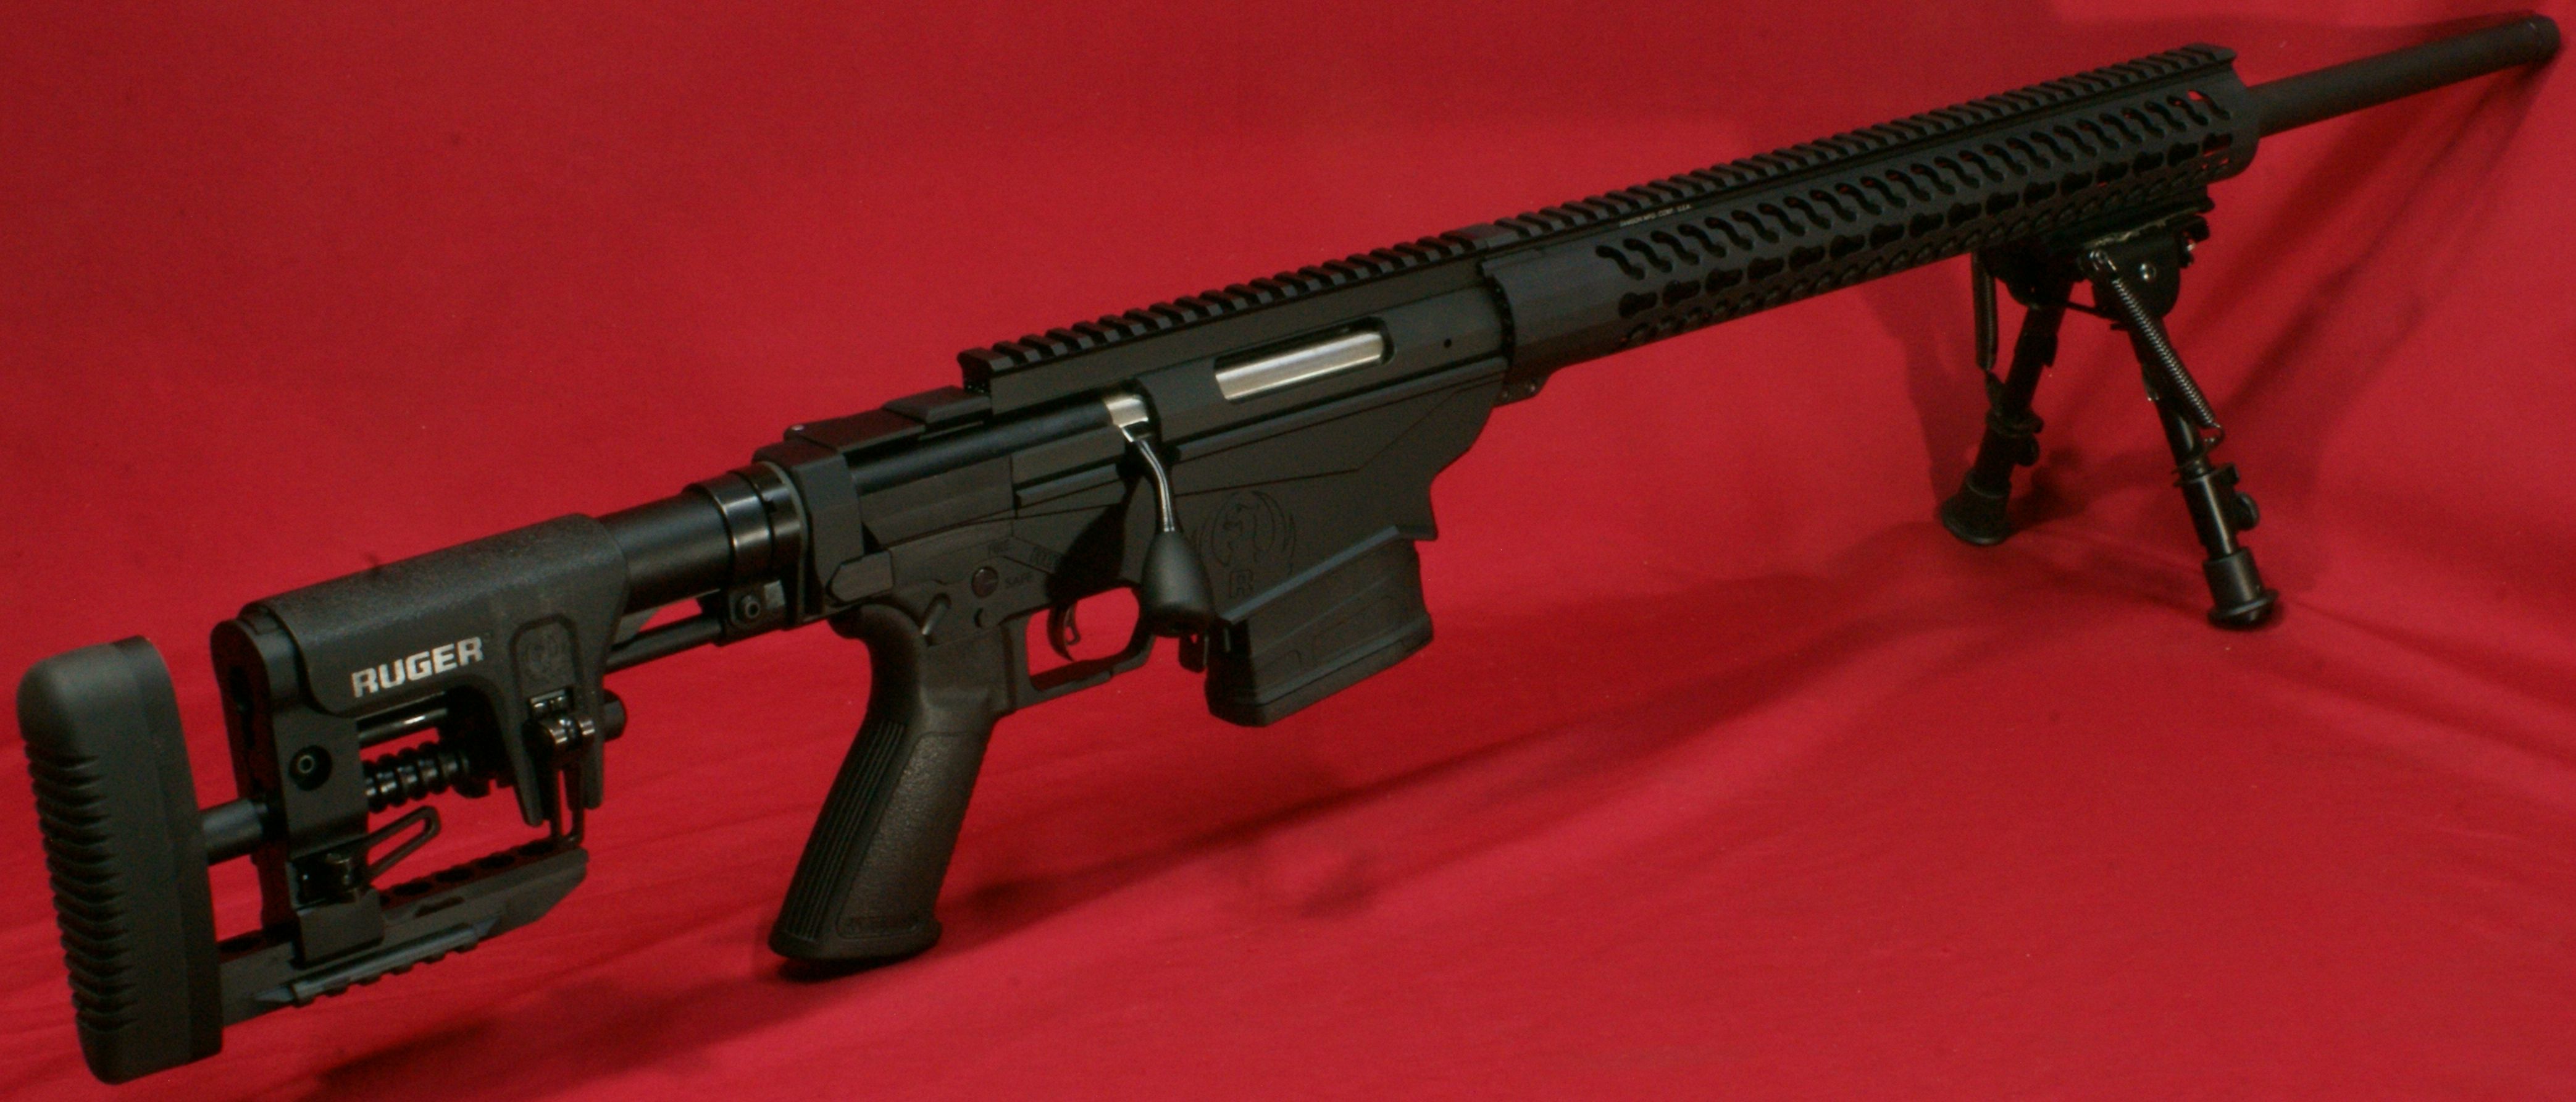
During the design of the rifle, it looks like Ruger paid close attention to allowing the potential use of many AR styled aftermarket parts such as forends, grips and buttstocks. This allows the owner to customize his or her rifle to suit their own needs or preferences. For me, most likely this rifle will remain in it's "stock" configuration because I feel the forend, grip and stock are a great match for this style of precision rifle.
Figure 2
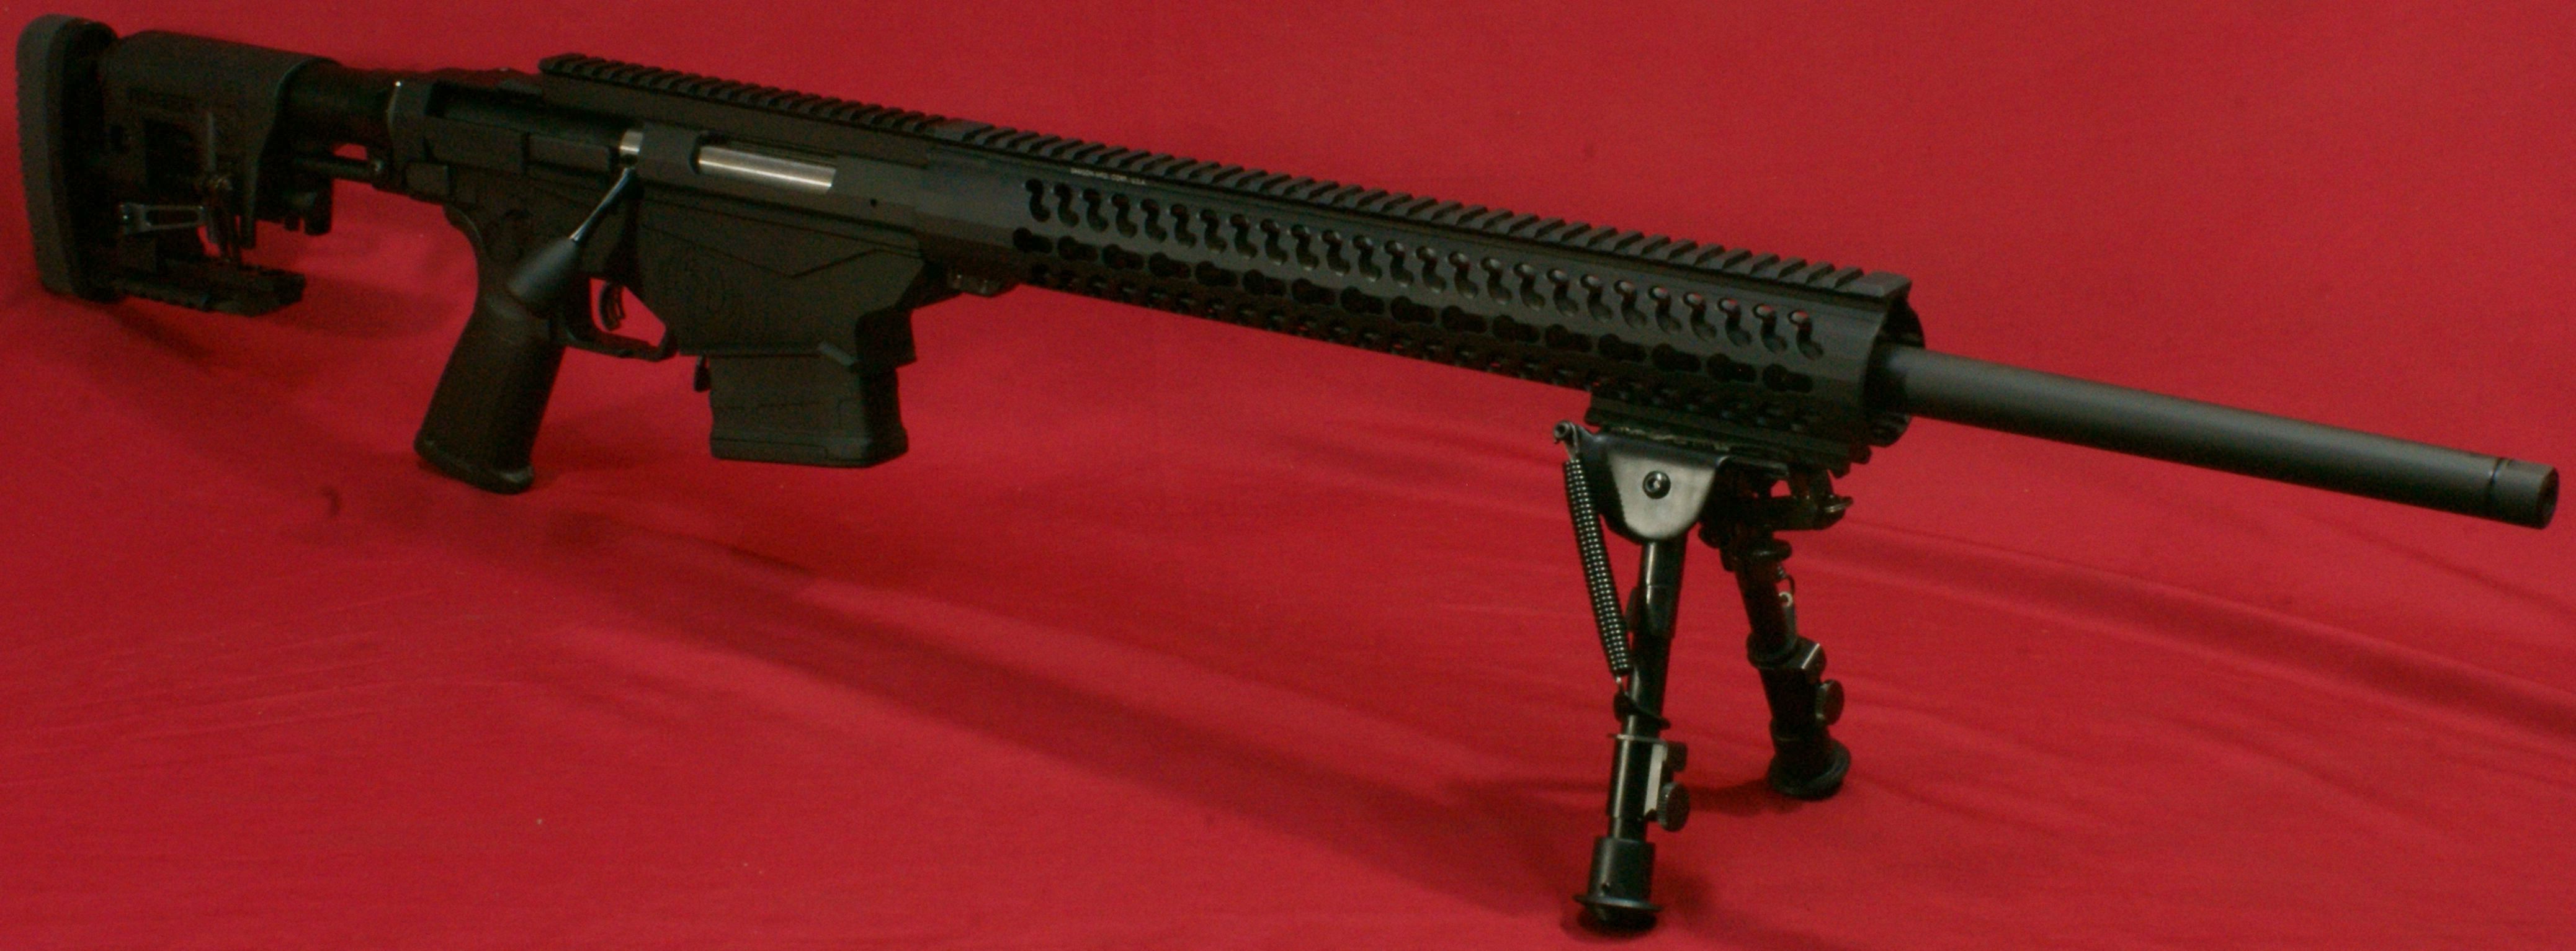
There is no doubt that this rifle has a tactical look and the new Ruger folding buttstock conveys the appearance of precision. One of the features I love which I will discuss more about further in the review is their lower receiver design. The styling is very attractive and they added versatility to the magazine type which is another big plus.
Figure 3
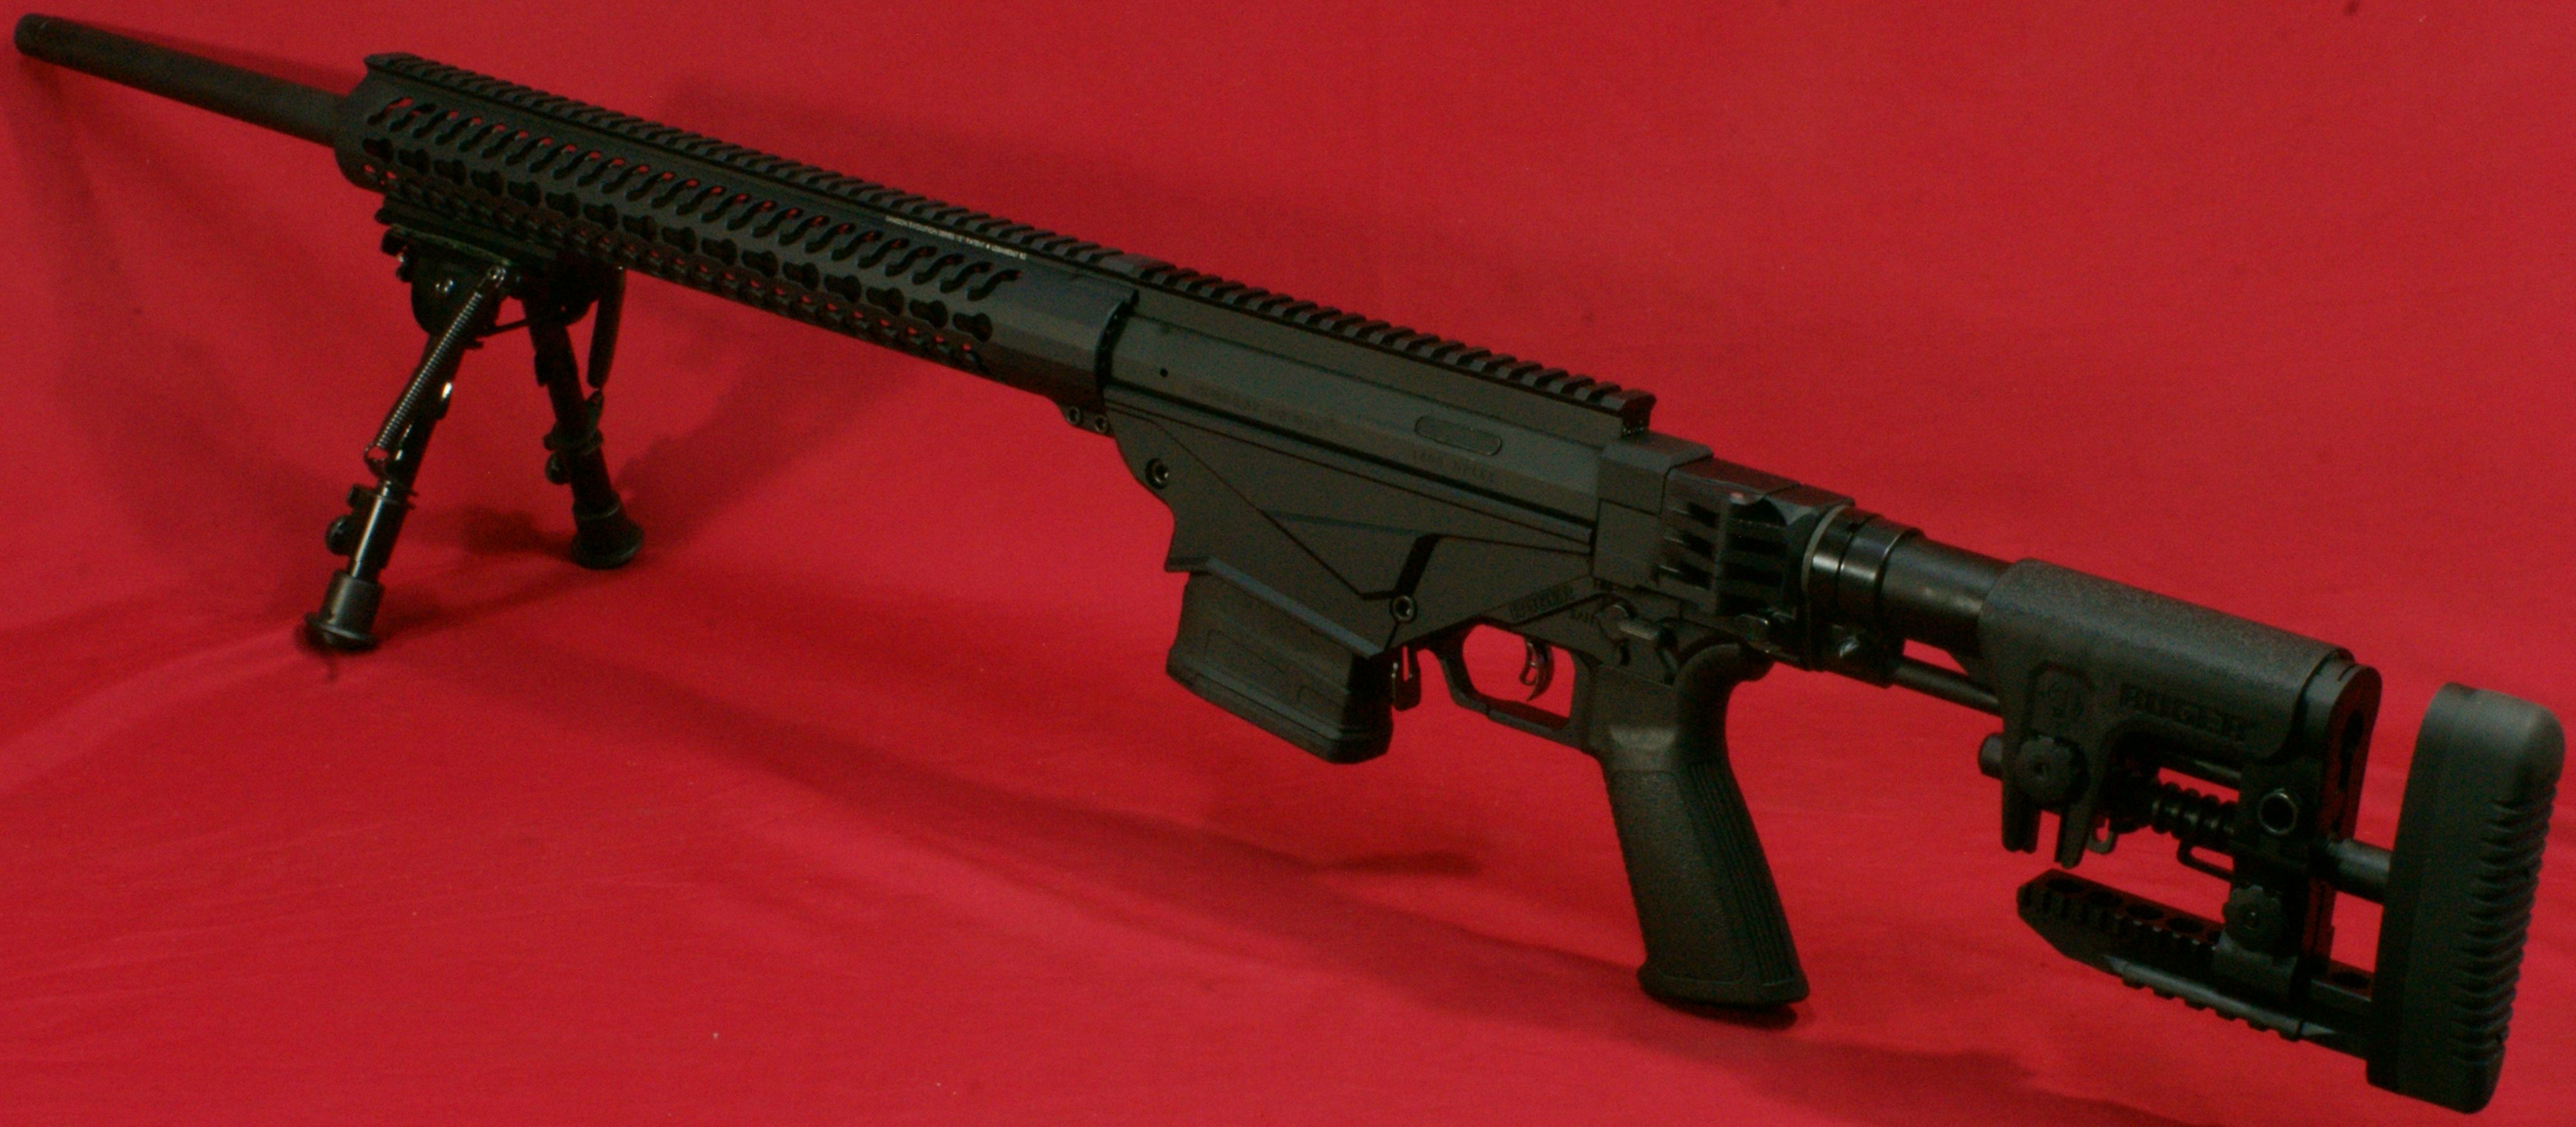
Everyone has their own opinions and I try to keep mine out of my reviews as much as possible, but I think this rifle may be the most attractive "black" rifle Ruger has produce over the last few years.
Figure 4
I measured the rifle to be about 3.45" in width when laying flat on a table with the bolt handle up. The next widest place is about 2.4" across the check riser cam and thumb screws.
Figure 5

The height measured about 7.3" and the overall length measures about 42.25" with the buttstock fully retracted and about 45.5 with it fully extended.
Figure 6

Figure 7

Figure 8

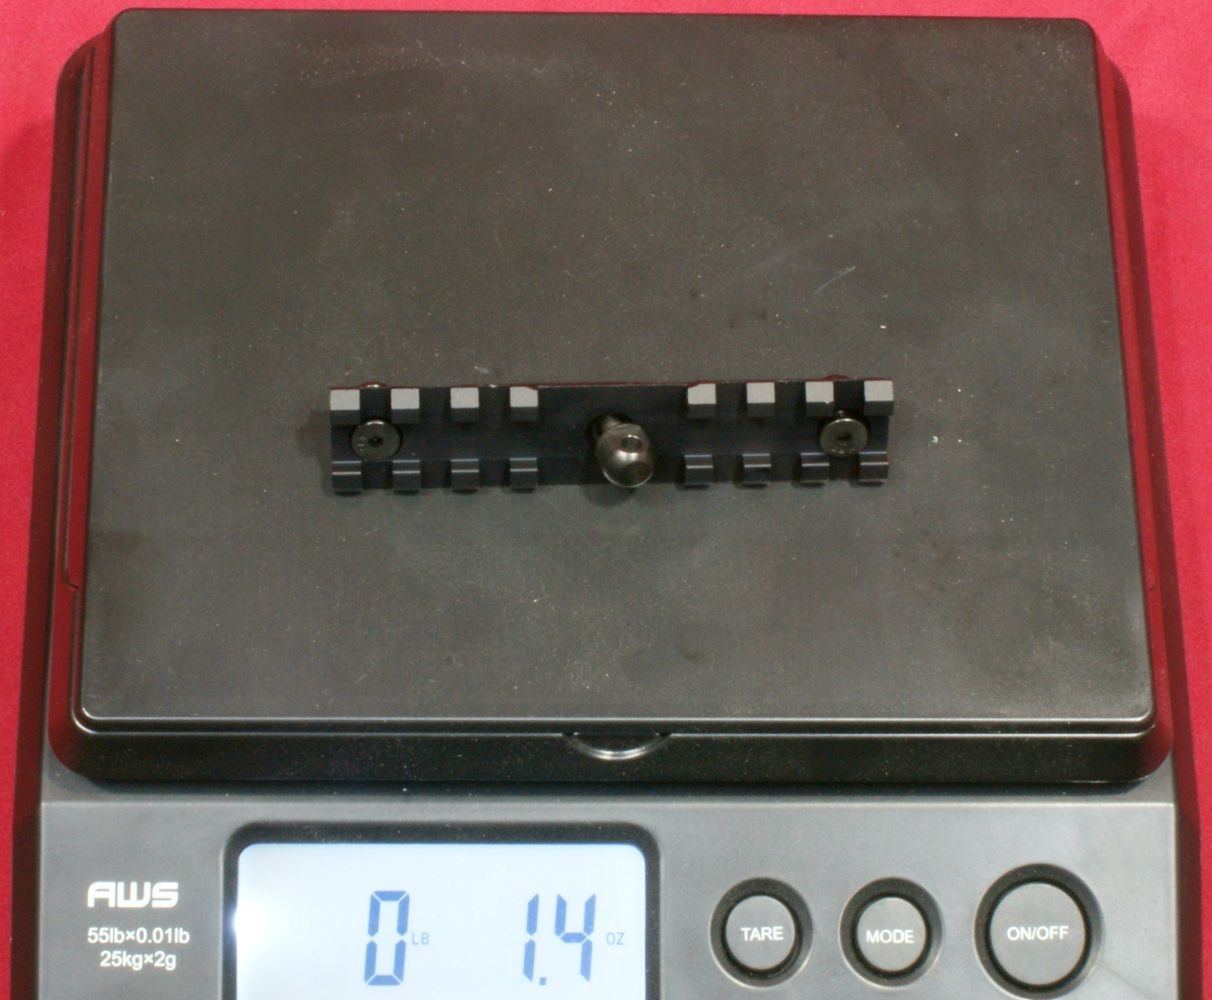
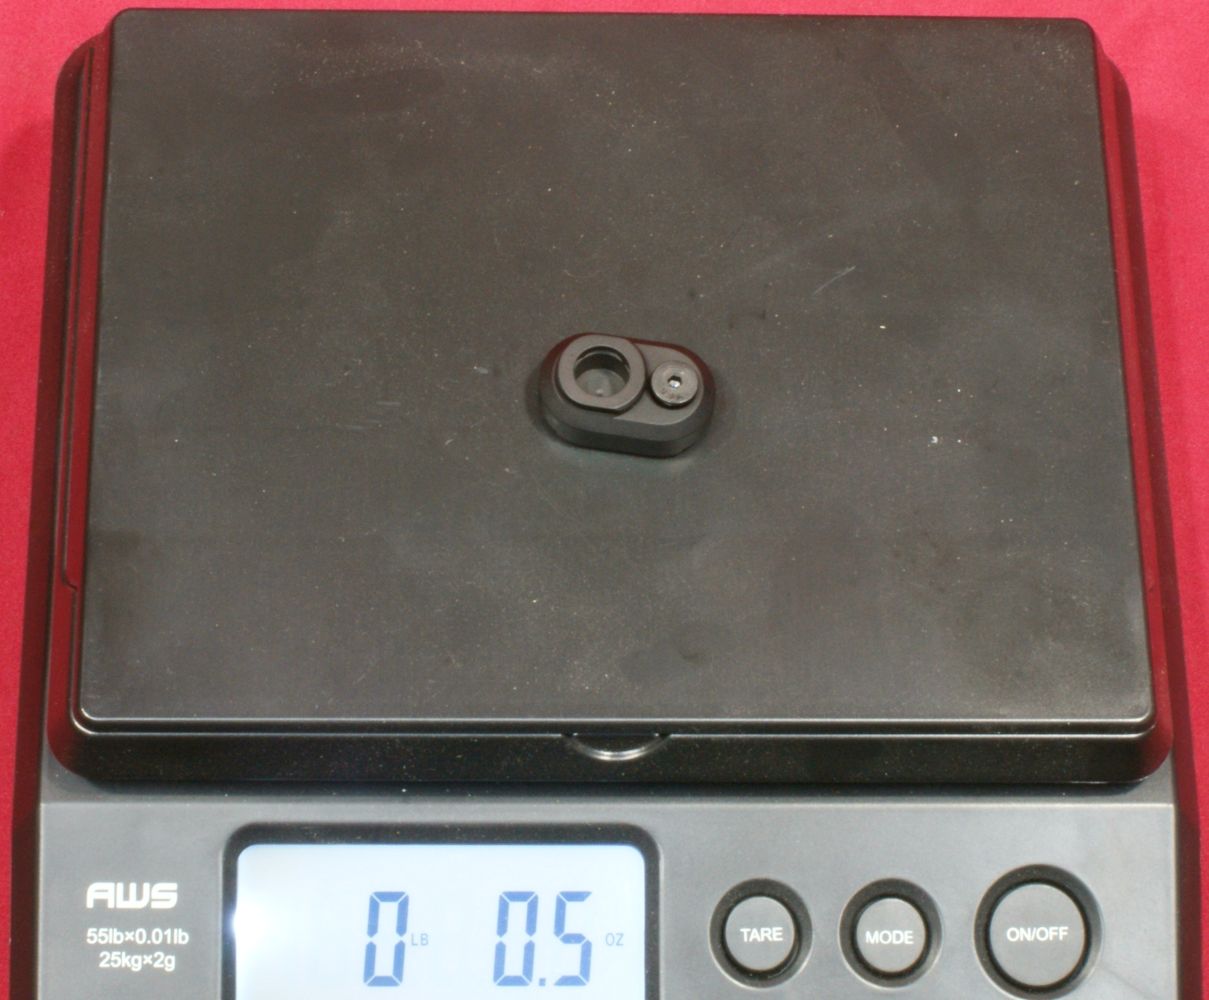
The basic rifle weighed in at 10.61 pounds. When you add the KeyMod rail, KeyMod QD adapter and a magazine, the rifle weighs in at a total of 10.95 pounds.
Figure 9

Figure 10
Figure 11
Figure 12

As I already mentioned, this rifle chambered in 6.5 Creedmoor came with a 24" barrel. Using a cleaning rod, I measure 24.12 from bolt face to the end of the crown.
Figure 13
Ruger states this rifle's barrel is a "cold hammer-forged 4140 chrome-moly steel barrel with 5R Rifling at minimum bore and groove dimensions, minimum headspace and centralized chamber." Basically, with 5R Rifling you have 5 lands and 5 grooves as compared to the typical 6 on most rifles. In theory the 5R Rifling causes less bullet deformation which in turn causes less fouling and more consistency between shots. The minimum bore, groove and headspace dimensions should provide for a tight bullet fit and good accuracy.
Figure 14

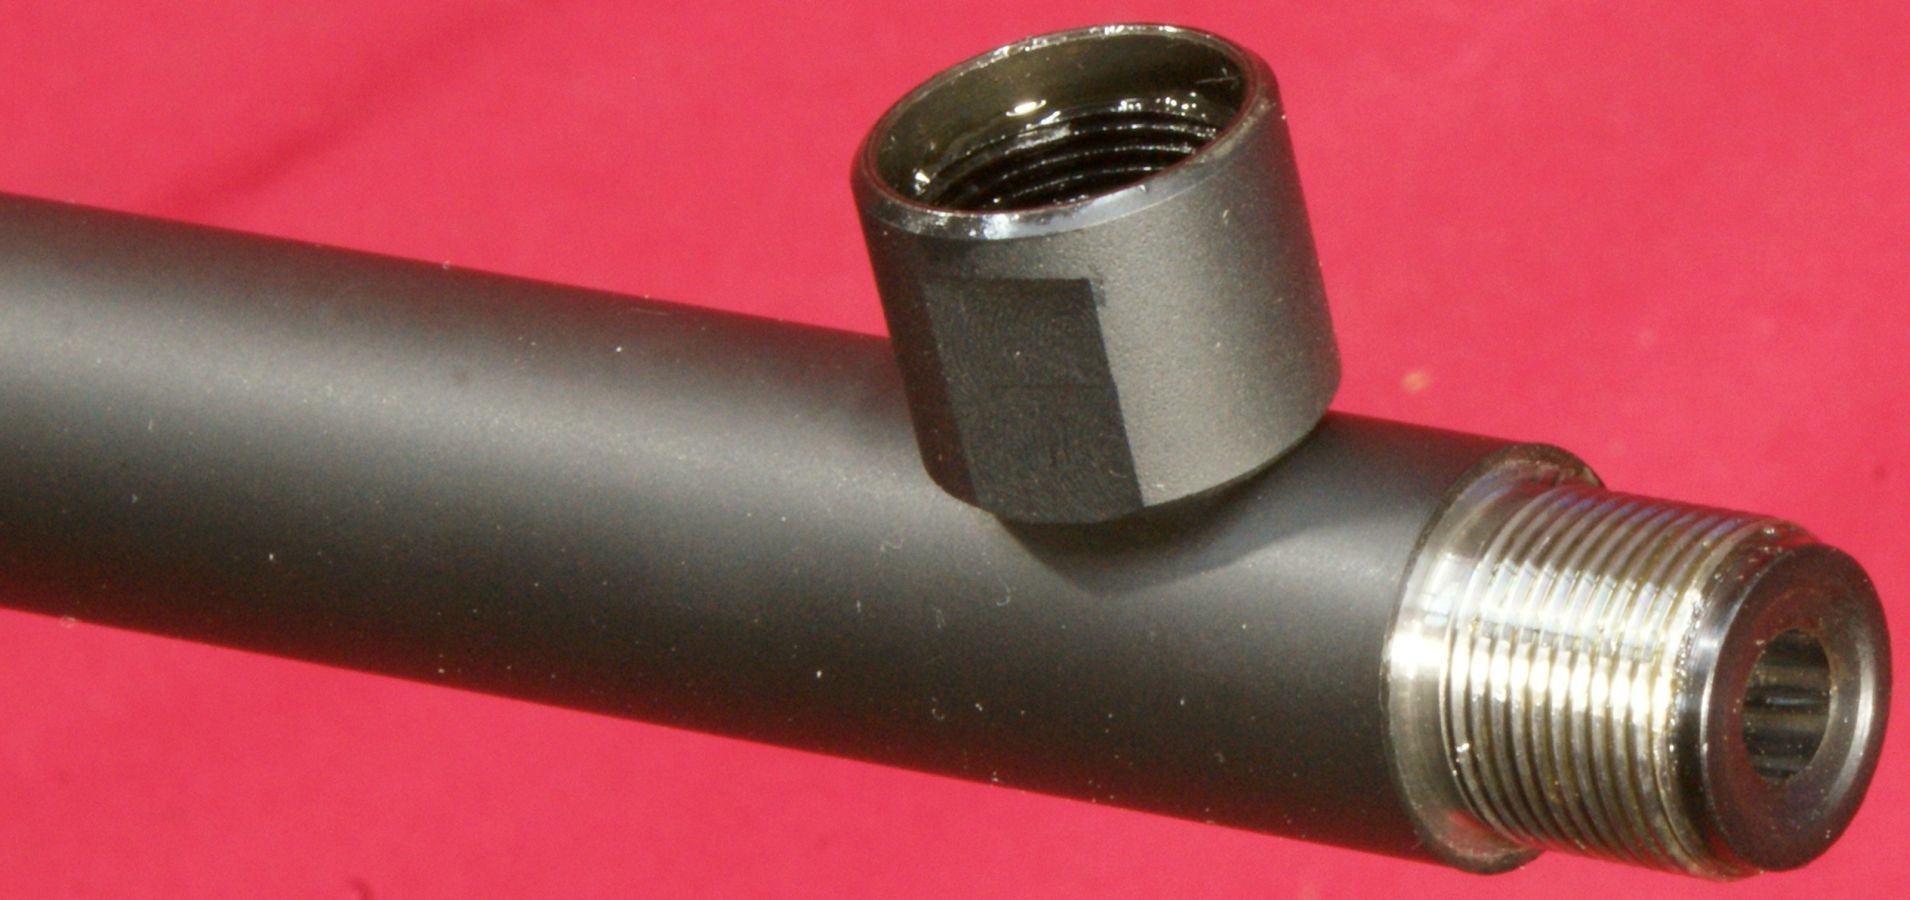
The barrel comes in what Ruger calls a "medium" profile and measured 0.740" just behind the thread protector. The end of the barrel has a visible recessed crown to protect the rifling.
Figure 15
The end of the barrel is also threaded with a 5/8"-24 thread for about 0.60" and comes with a steel thread protector that has two flats which allow the use of an 11/16" wrench for tightening/loosening. Typically I only tighten a thread protector hand tight with my fingers and so far have never had any issue with them loosening. I was a little surprised to see the bright shiny threads at the muzzle of the barrel under the thread protector. This gave me the impression there was no corrosion protection coating and I plan to ensure there is always some good rust preventative at this location. This may or may not be the case on every rifle, so please comment below if you see something different.
Figure 16
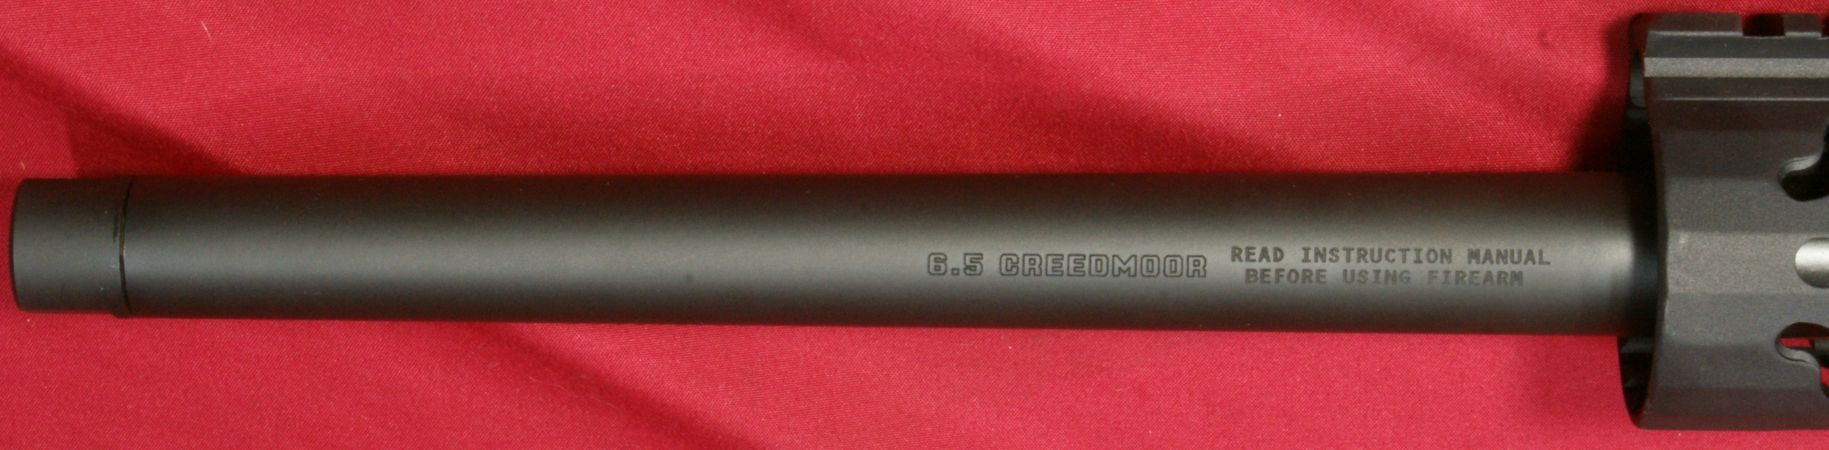
The only marking externally visible on the barrel were the caliber "6.5 CREEDMOOR" and the normal warning "READ INSTRUCTION MANUAL BEFORE USING FIREARM". Some rifles will state twist rate on the barrel and I think this might have been a good addition on this rifle since twist rate is used in spin drift calculations. The specifications state a twist rate of 1:8 (one turn every 8 inches) which should stabilize the heaviest (longest) of nearly any 0.264 diameter bullet on the market.
Figure 17
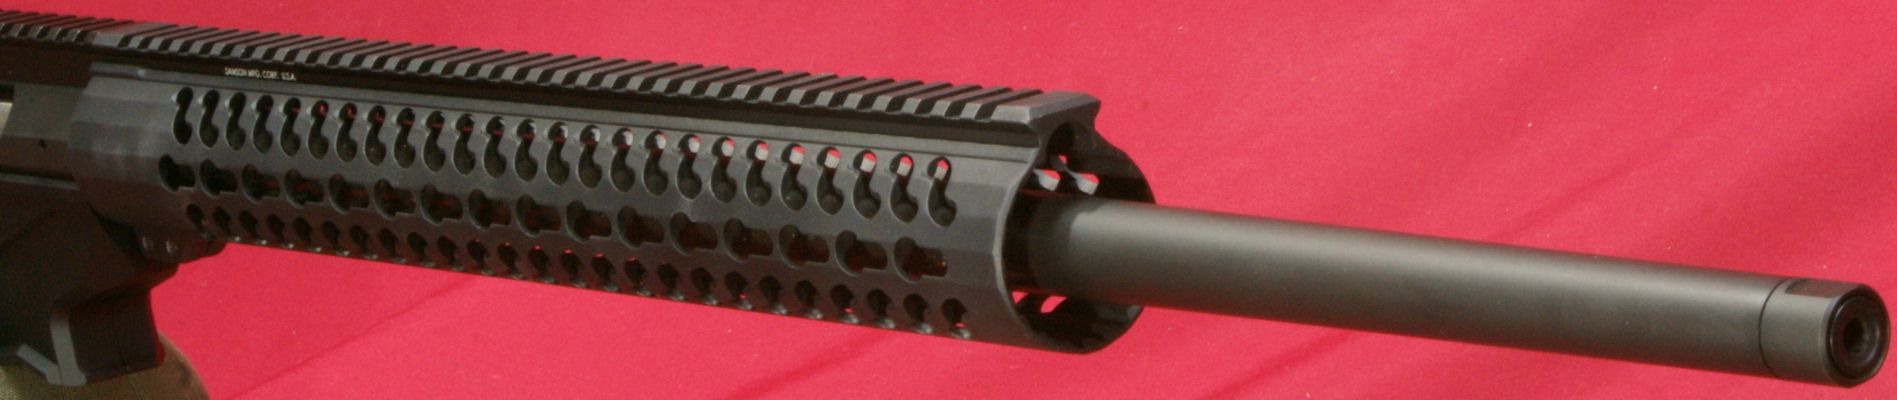
I'm not even sure it is worth stating, but clearly the barrel is fully free floated.
Figure 18
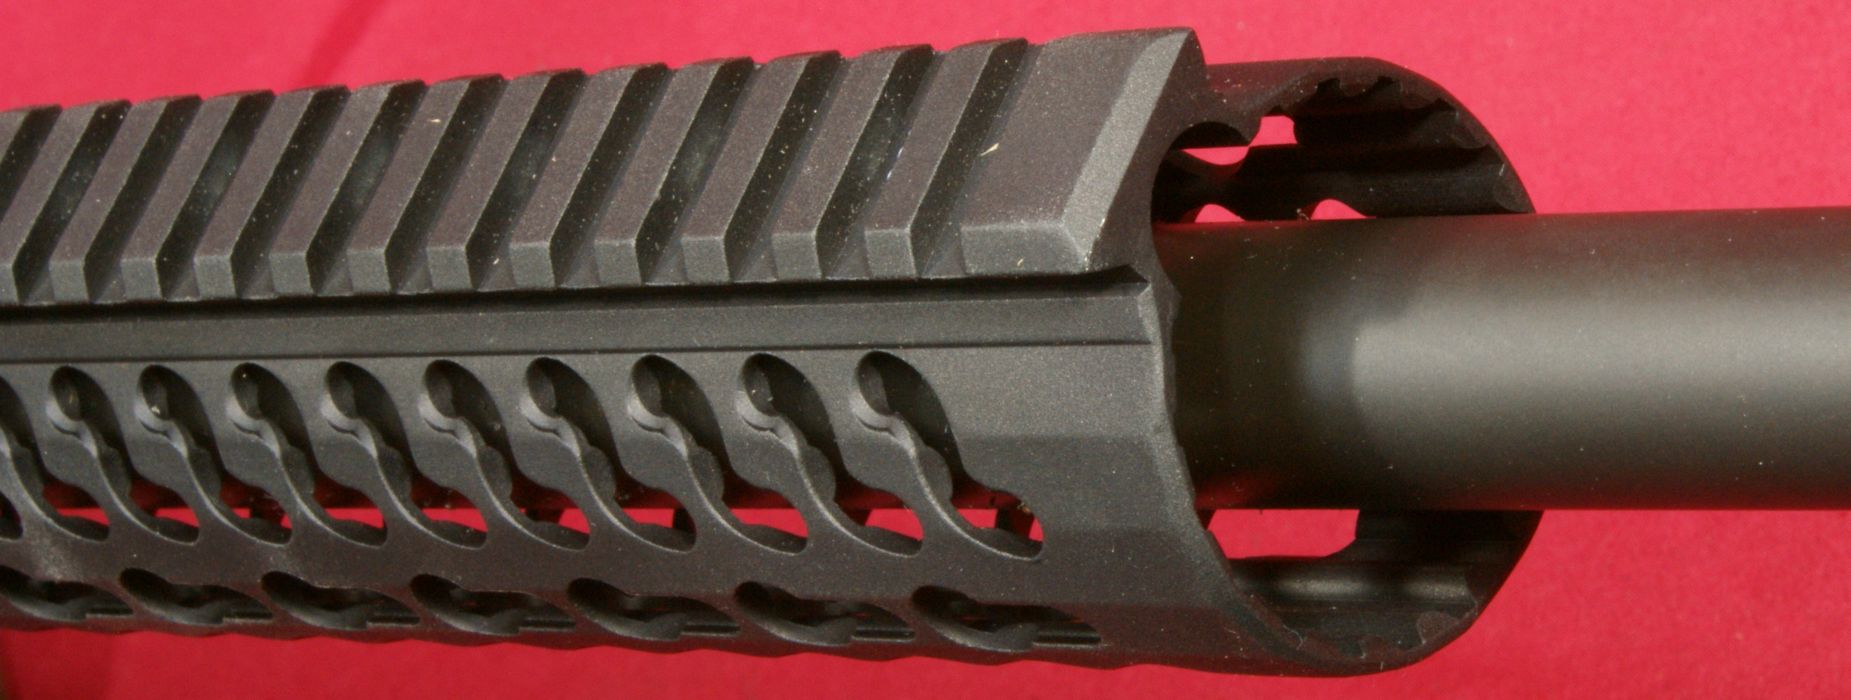
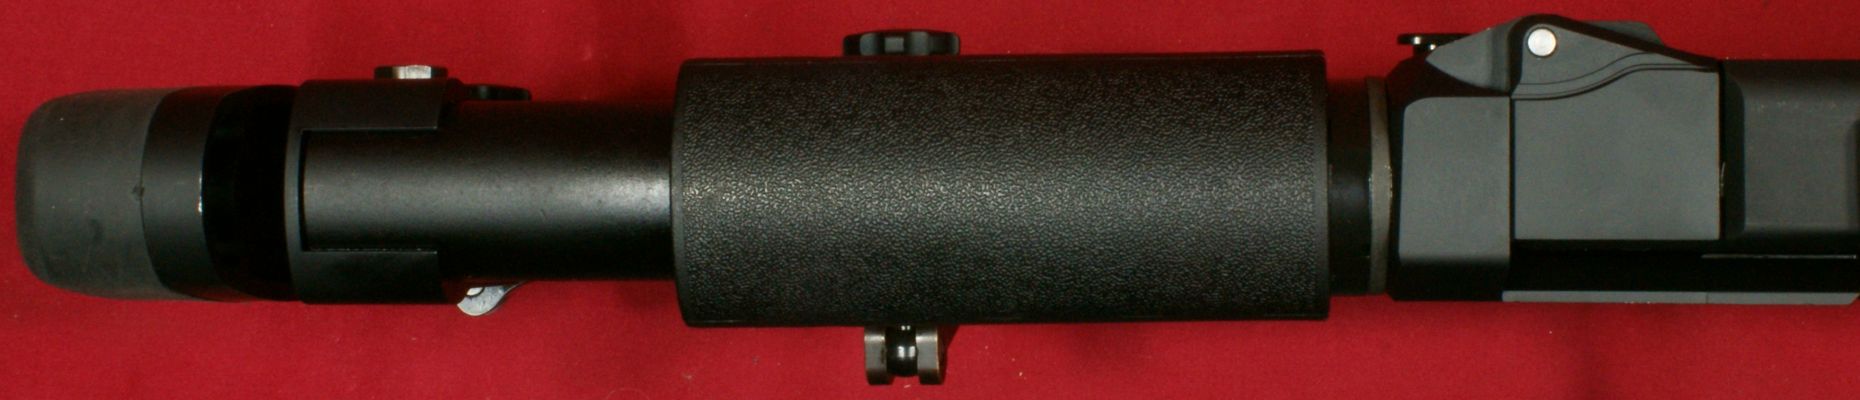
I was really glad to see that Ruger selected the Samson Evolution Rail for this rifle. I have used the Evolution rail on a couple of my own builds and really like the slim feel. The actual handguard is Samson's Keymod Evolution Series 15. Samson does a good job with their description of their rail below.
After repeat requests from SOCOM users the decision was made to bring it to production. The Evolution Keymod will feature standard Keymod slots at the 3 6 and 9 o "clock positions. In addition the Evolution rail will maintain the ability to accept standard evo accessories at multiple angles around the rail through the original "s cuts ". This allows operators to take advantage of a much larger variety of accessories while still having cross platform capability where it is most needed. The Keymod will have the same hand feel and inside diameter as it "s older brother but will be even lighter. This lighter faster more adaptable EVO will perform to the same stringent standards our users have come to expect. The Evolution Keymod will be available in a variety of standard lengths and will be compatible with standard Keymod accessories.
- Rifle Length
- Free Float Design
- Thermal bushings clip to any mil-spec barrel nut
- Relieved for Most Gas Piston Systems
- No Need To Remove Front Sight Base
- Rail Includes Integrated Anti-Rotation Tabs
- All Rails 1913 Picatinny Mil-Spec
- Type III Mil-Spec Hard Coat Anodizing
- Precision Laser Engraving
- Forms Continuous Top Rail
- 6061 T6 Aluminum
- Overall Length: 15.0 "
- Weight: 12.8 oz.
- ID: 1.56 "
- OD: 1.8 "
Figure 19

Figure 20

Figure 21

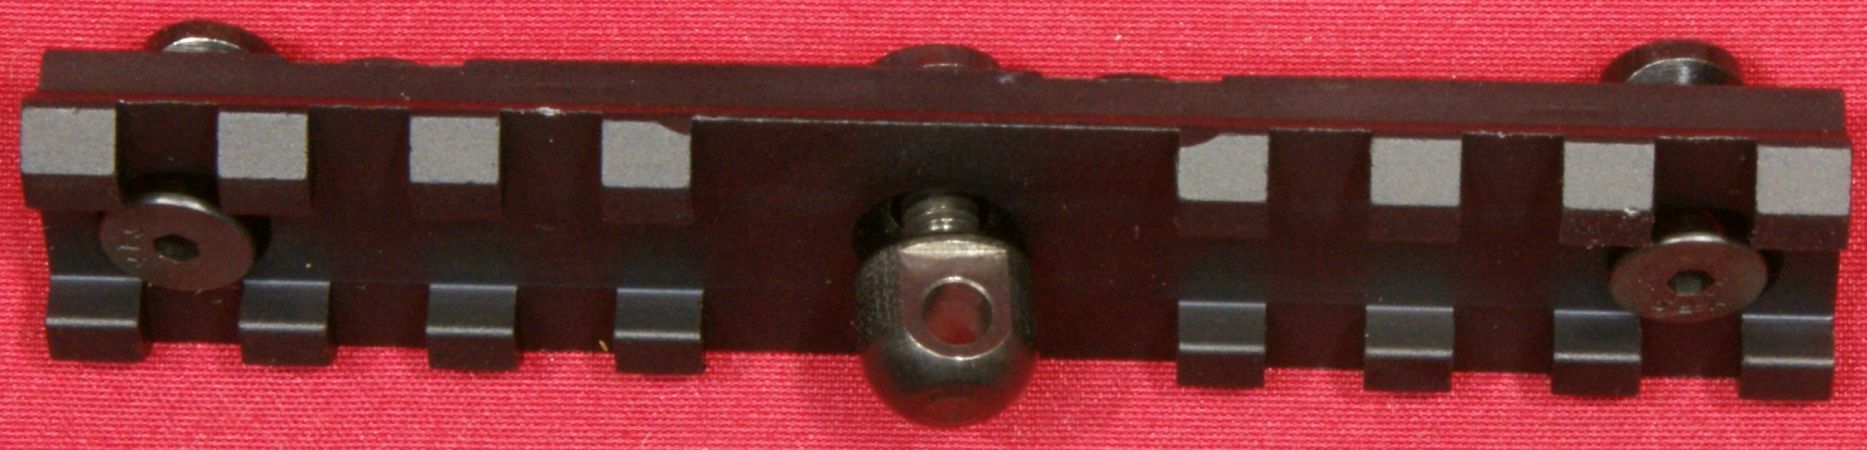
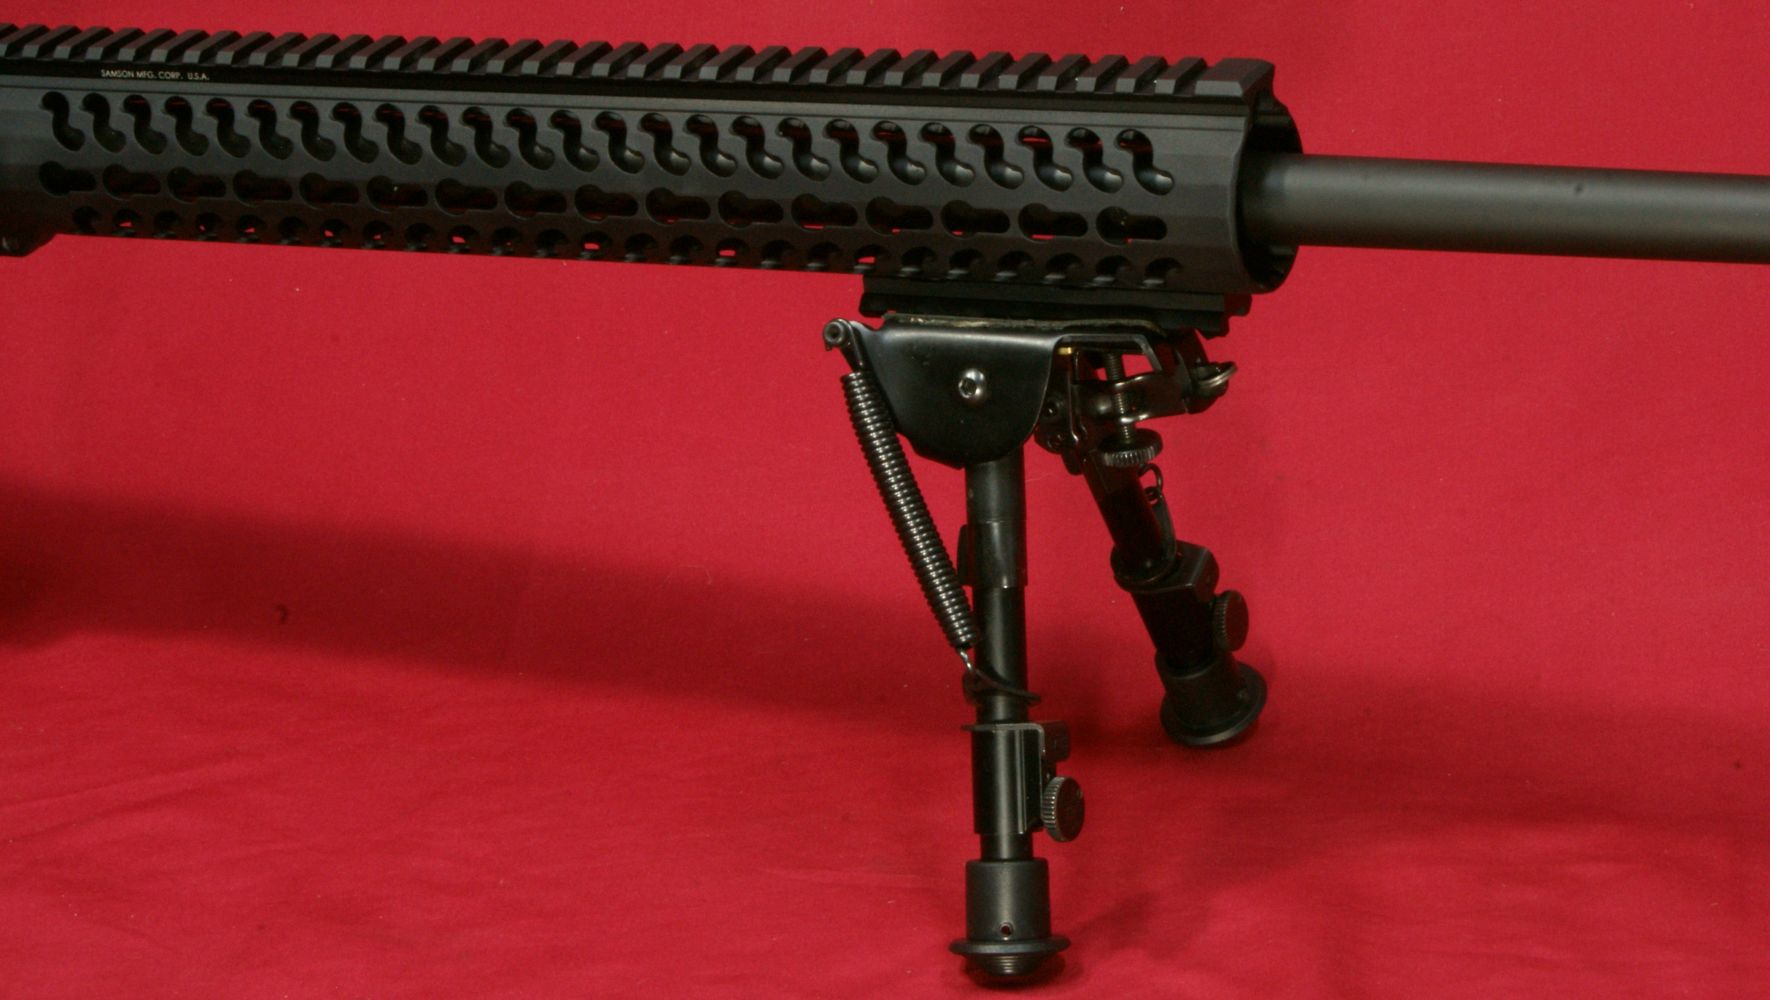
Ruger provide a 3.75" section of rail to allow you to mount a bipod which can be either rail mounted or swivel stud mounted. The swivel stud they provided was separate from the rail and you have to change out the center screw with the stud.
Figure 22
The KeyMod mounting system was designed to be superior to the MIL-STD-1913 (Picatinny) rail system in that the KeyMod system can reduce the handguard weight and get rid of the sometimes non-ergonomic feel you get from the slots of the Picatinny rail system. In this case, mounting a Picatinny rail to the handguard via the KeyMod interface is a little redundant, but you can purchase other accessories that will mount directly to a KeyMod handguard.
Figure 23
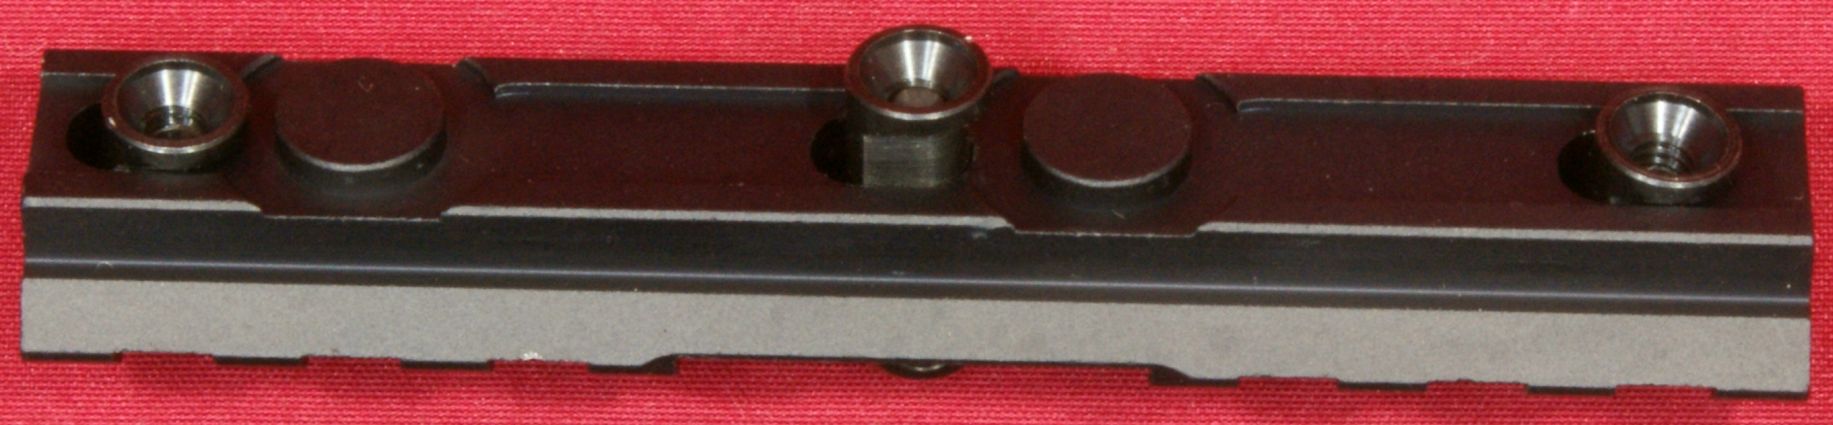
When the KeyMod rail is installed, the photo below shows were the nuts and recoil lugs will be located (line up) in the KeyMod slots.
Figure 24
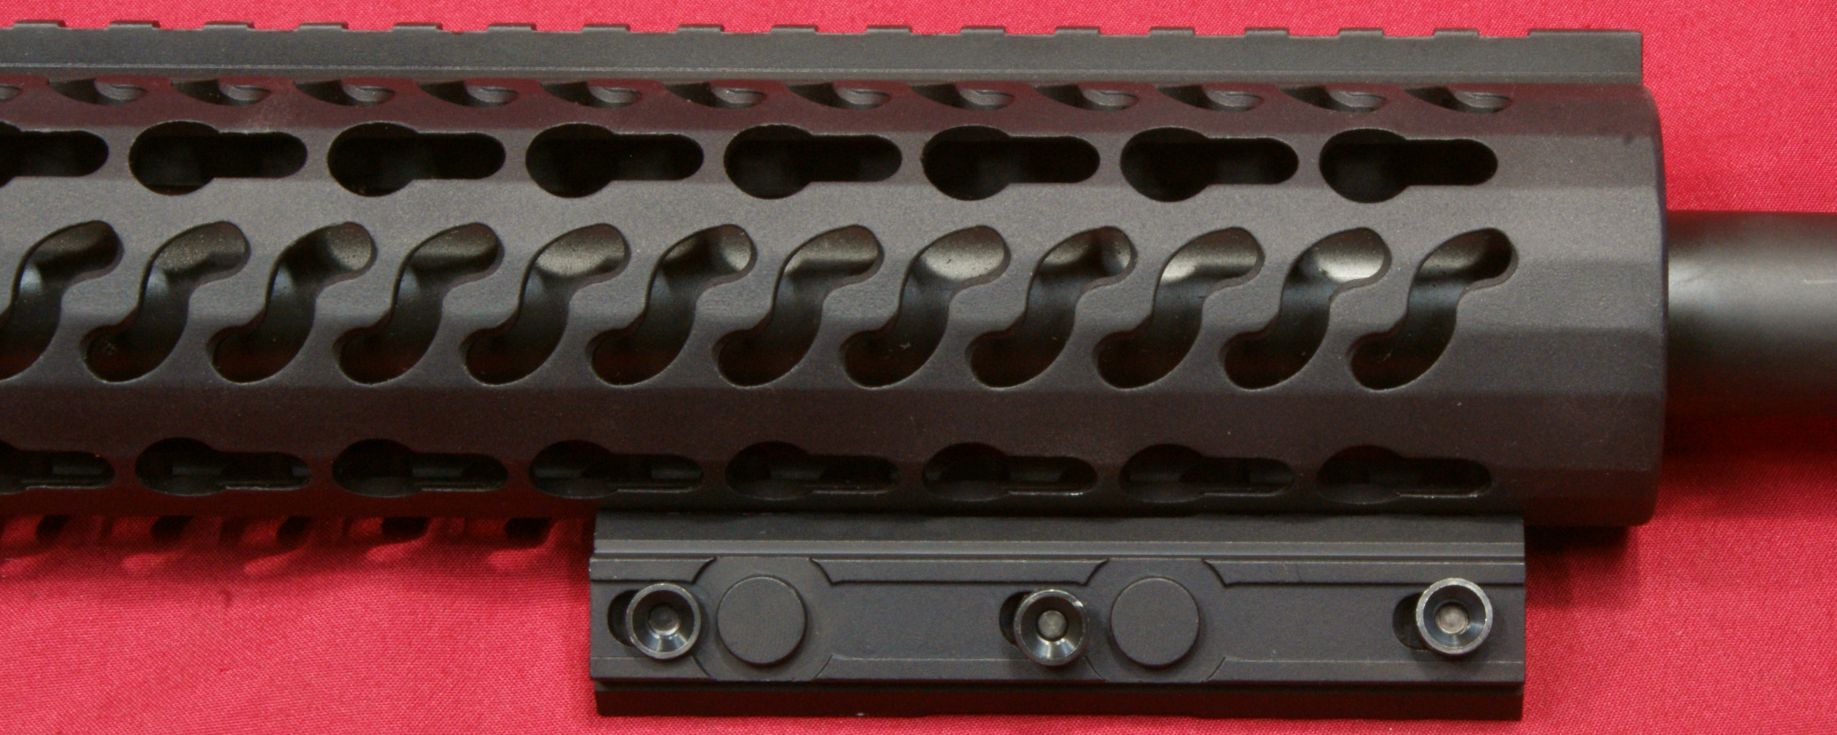
Once you understand the KeyMod system, it is actually very simple and does allow for an easy connection to a smooth handguard. Fortunately I was able to tighten the sling swivel stud so that it lined up perfectly with the axis of the rifle without the stud being too loose or tight.
Figure 25
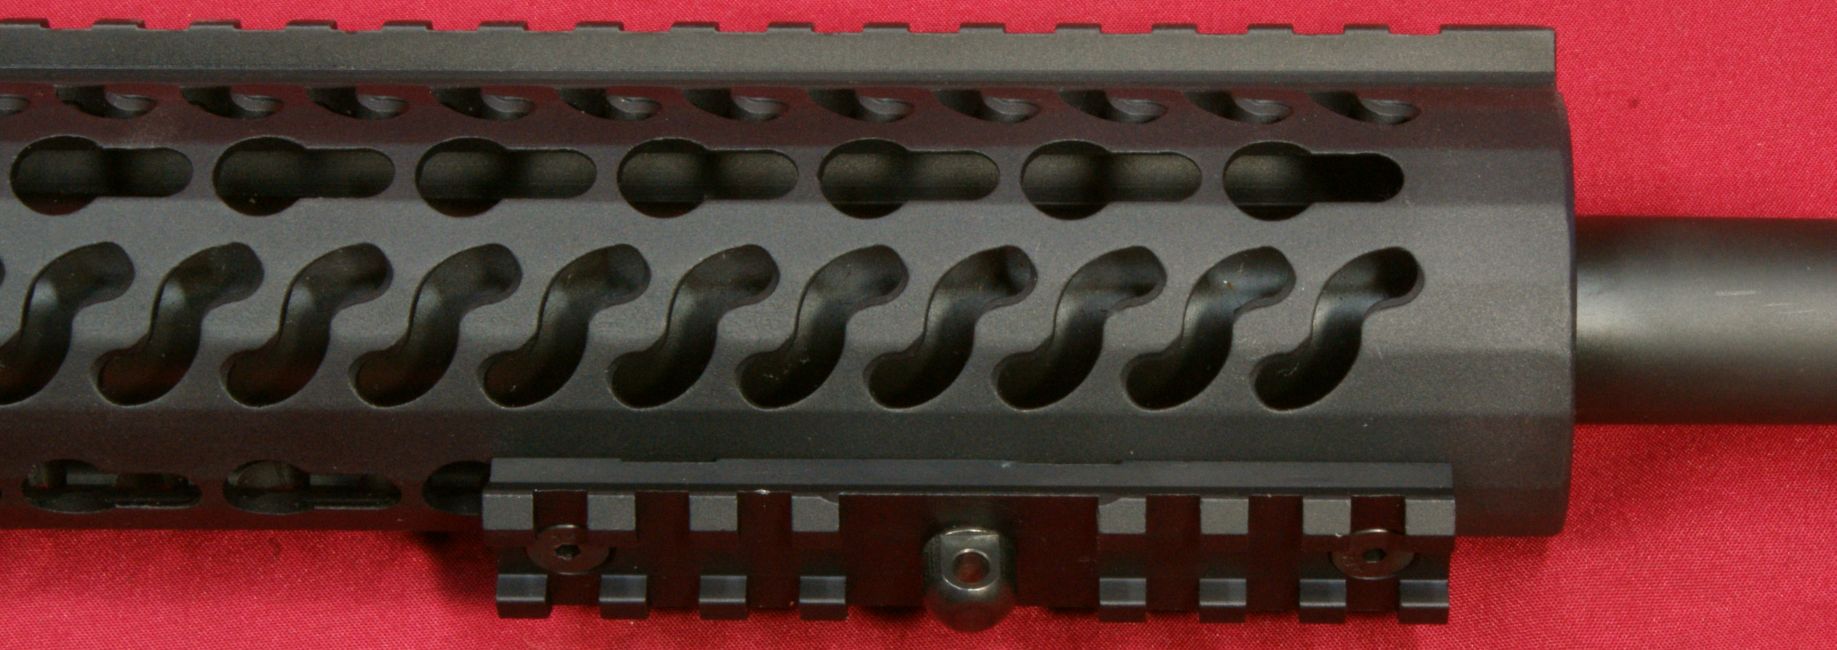
Once I had the rail and swivel stud installed, I was able to mount one of my Harris-style bipods. This particular bipod is a 6"-9" height bipod that I think is made by Shooter's Ridge. I purchased another Caldwell 6"-9" bipod that has a swivel head and plan to use this new one on this rifle.
Figure 26
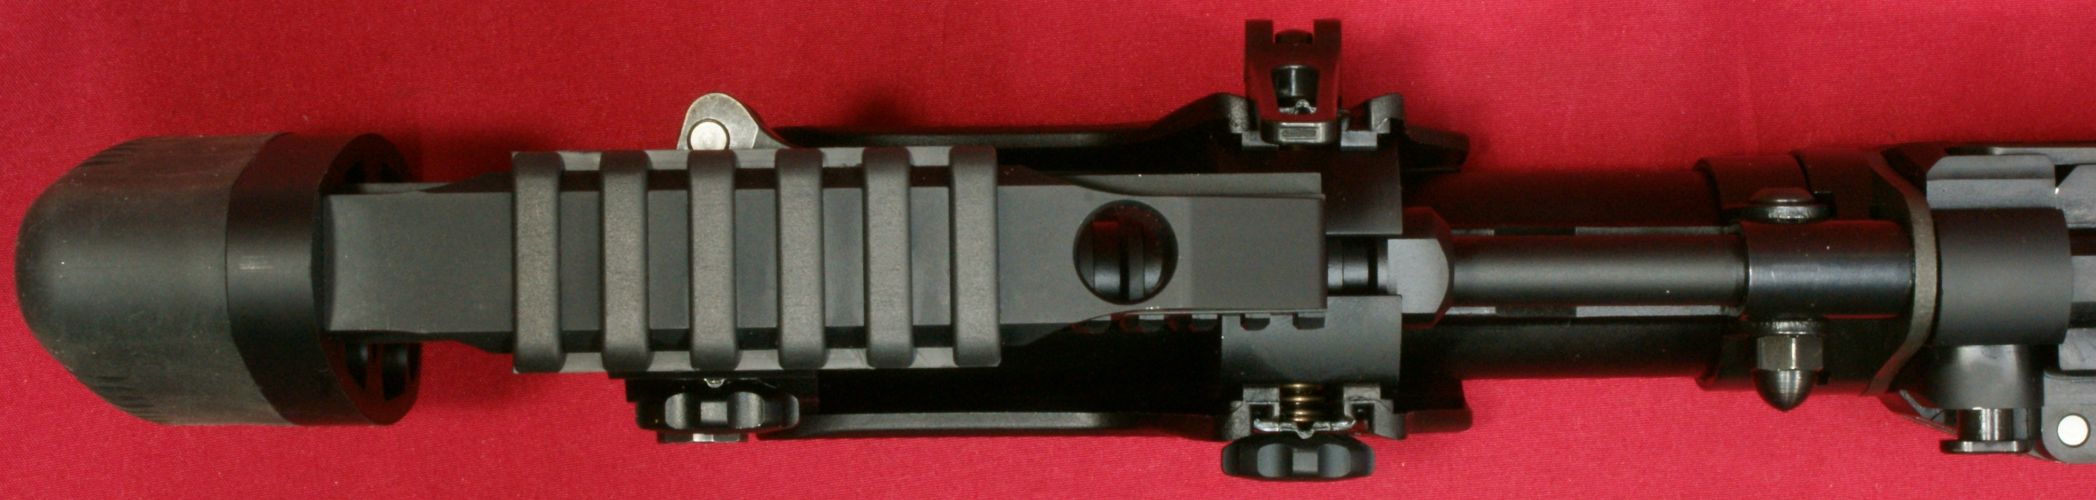
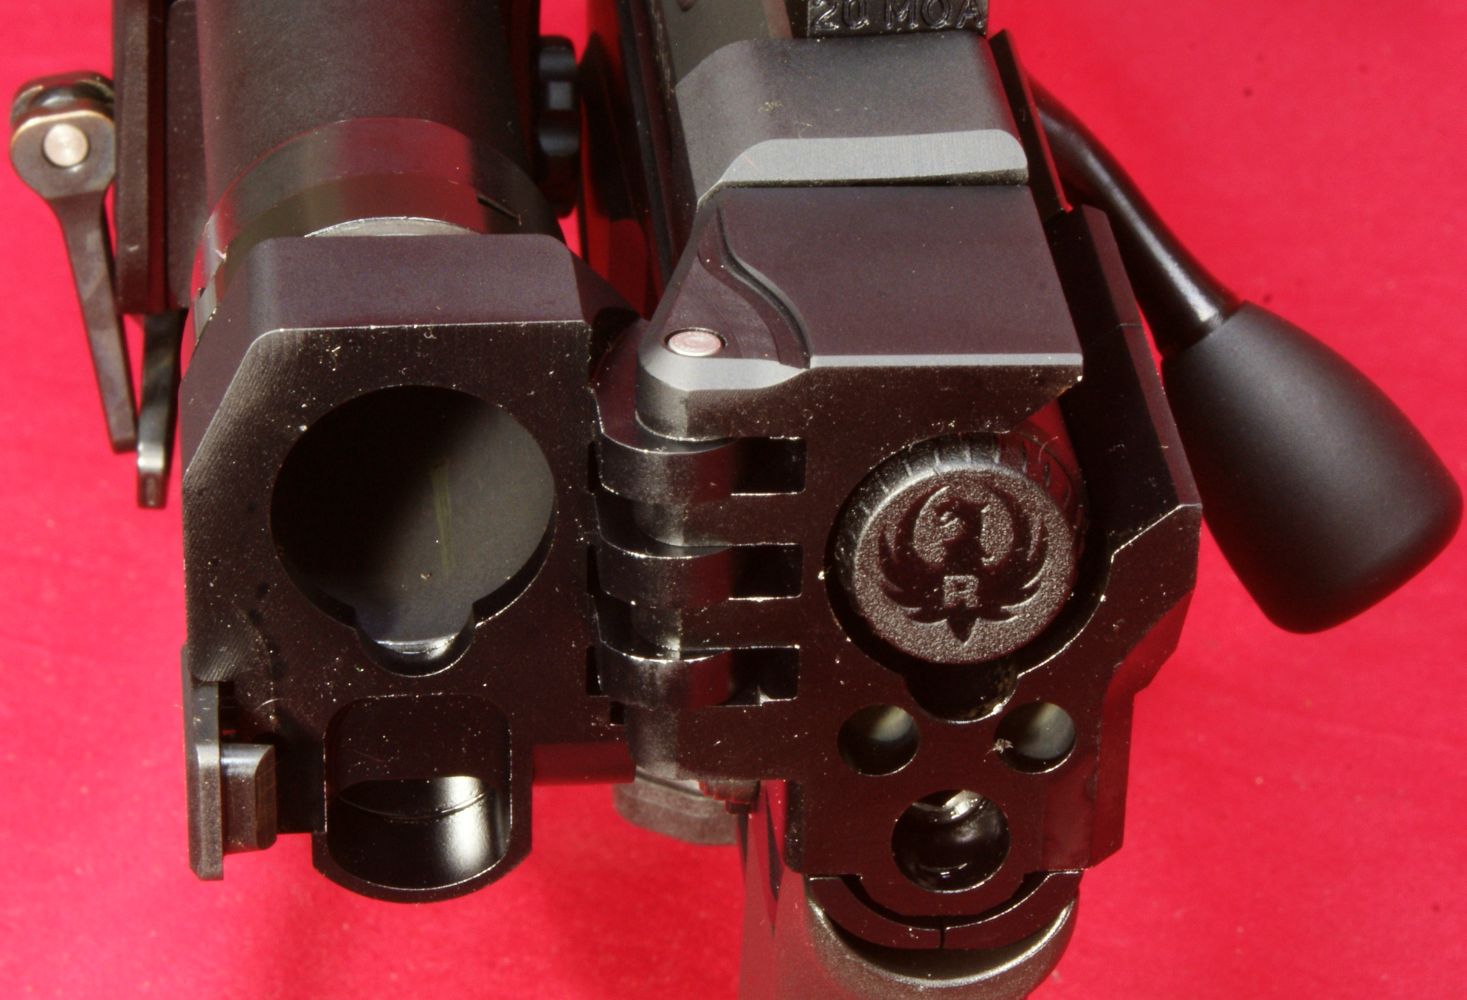
The top of the receiver comes with a pre-mounted aluminum 20 MOA 19-slot Picatinny rail. The rear of the rail has "20 MOA" machined into the surface.
Figure 27
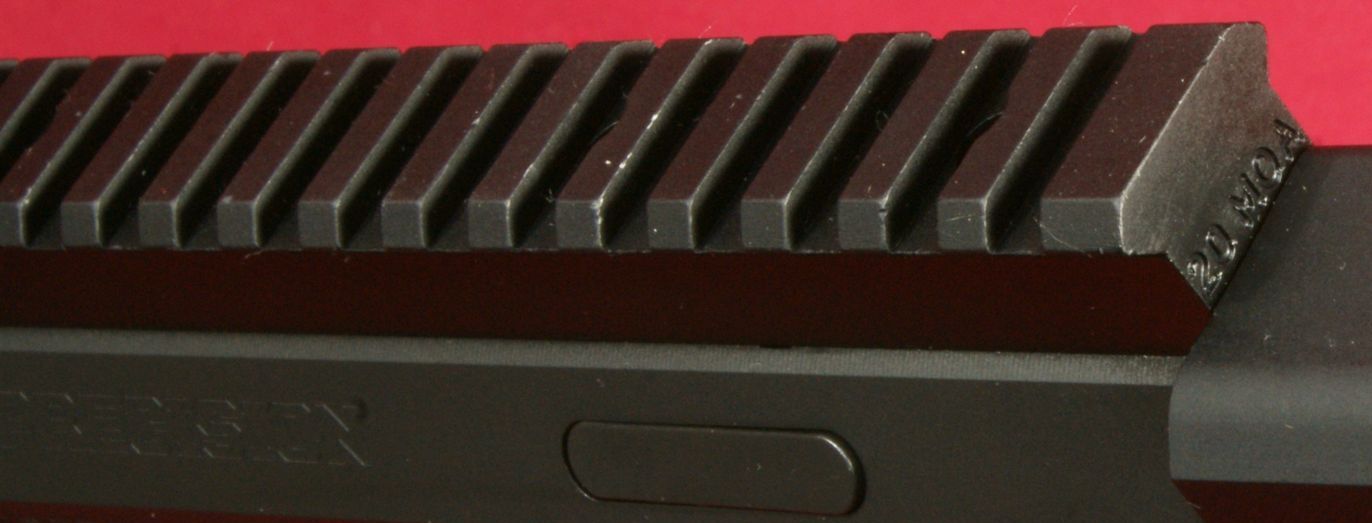
This rail is attached to the receiver with four #8-40 screws and I'm glad to see Ruger to go ahead and use these larger screws instead of the fairly standard #6-48. I checked torque and they all appeared to be torqued greater than 25 in-lbs each.
Figure 28
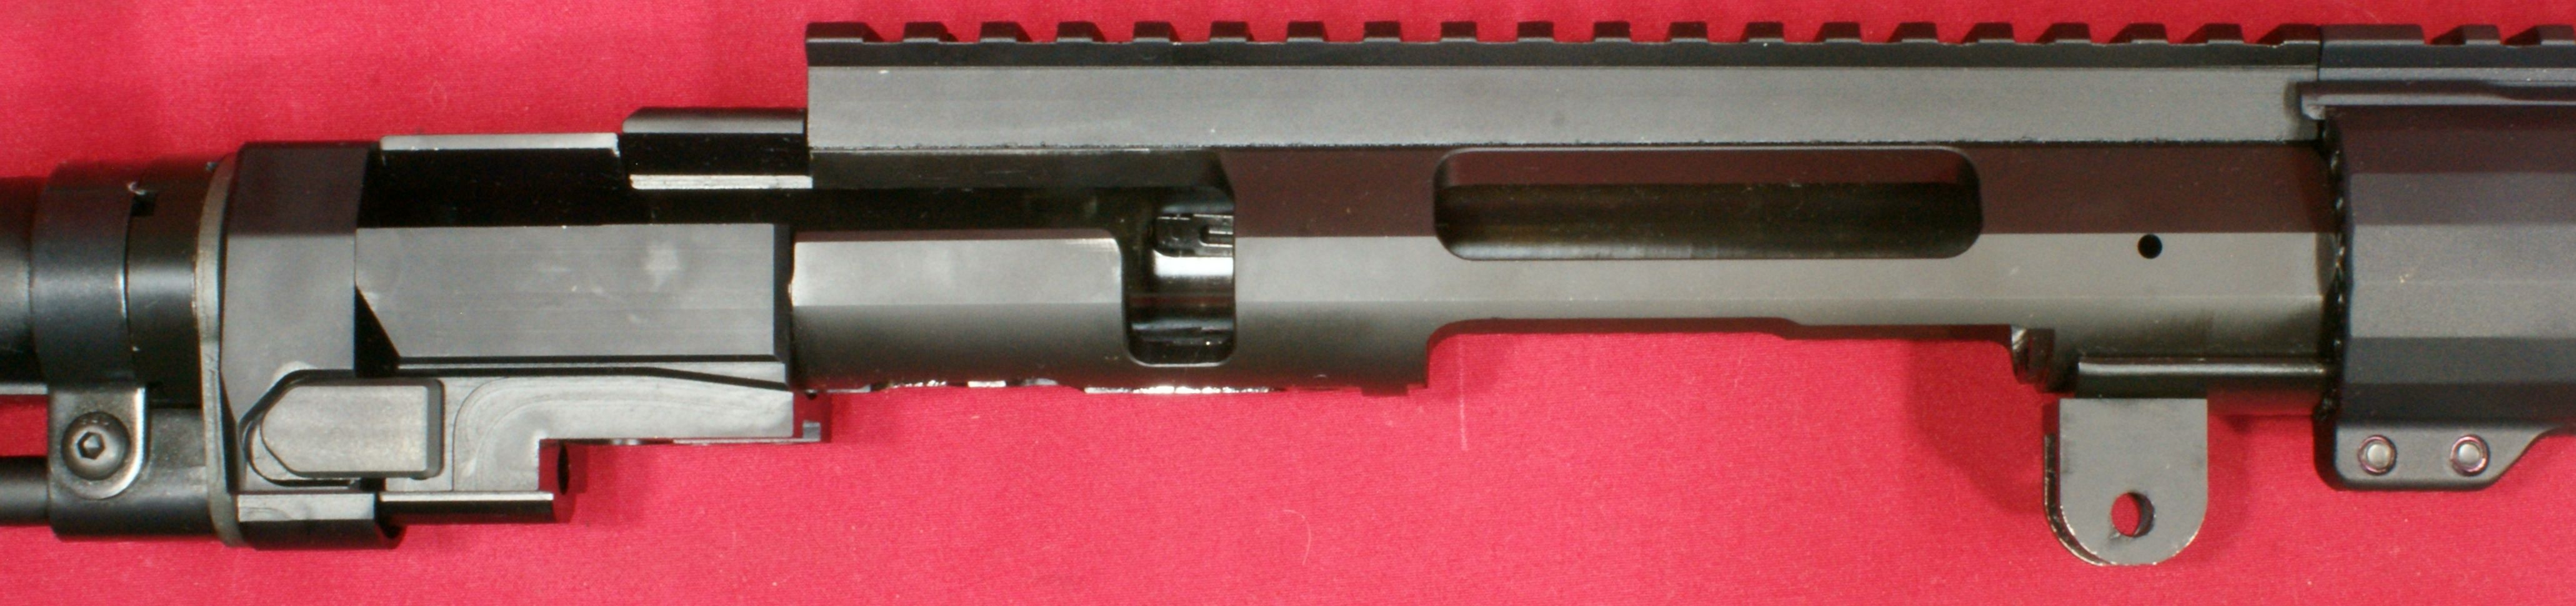
The receiver area is really where Ruger worked their magic to produce this rifle. Whoever came up with this design should be given a big bonus this year. Not only did they make an extremely functional upper and lower receiver system, they also made one that is extremely attractive and really shows off the Ruger logo. Ruger took the approach of having both an upper and lower receiver similar to that of an AR style rifle. The upper receiver is "precision CNC-machined from pre-hardened 4140 chrome-moly steel to minimize distortion." The lower receiver is actually an assembly of two halves and these "halves are precision machined from aerospace-grade 7075-T6 aluminum forging and are Type III hard coat anodized for maximum durability."
Figure 29
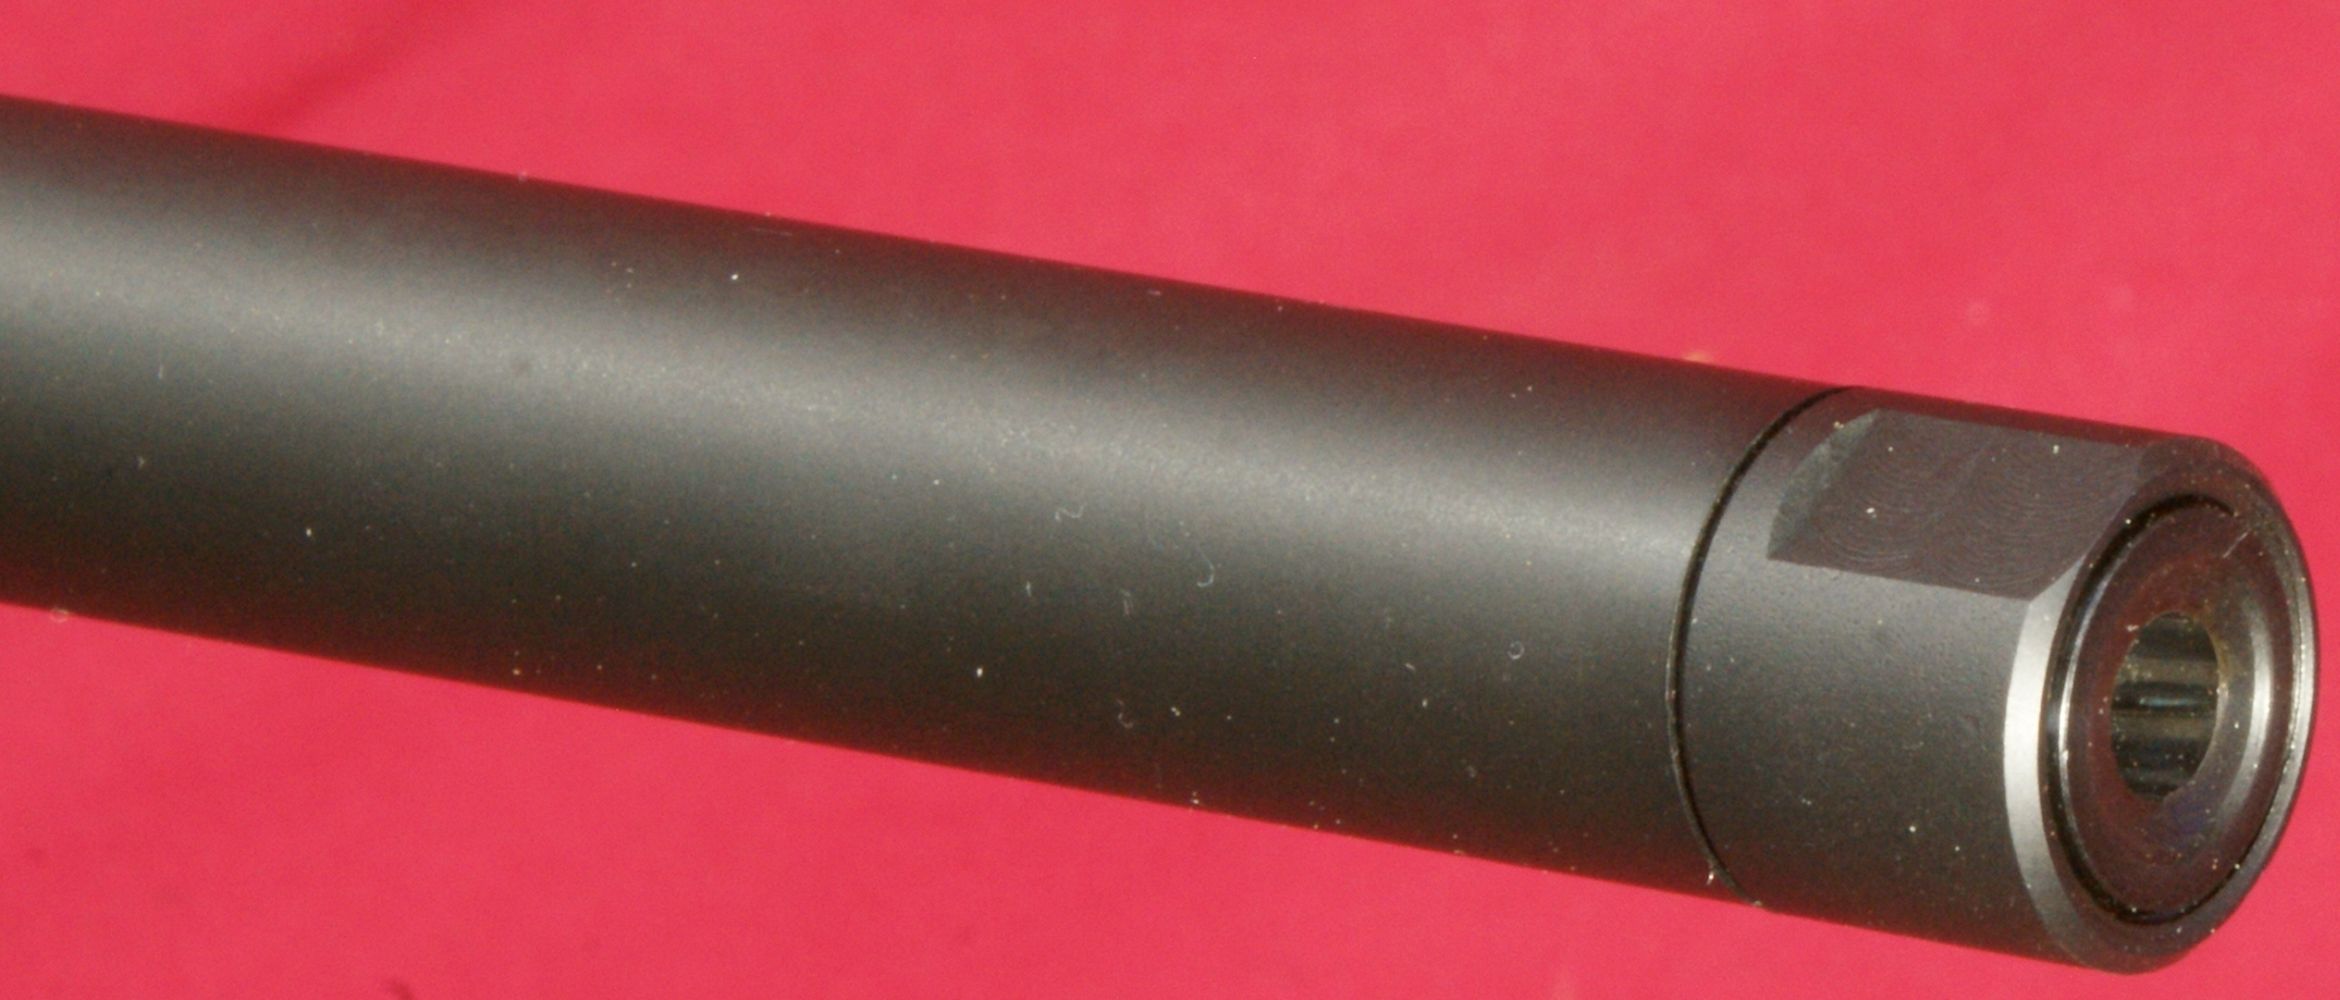
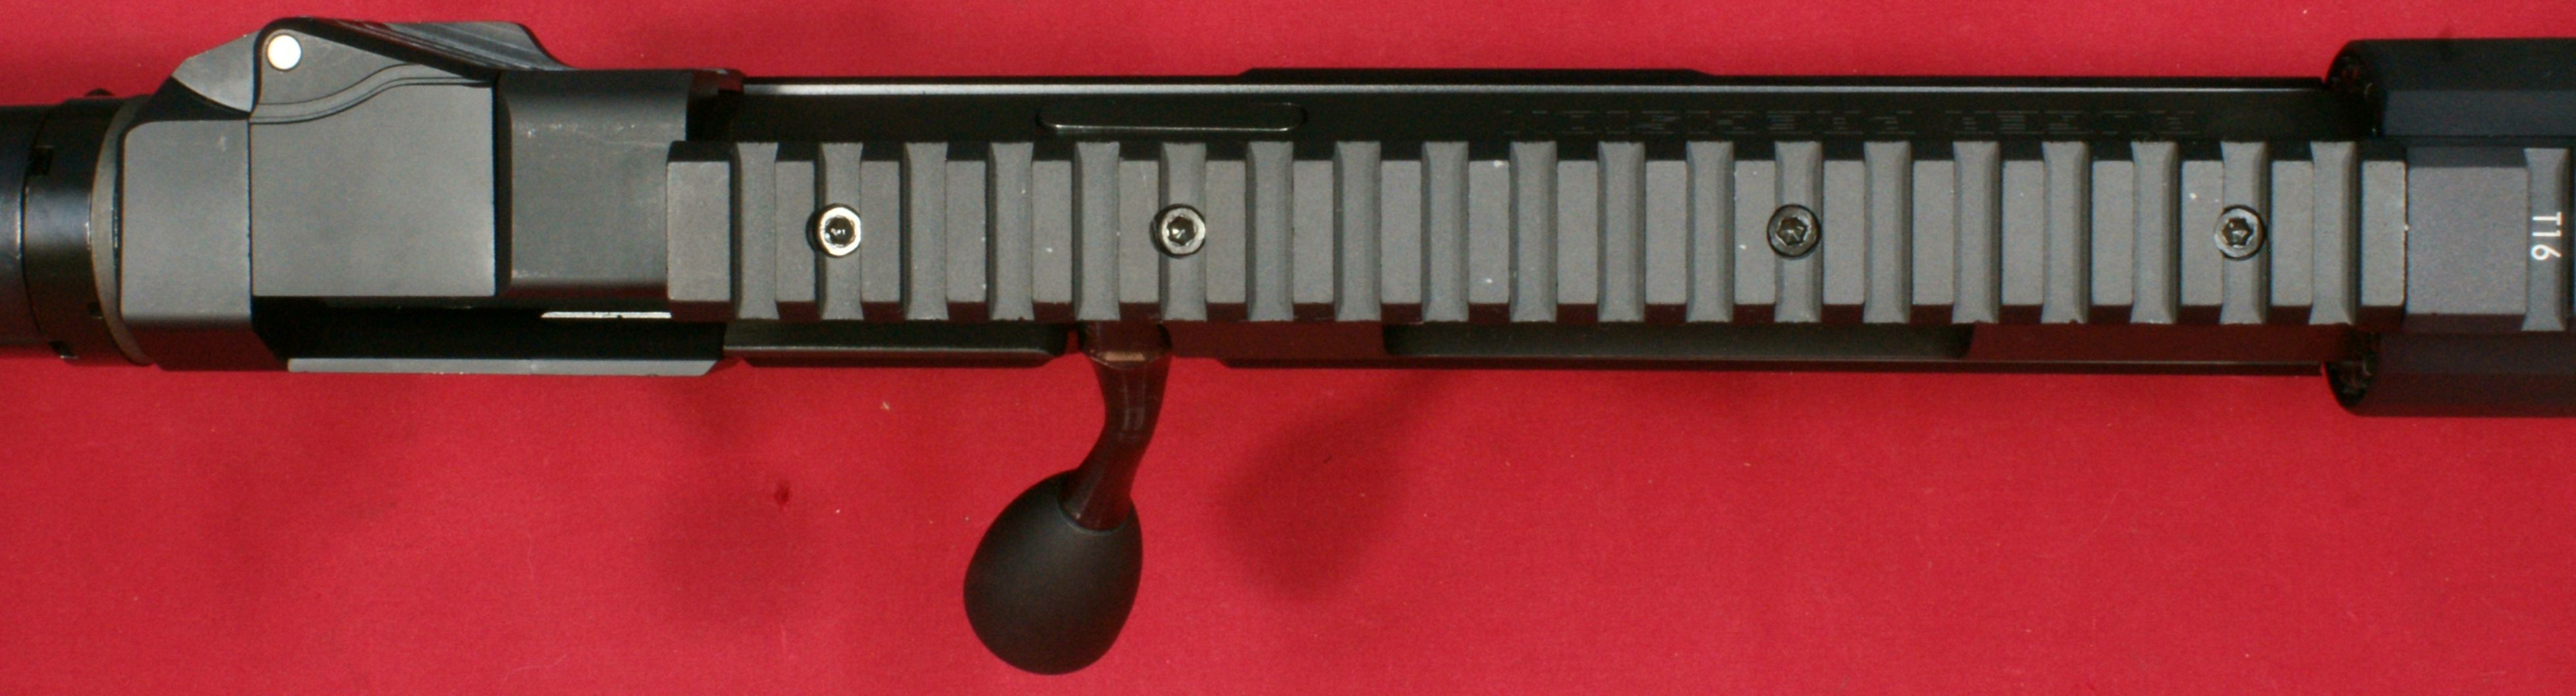
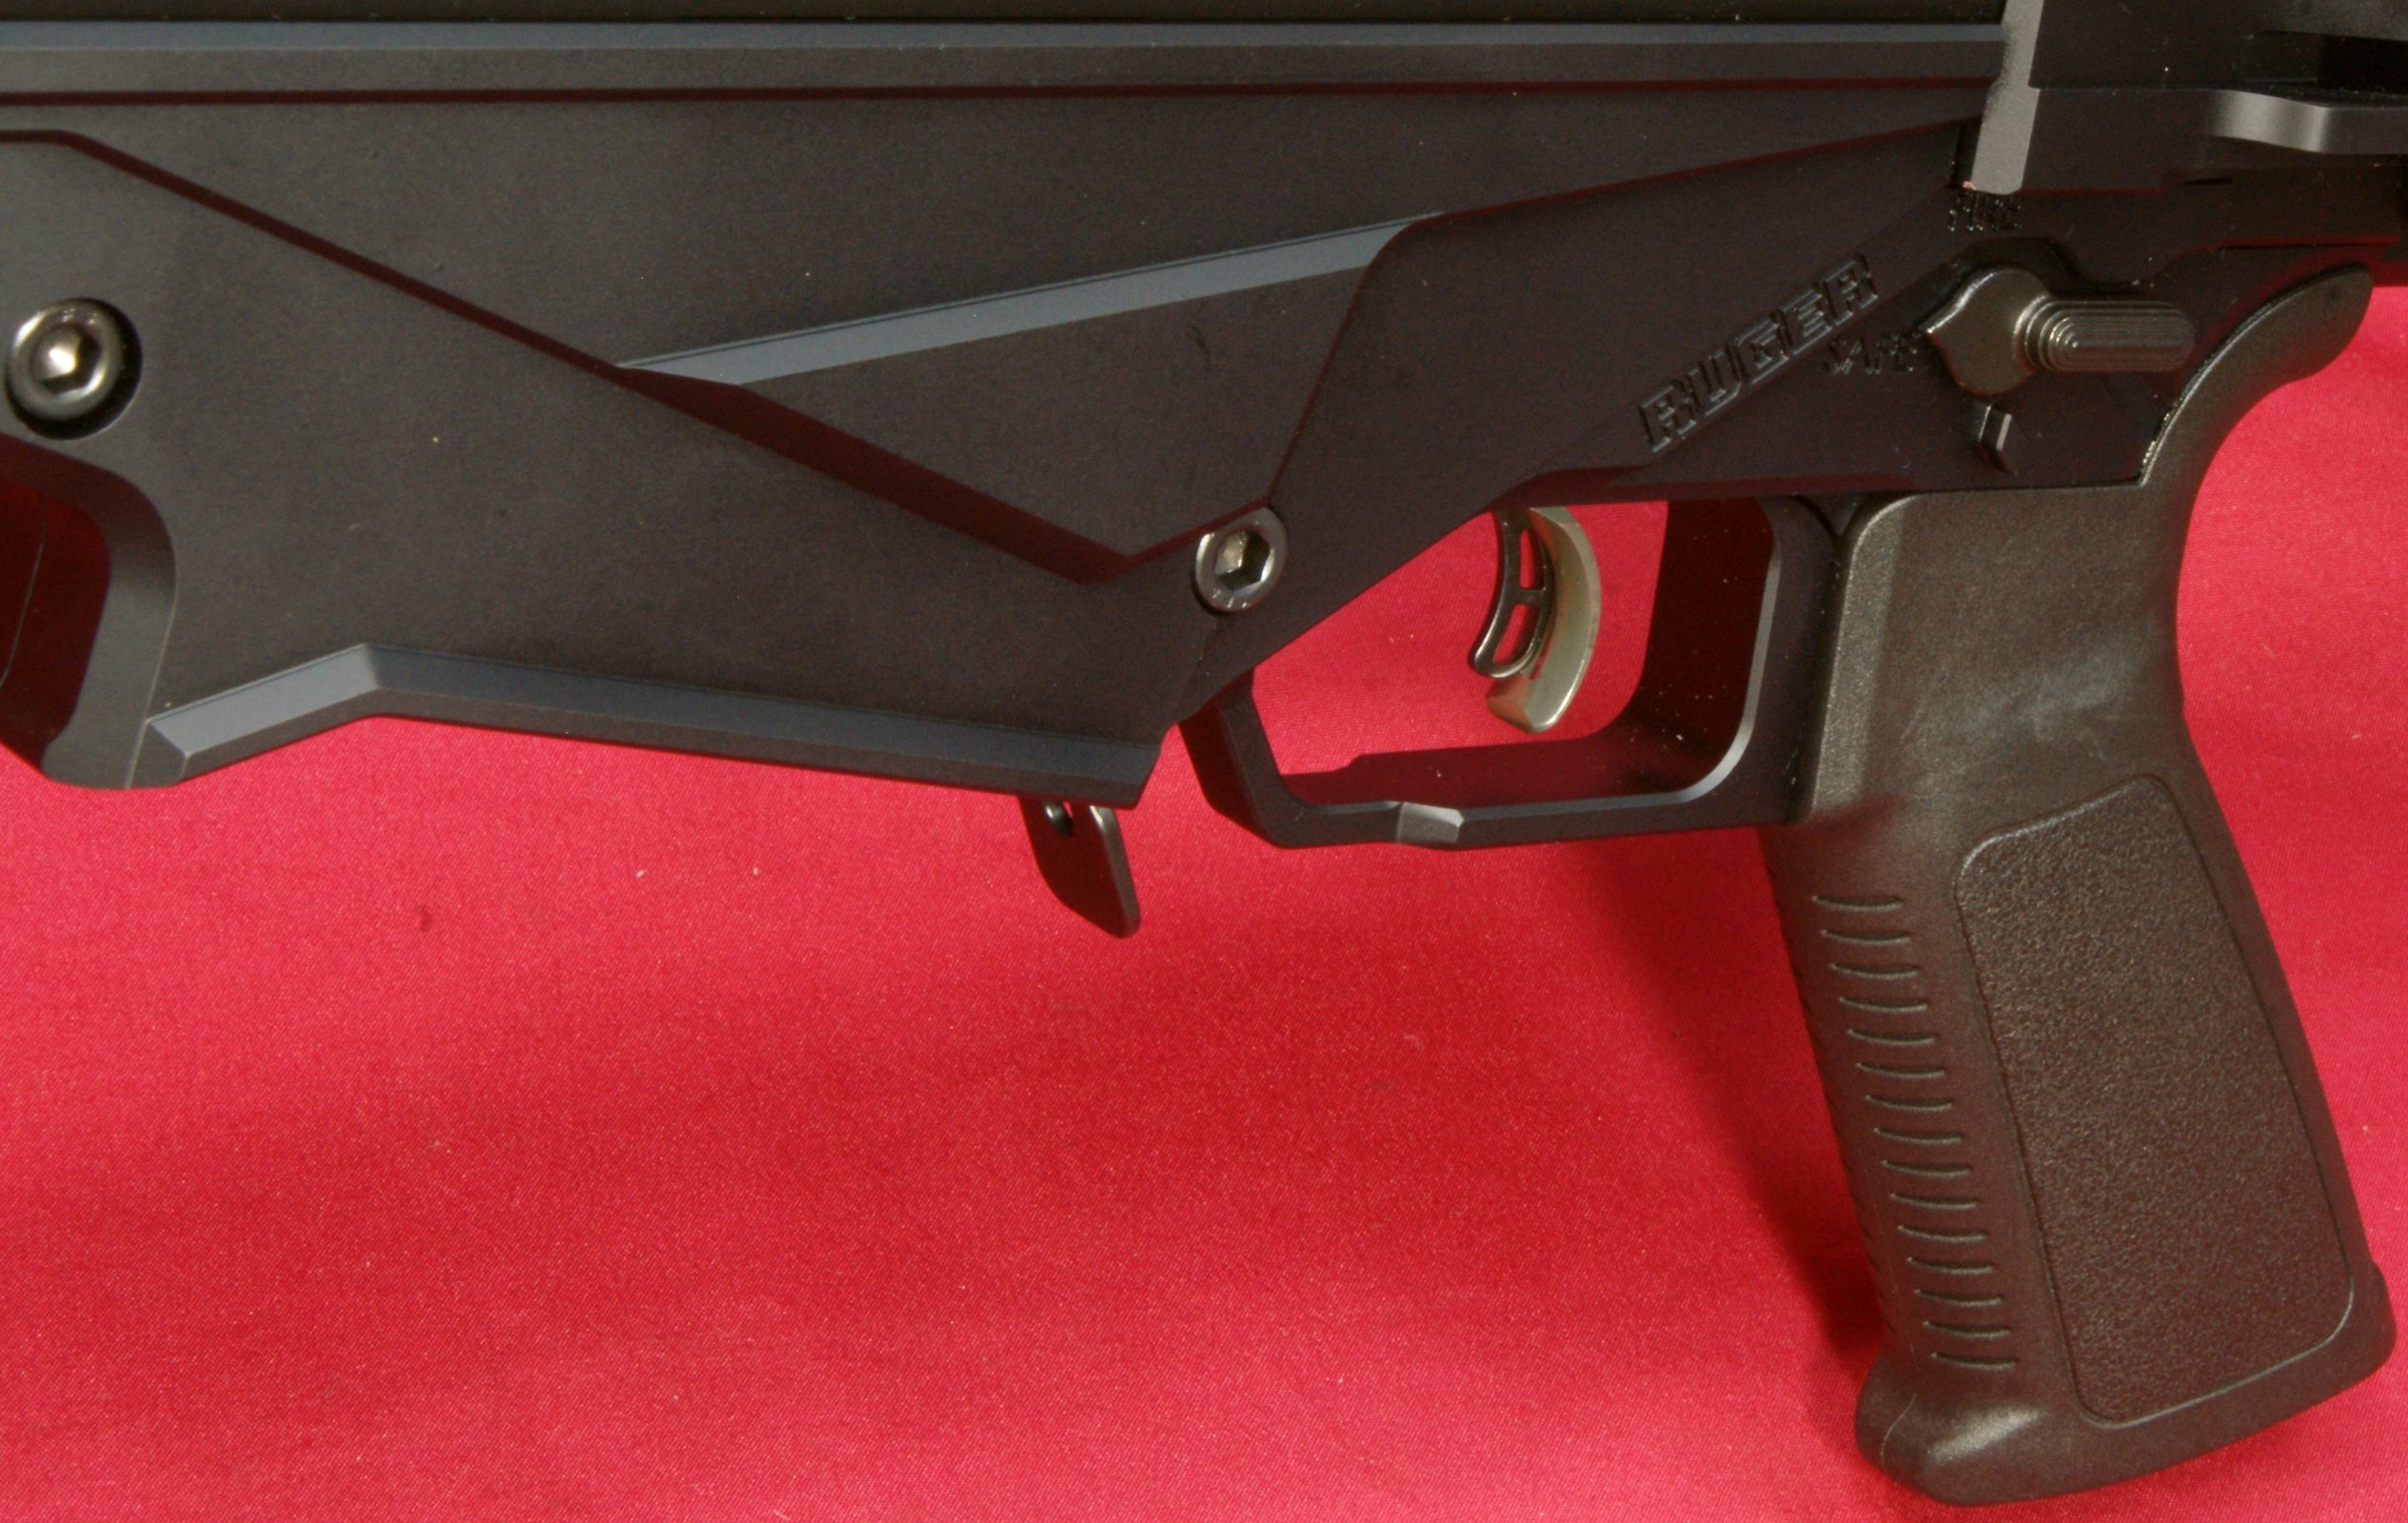
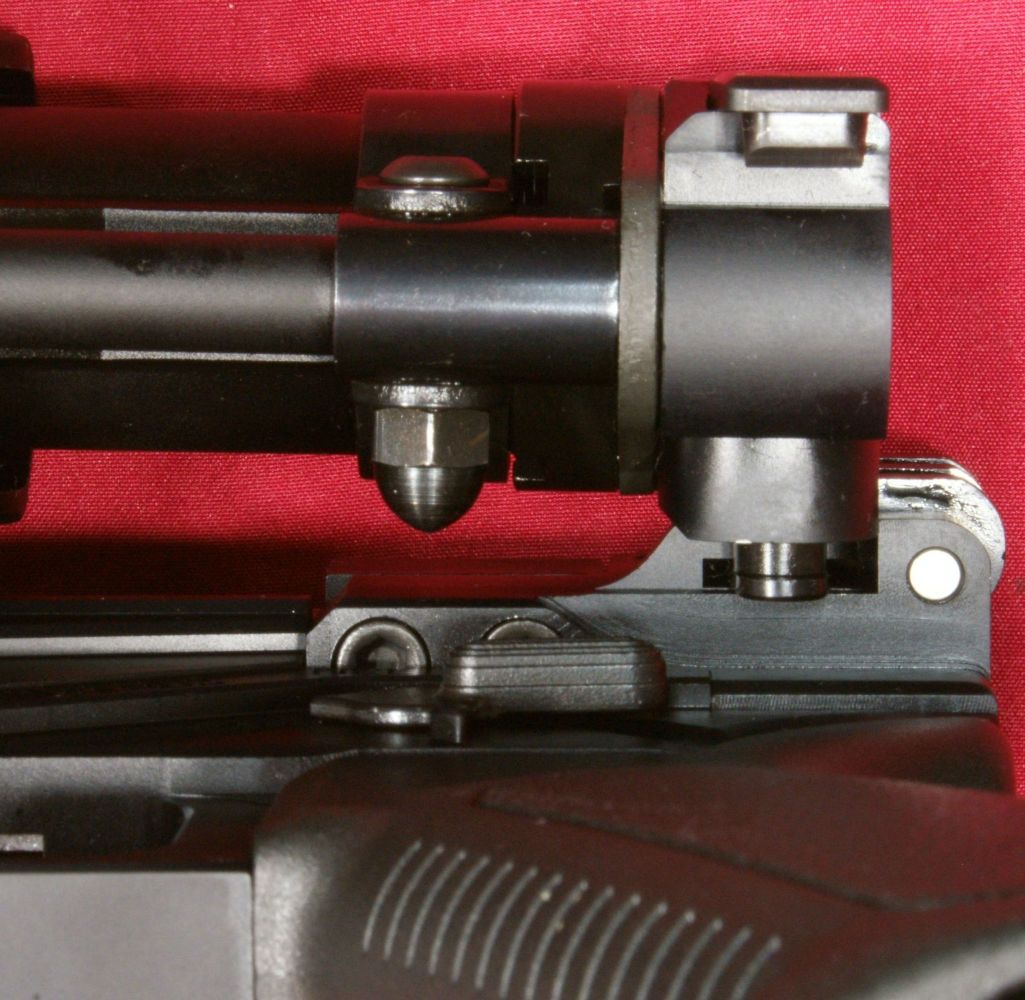
It is not fully apparent, but since the lower receiver is made from two halves, the trigger guard resides fully on one of the halves. You can see the line between the two halves forward of the magazine well. The oversized bolt handle includes an aluminum black anodized bolt knob that is replaceable if you prefer another style. The knob has an Allen wrench socket for removal and the handle has 5/16"-24 threads.
Figure 30
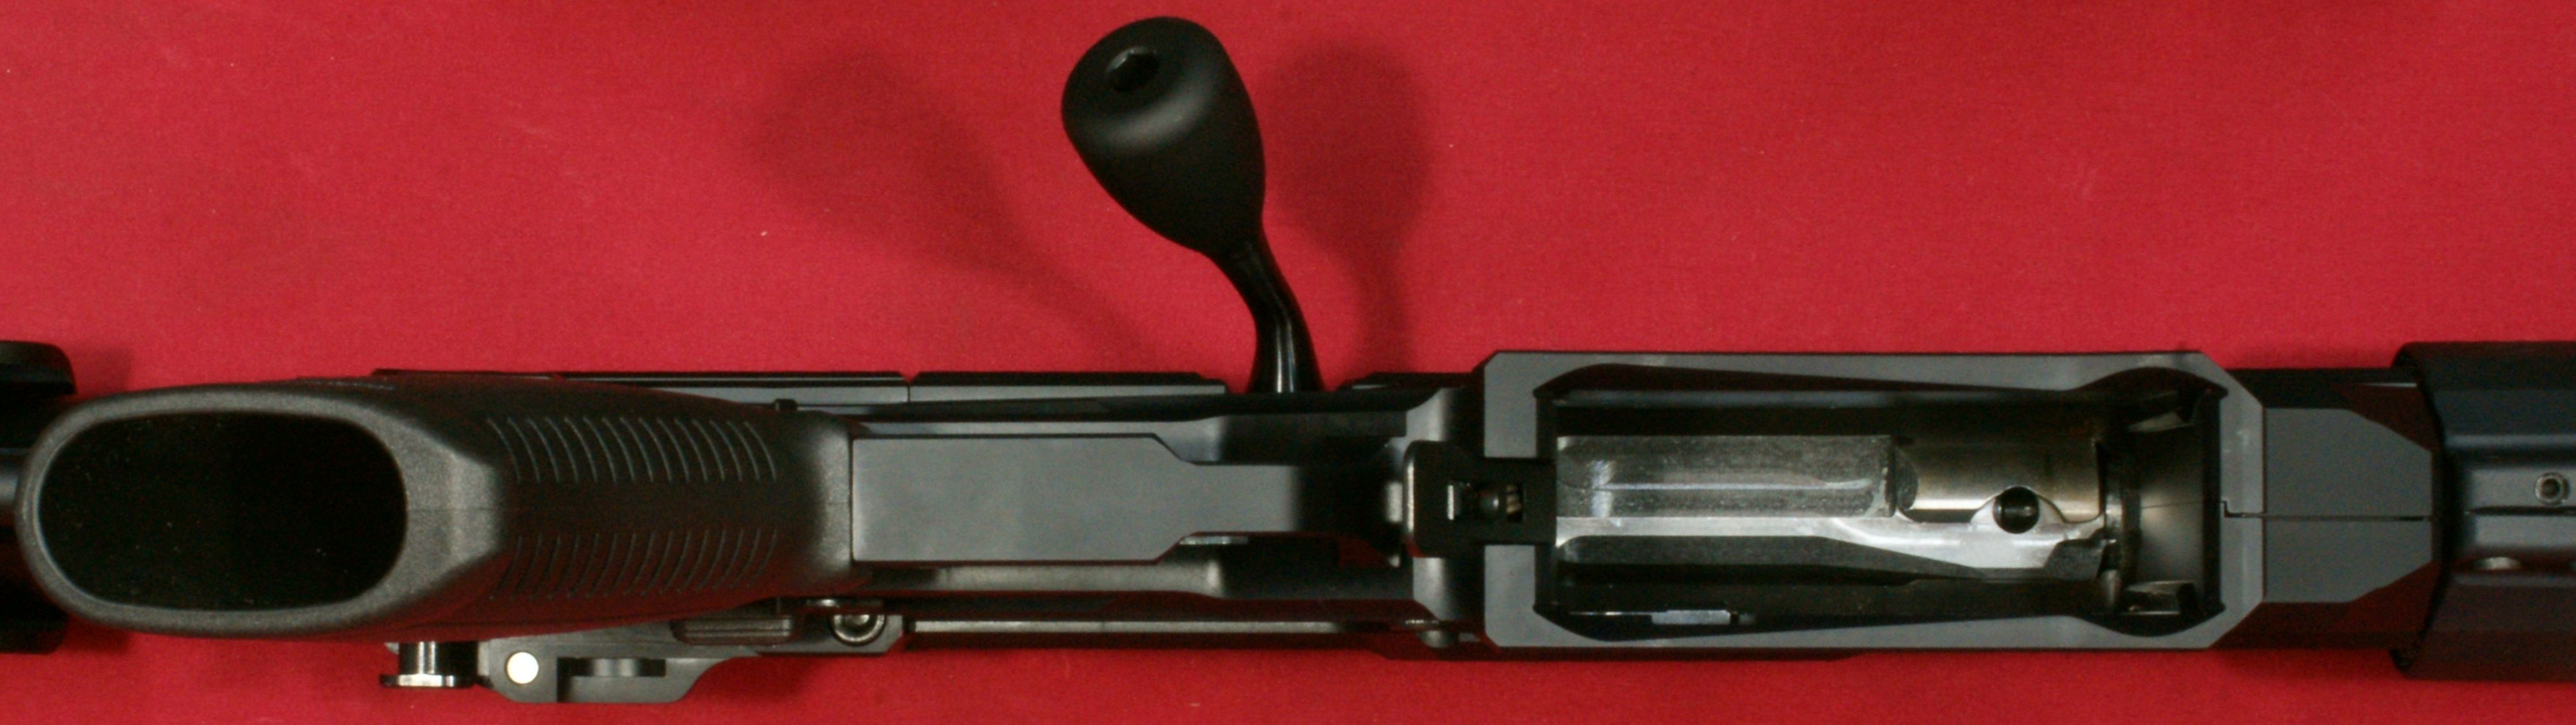
The bolt has a 70° throw and the rear of the bolt passes back into the buffer tube similar to that of an AR style bolt. Although the bolt has a stainless steel appearance, Ruger states that the "one-piece bolt is precision CNC-machined from pre-hardened 4140 chrome-moly steel." The addition of chromium in 4140 steel does provide some improved corrosion resistance, yet it does not provide the same level of corrosion resistance as stainless steel. Bottom line... keep a light film of surface protectant on the bolt to keep it looking good and corrosion free.
Figure 31
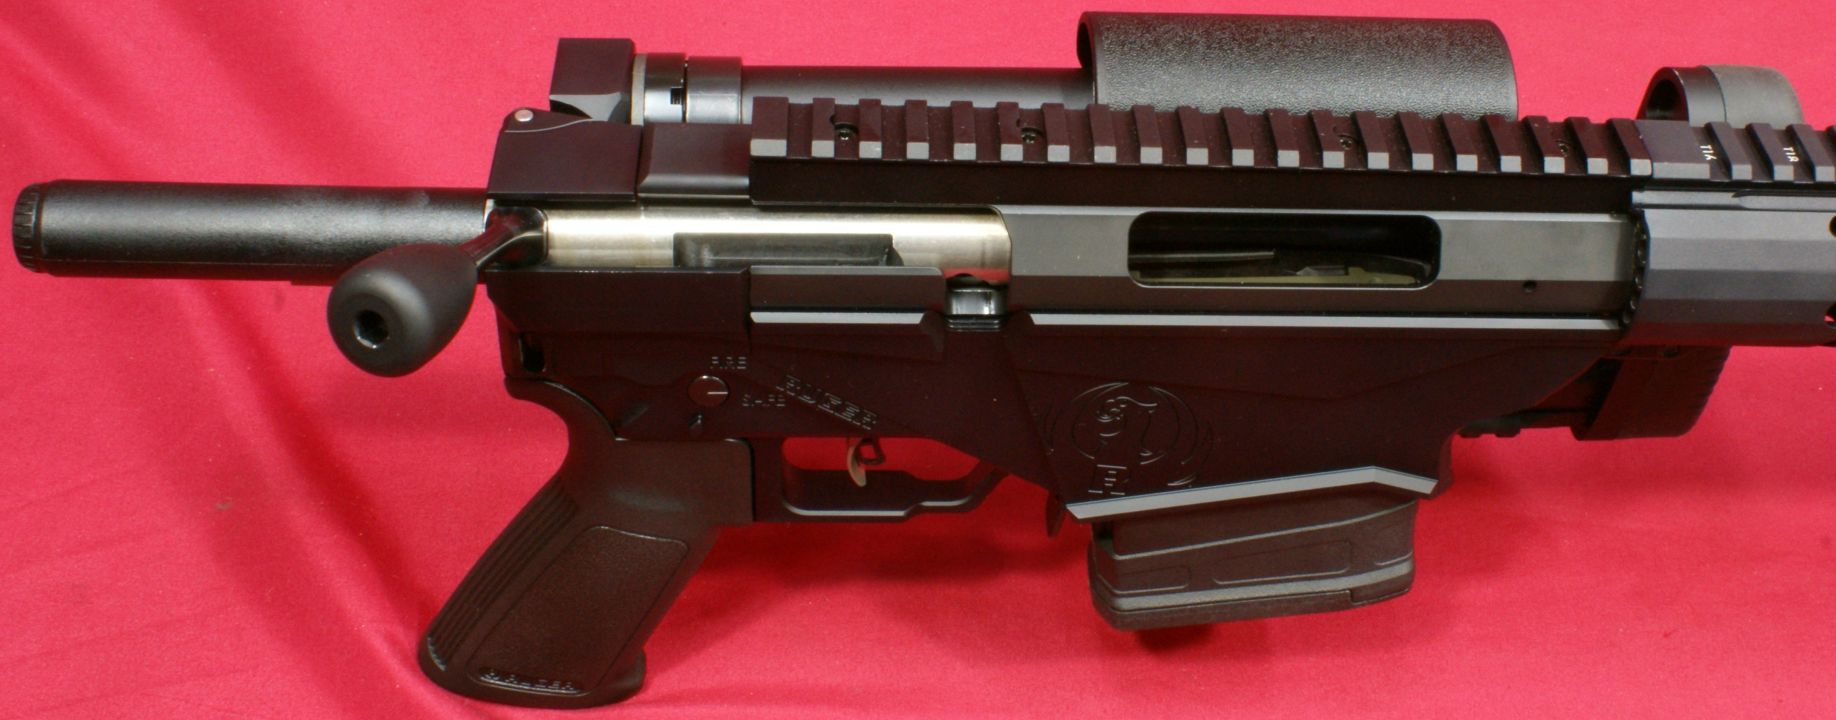
In this next photo I have removed the lower receiver so you can understand what Ruger means by when they advertise that the "Inline recoil path manages recoil directly from he rear of the receiver to the buttstock, not through a traditional bedding system, providing maximum accuracy potential." Since the buffer tube is mounted rigidly inline with the receiver, the recoil forces will act directly down the tube and be transferred into the buttstock at a height similar to that for any AR styled rifle. The rigid connection of the upper receiver to the hinge system prevents the need for bedding. Also, Ruger seems to have done an excellent job with making sure the hinge is extremely rigid when closed and there is no freeplay in the hinge.
Figure 32
Since the Ruger Precision rifle has a geometry similar to that of an AR styled rifle, I required high height rings (1.5" from top of rail to scope centerline axis) to mount my scope at a height that was comfortable to shoot and to allow clearance for a 50mm objective lens and lens cap. I plan to discuss this further in Part 5.
Figure 33

The left side of the lower receiver has a similar geometric styling as the right which gives the rifle an attractive and interesting look. The upper receiver has "RUGER PRECISION" and "NEWPORT · NH · USA" engraved using block lettering along with the serial number using normal letting. The upper receiver also has a bolt stop just like you would expect on a bolt action rifle. Ruger also states that the "Magazine well front is contoured for a positive grip for bracing against shooting supports." I would agree, but don't feel this is critical for my application. I will say that this detail adds to the attractive look of the rifle.
Figure 34
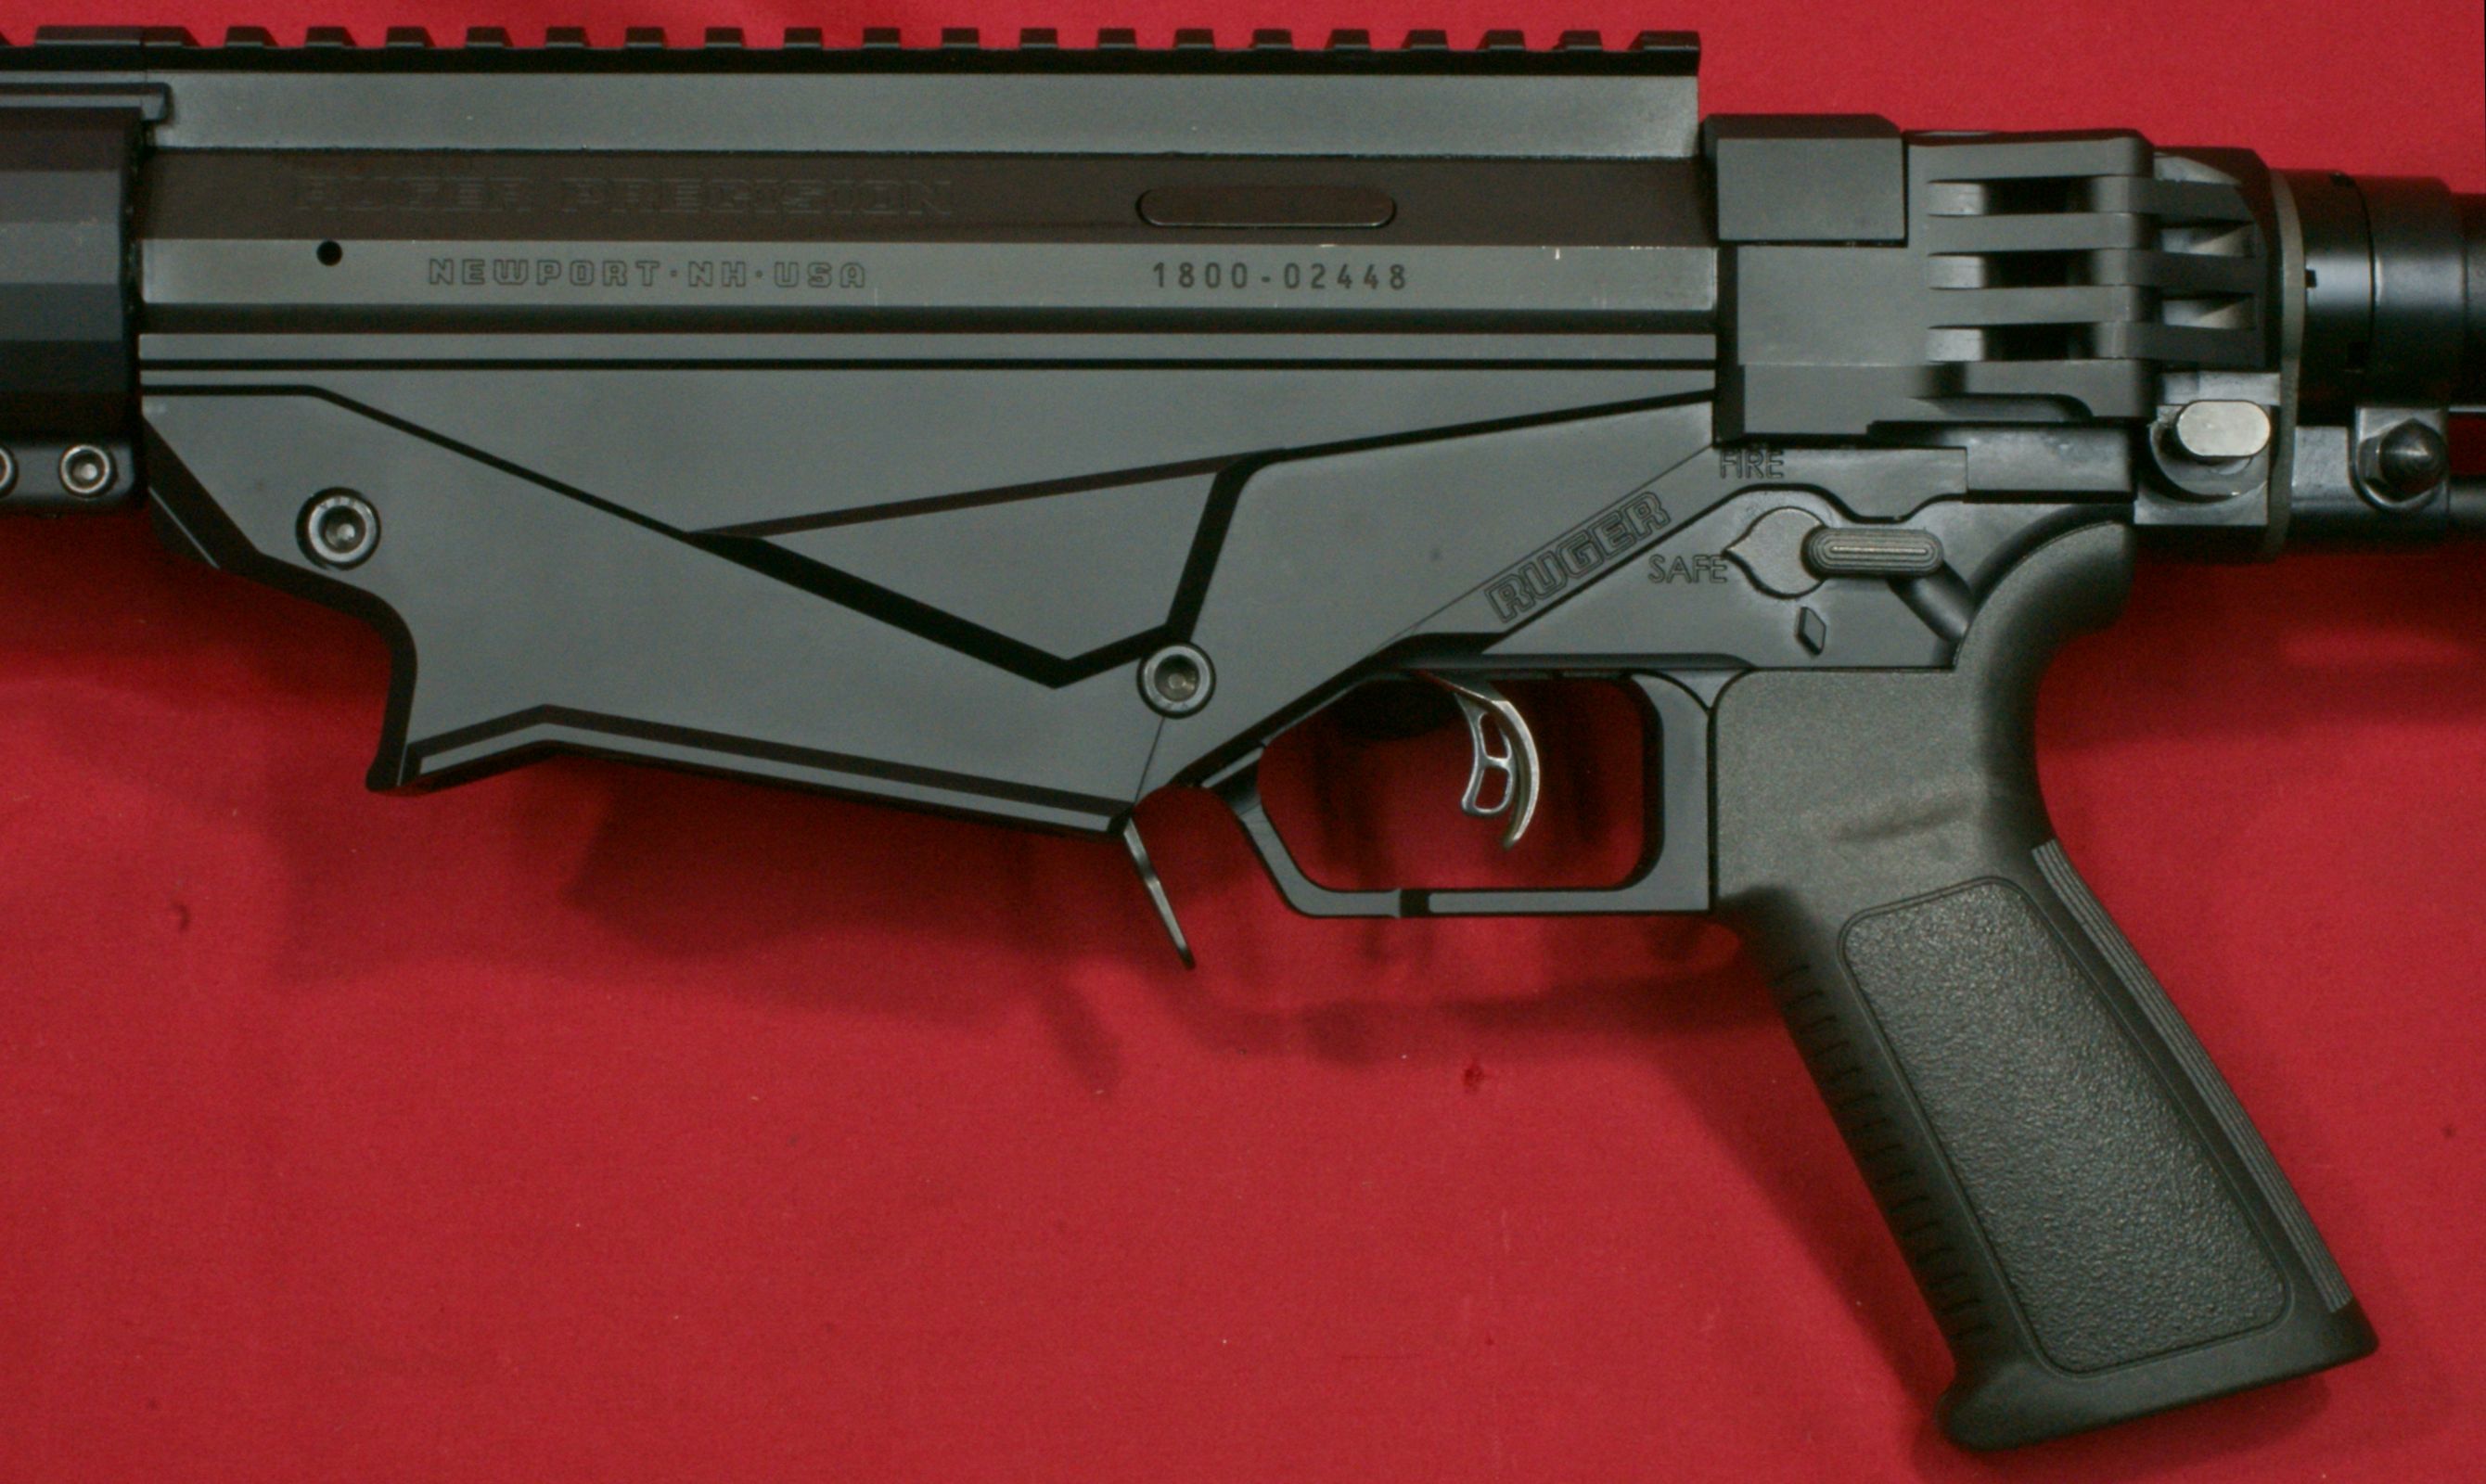
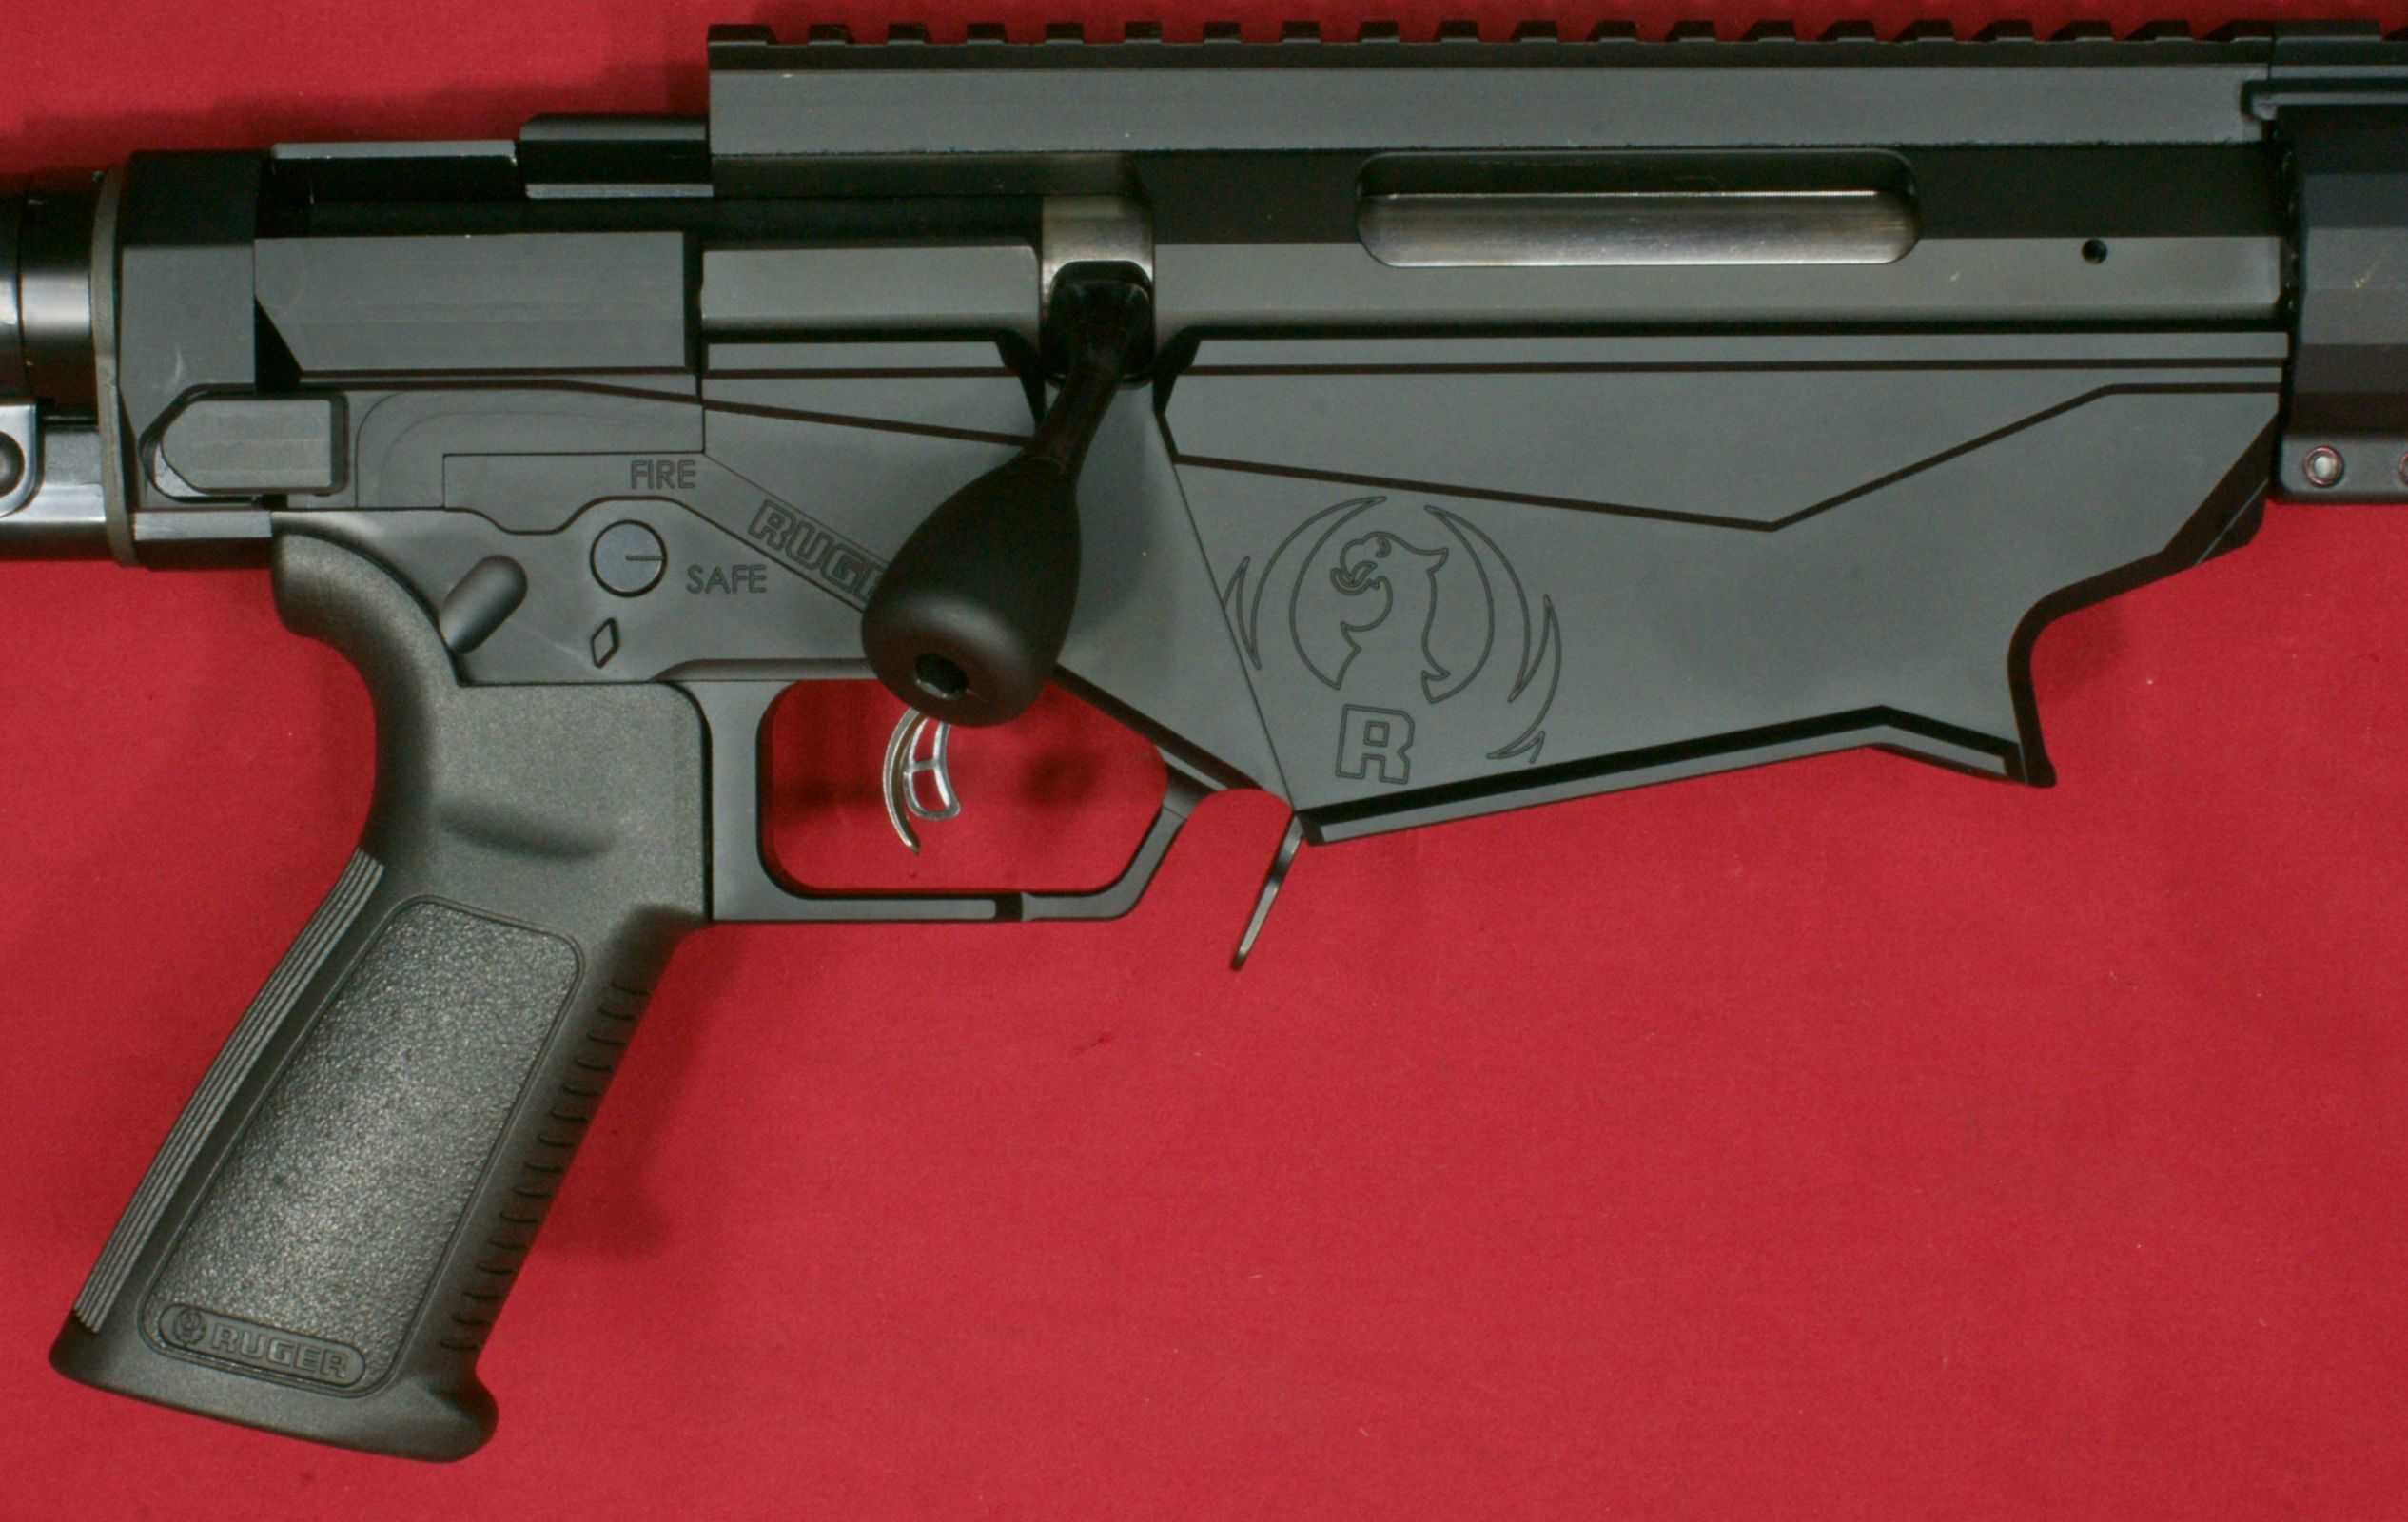
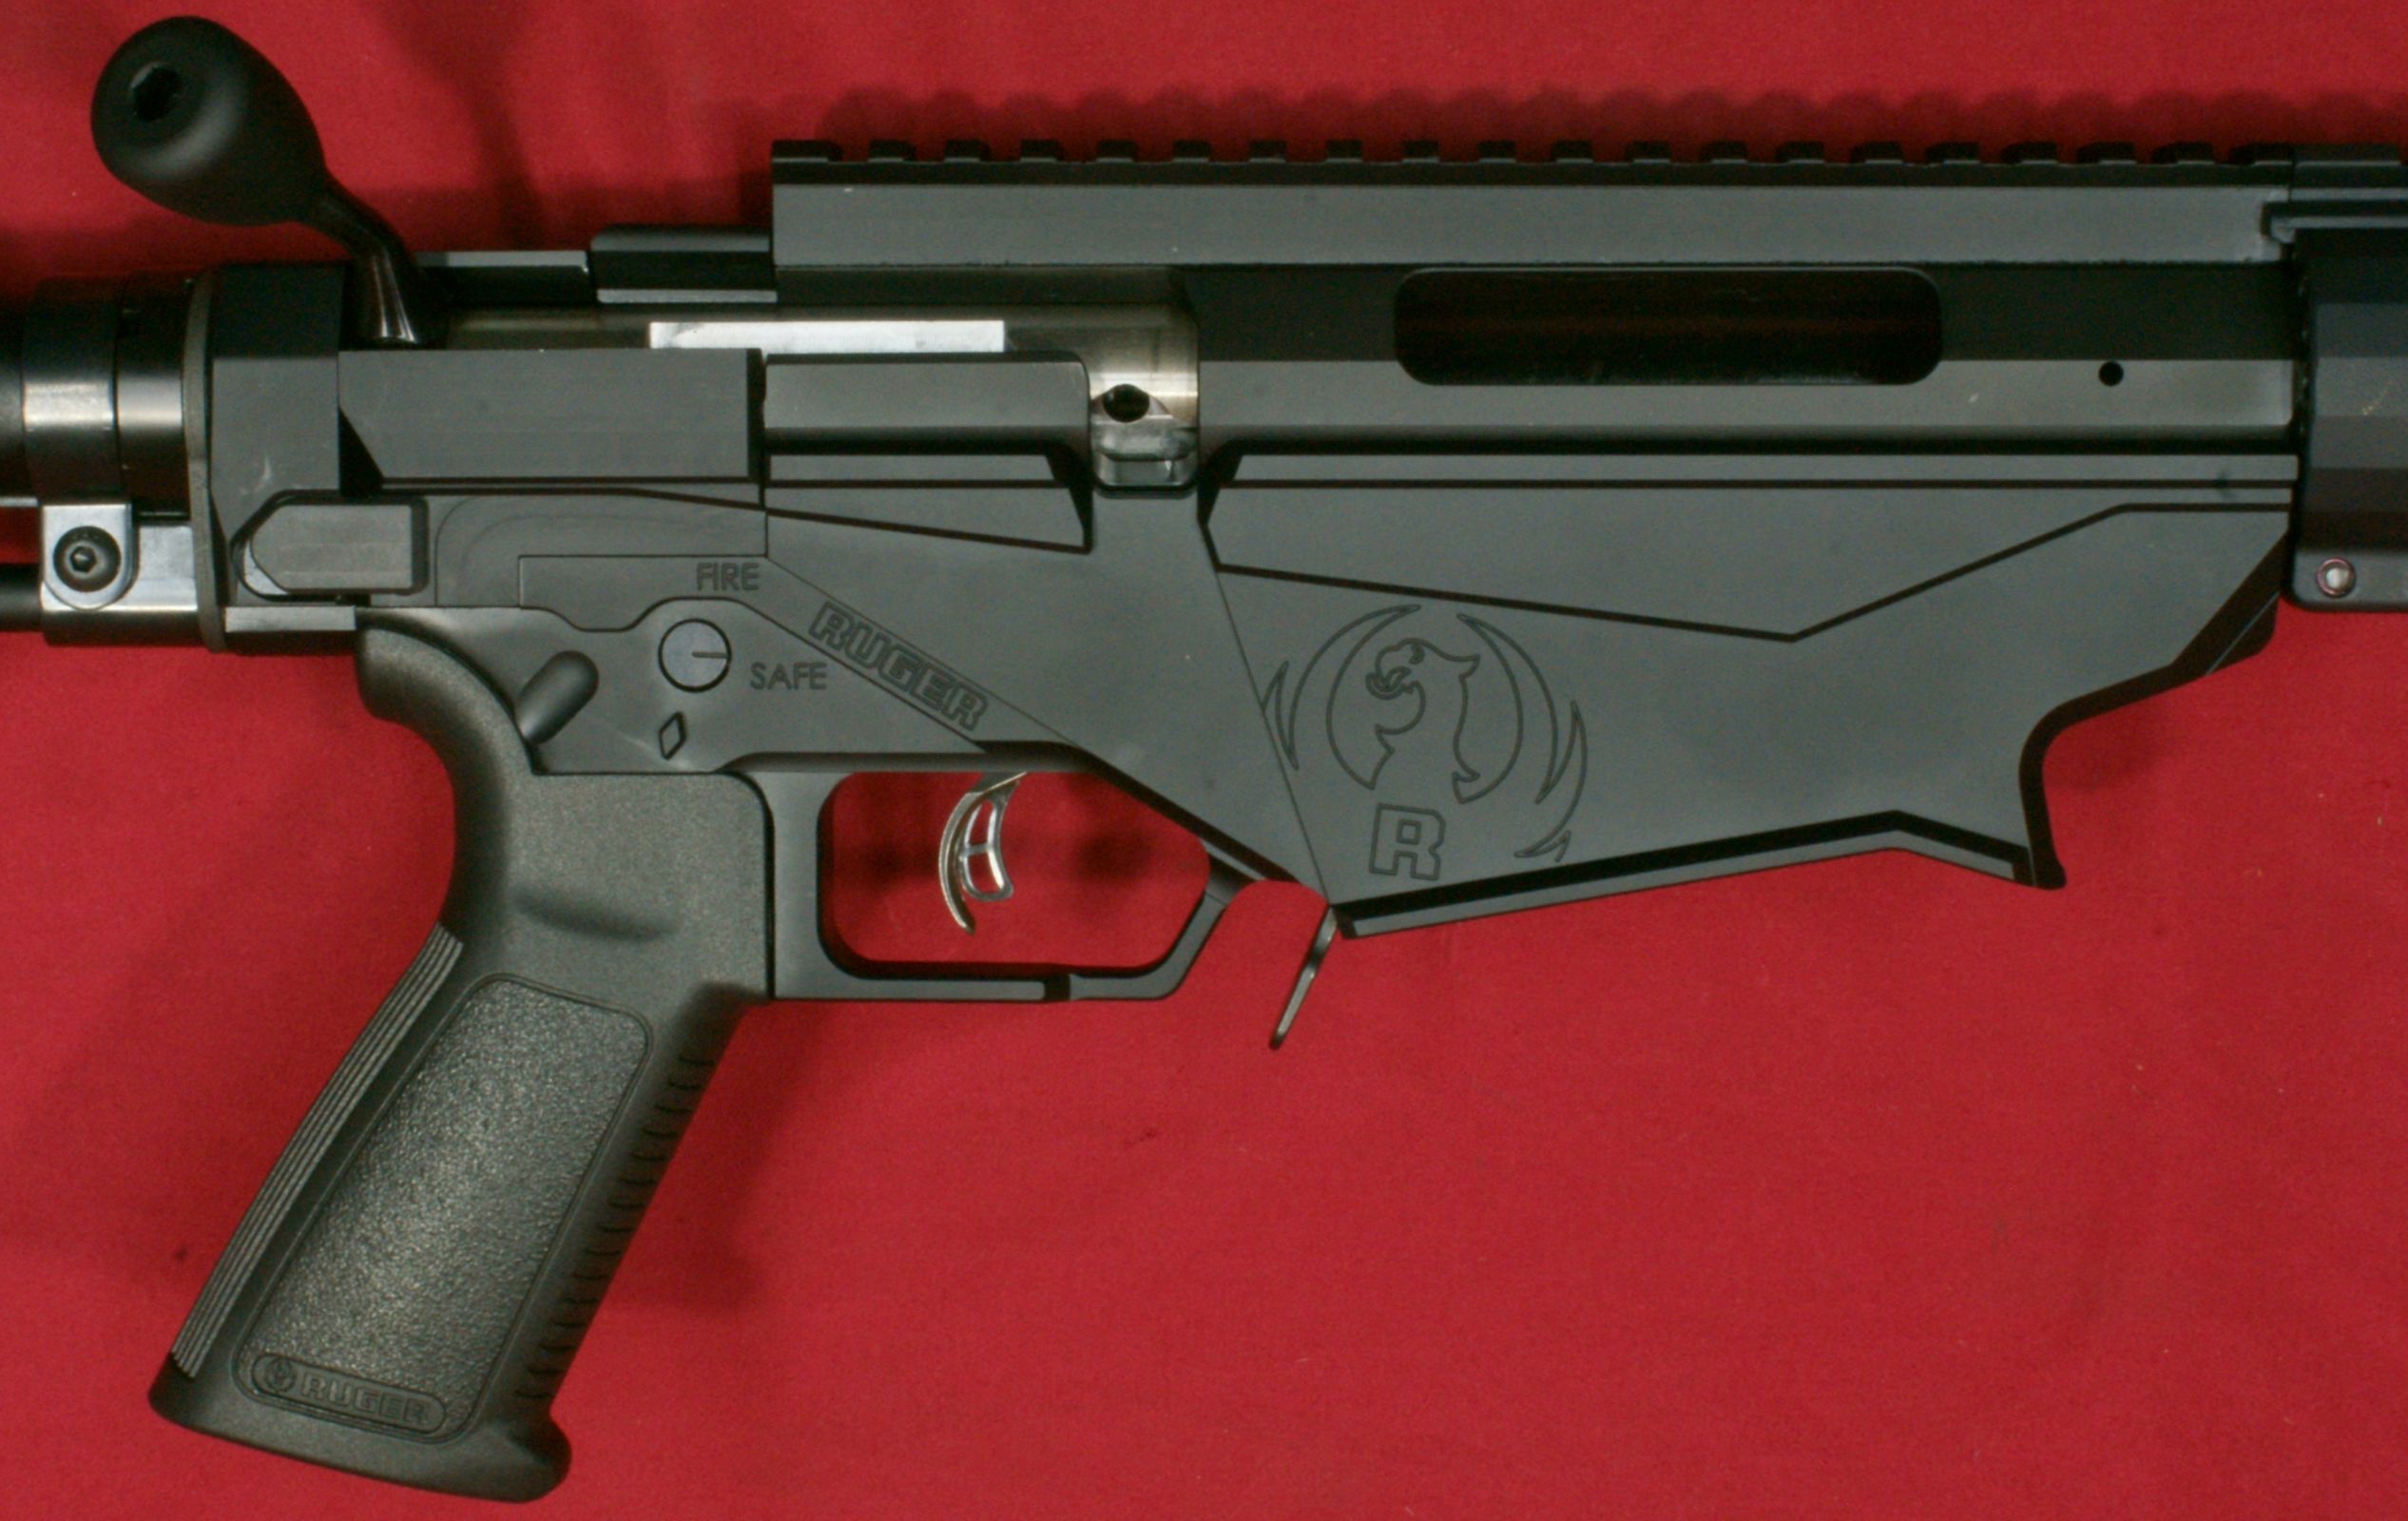
Ruger chose to put a standard style AR grip on this rifle which gives the consumer the option to swap this grip out for their favorite style. The actual grip is an extended trigger-reach AR-style grip similar to that of a Magpul MOE grip. The grip has stippling on each side and is ridged both front and back. The grip is all polymer and has a slick feel.
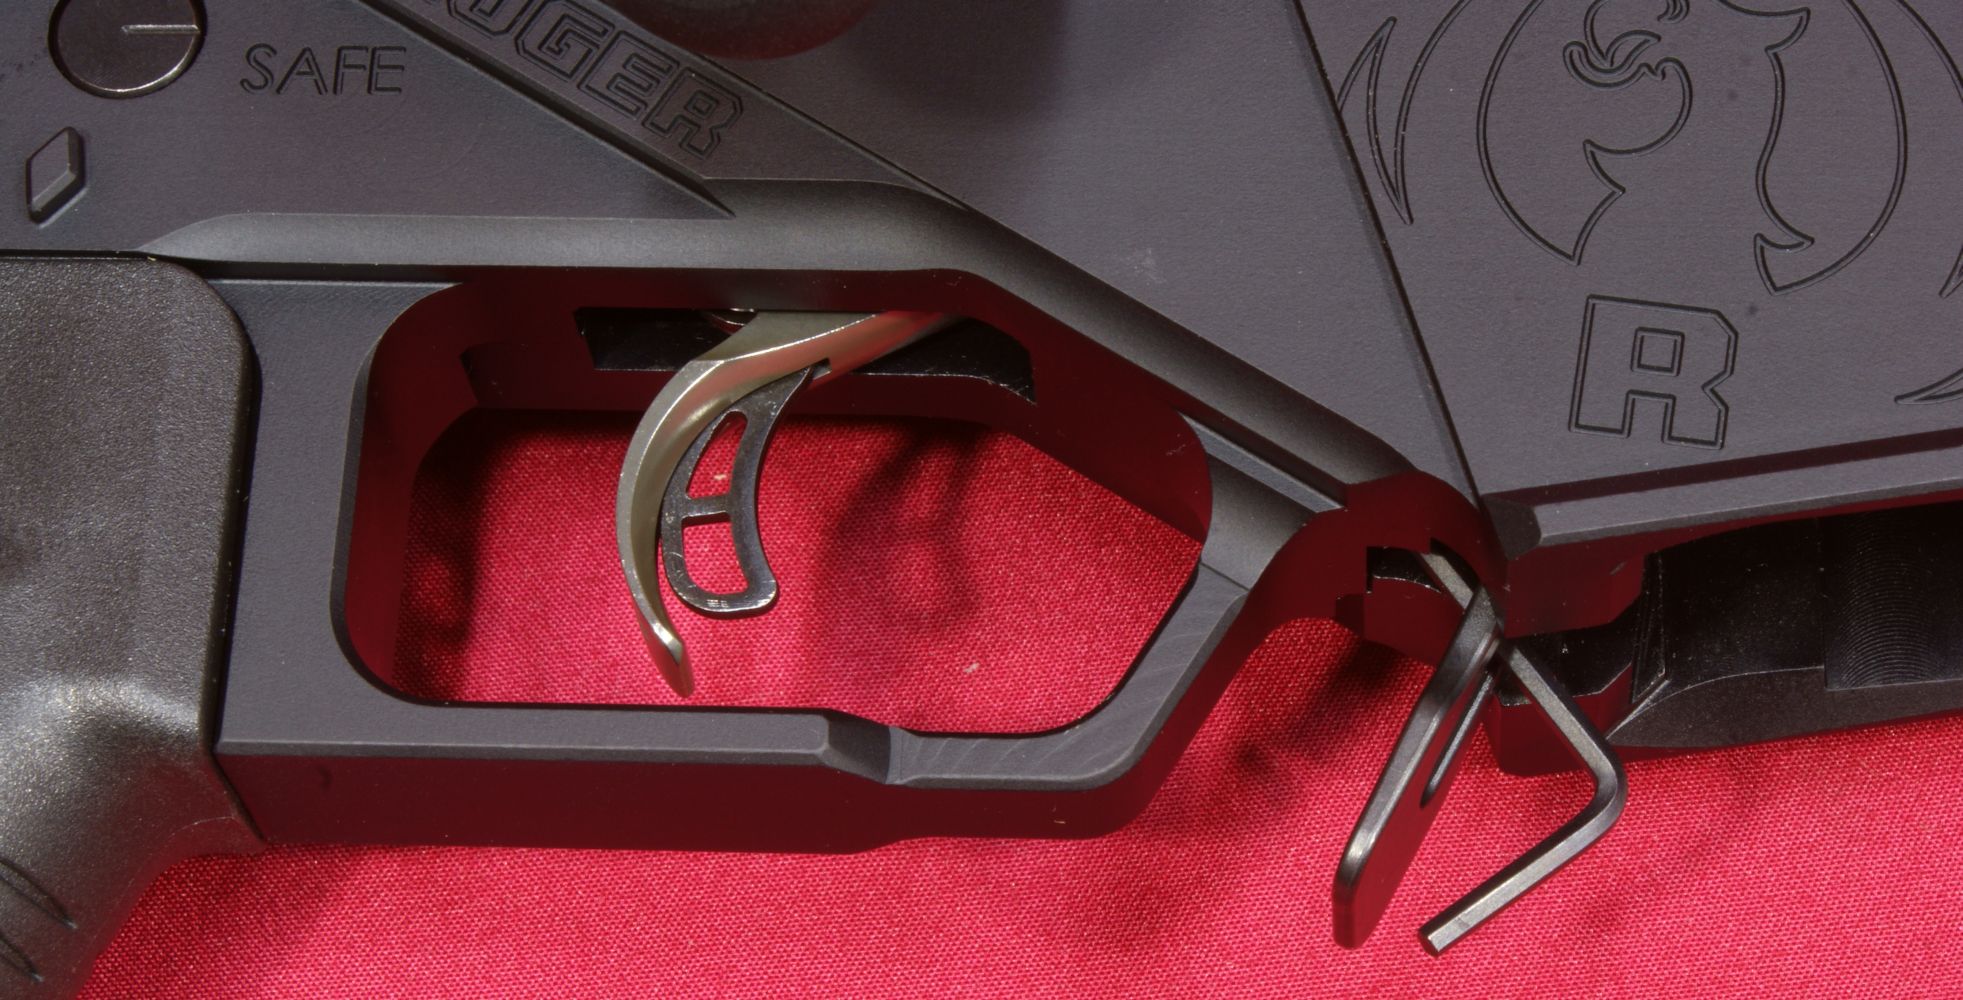
The rifle comes with the Ruger Marksman Adjustable™ trigger which is externally adjustable with a pull weight range from 2.25 to 5.0 lbs. This rifle had a 2.35 pound trigger pull based on an average of ten pulls using a Lyman Digital Trigger Pull Scale. Actually, the trigger pull seemed to drop about 2 ounces from the original "out of the box" condition once I got around to testing it again when writing up this part of the review.
Figure 35
If you want to adjust the pull weight, Ruger provided an Allen wrench that is located in the end of the bolt shroud. Remove the end cap (actually the bolt disassembly tool) and the Allen wrench is held inside the cap.
Figure 36
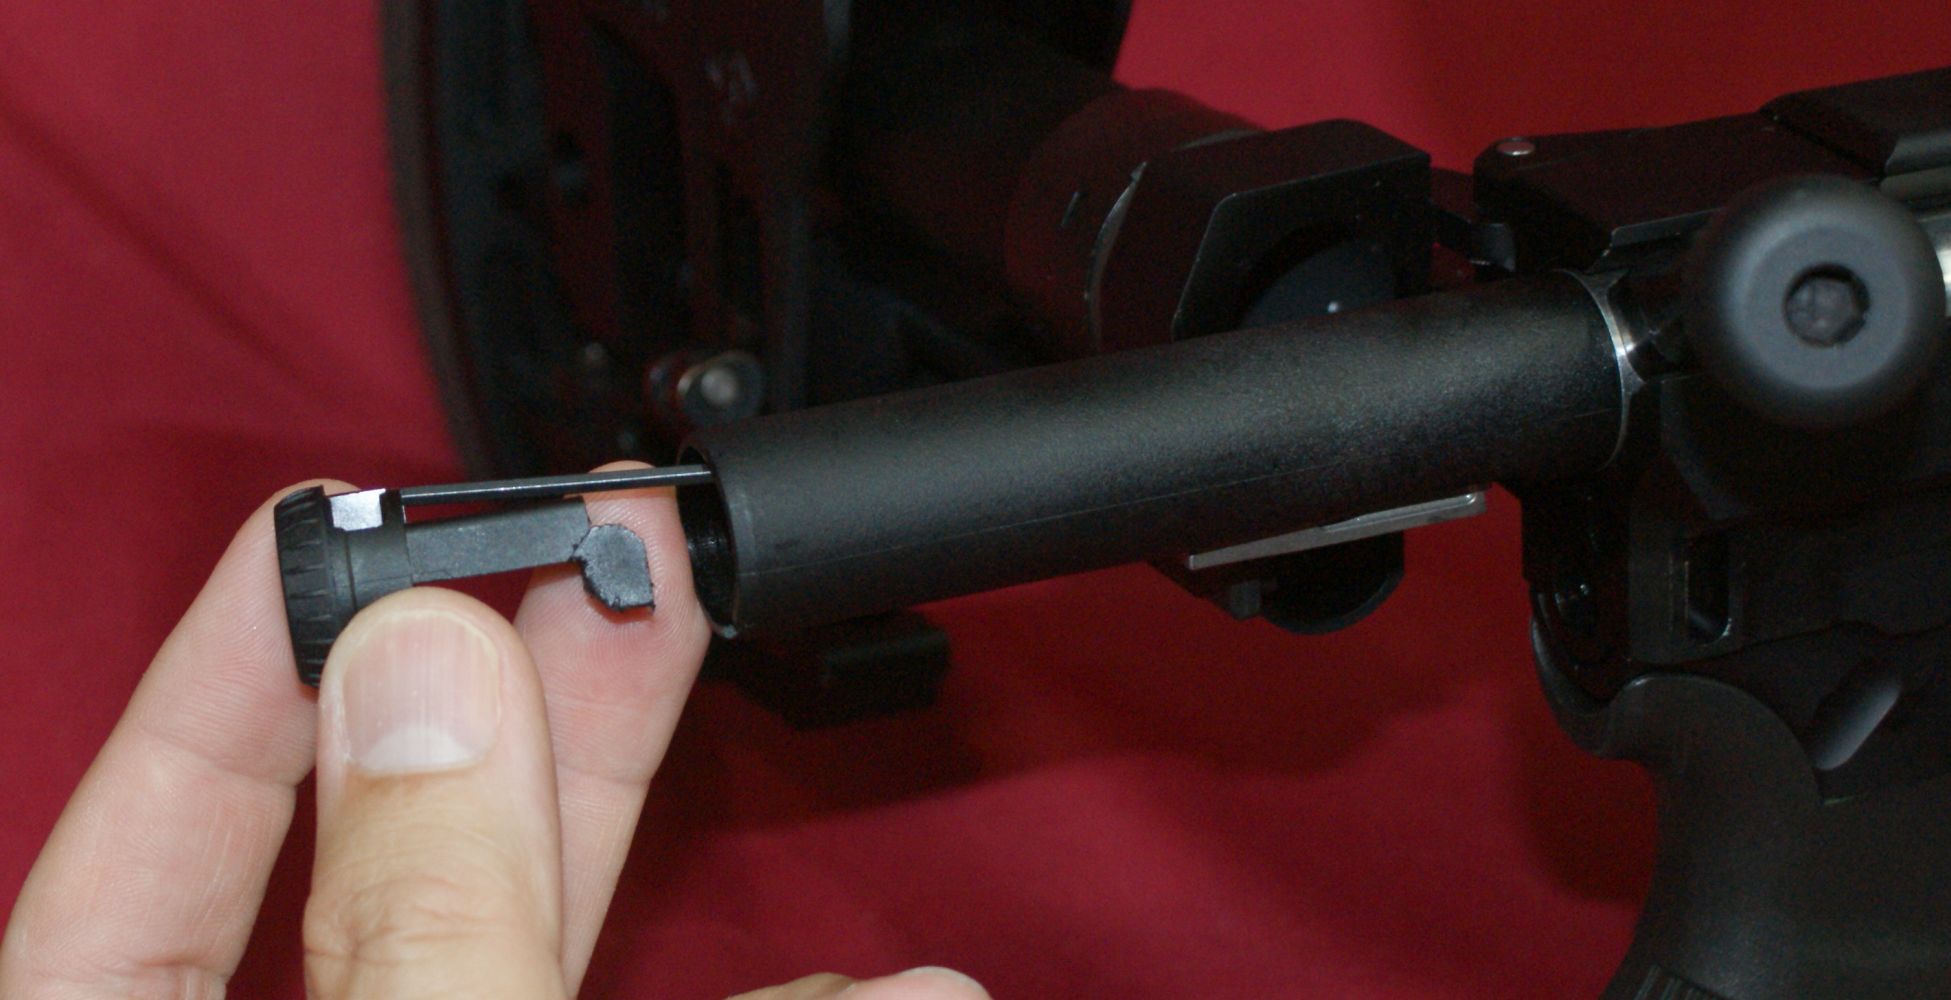
Insert the Allen wrench as shown below until is seats in the screws on the trigger housing. Turn the screw clockwise to increase the pull weight and counterclockwise to decrease the pull weight.
Figure 37
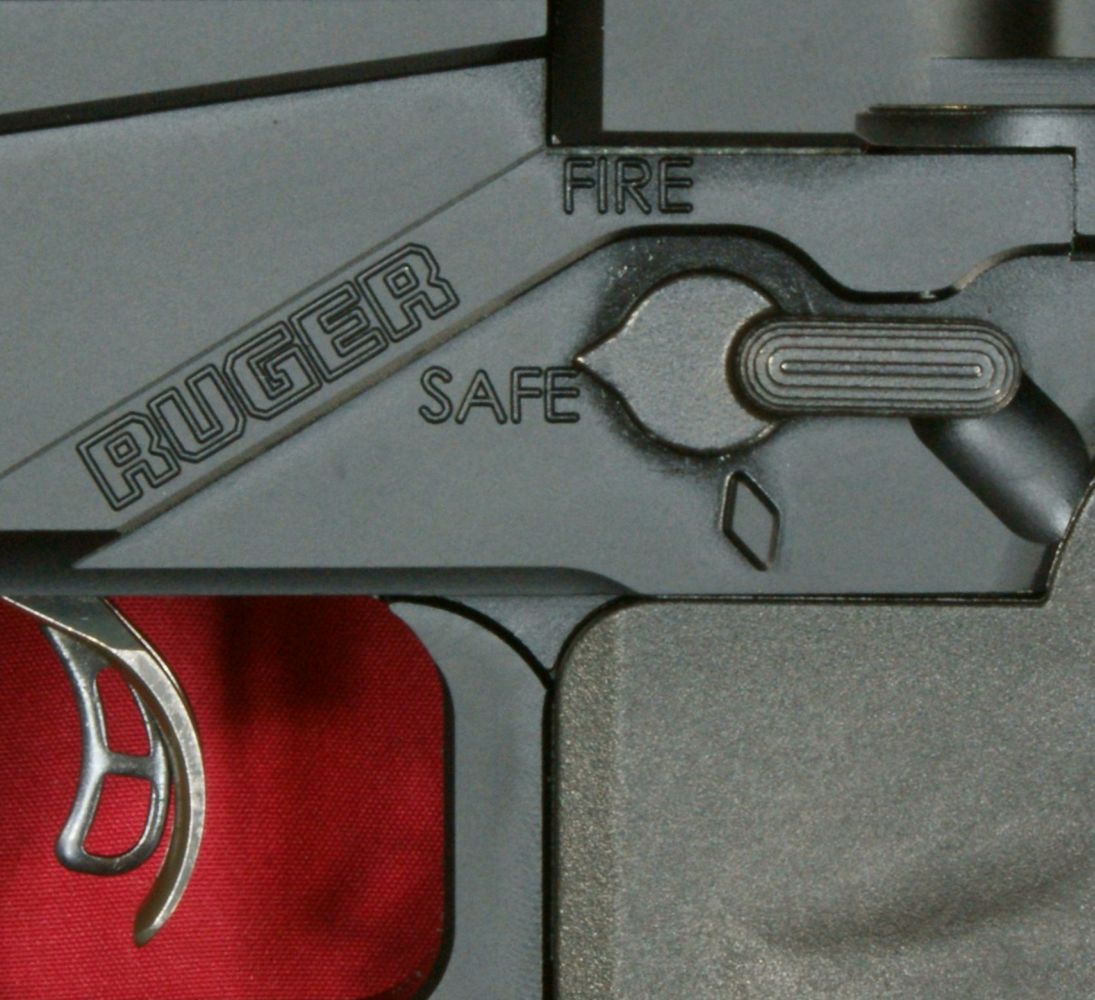
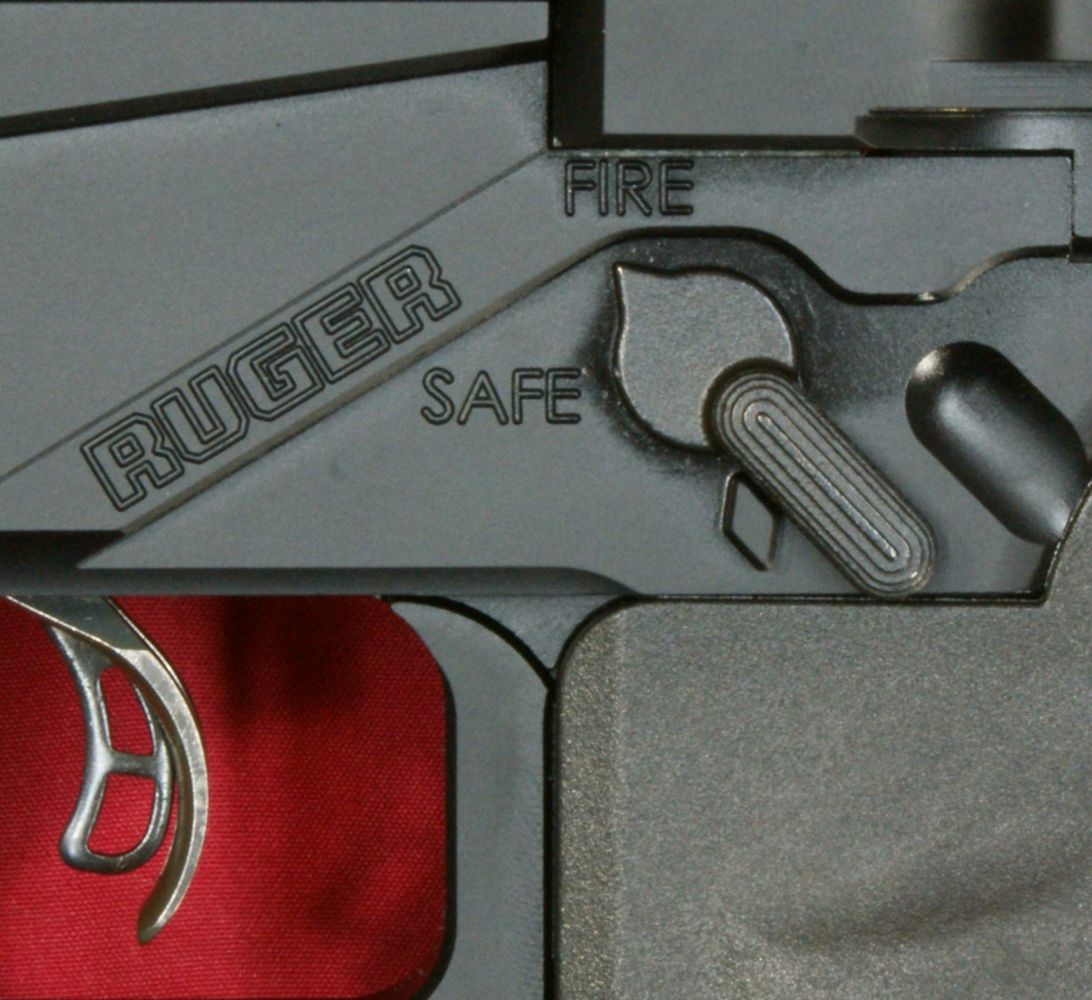
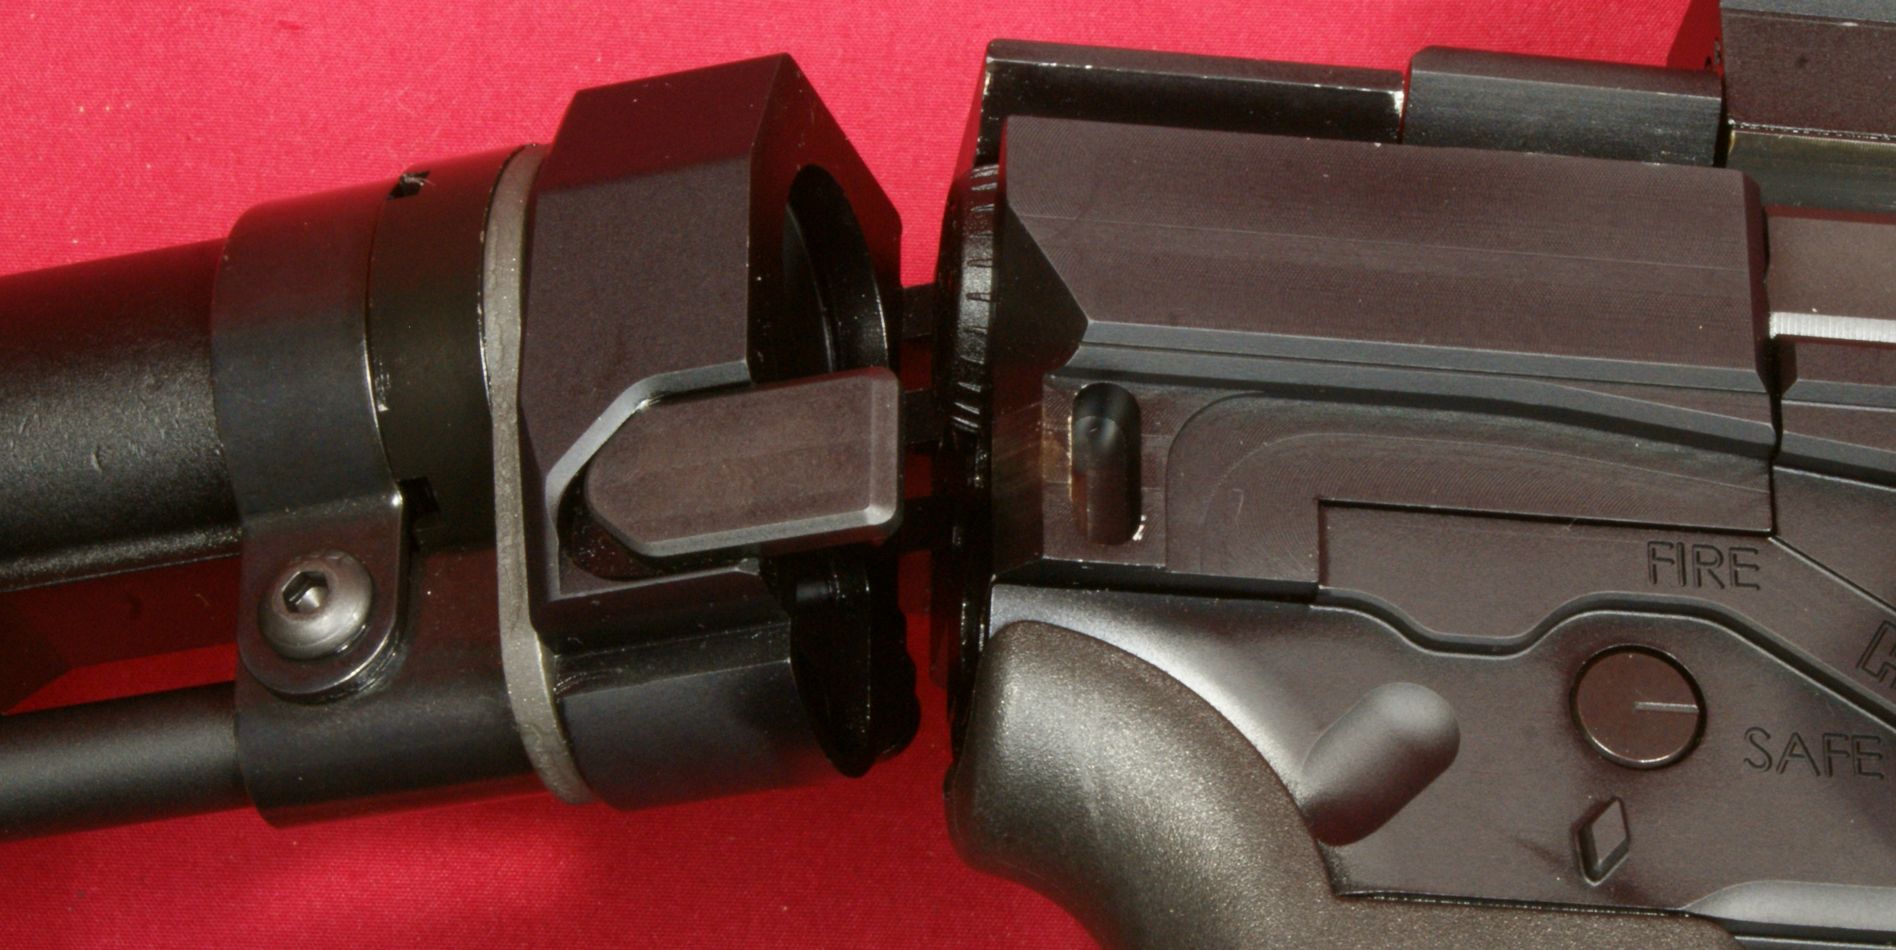
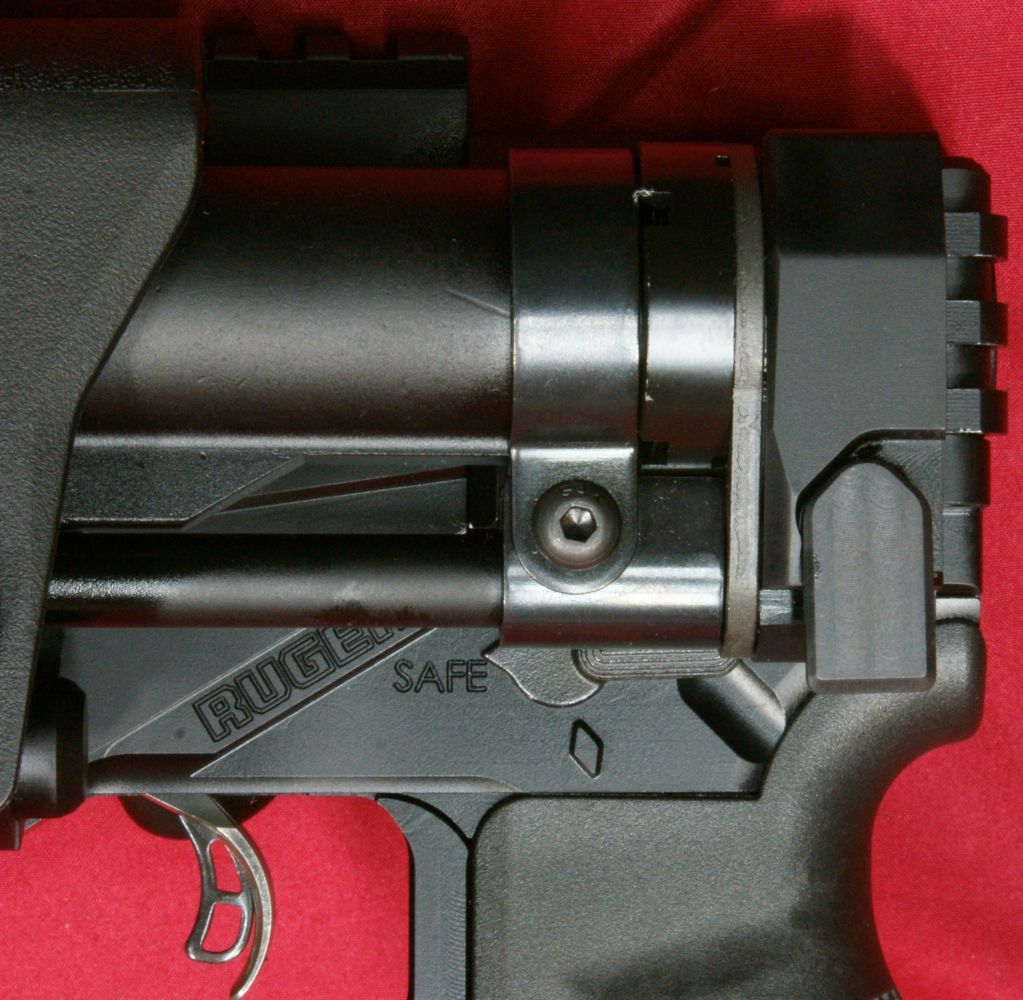
Ruger used a standard AR style safety selector. The selector has a 45° throw to switch from SAFE to FIRE. Since no spring loaded detent pin was used which normally pushes up on the safety, the selector has some jiggly feel. As you switch the selector from SAFE to Fire and back, there is a very positive click into each of these positions. It is possible to reverse the safety selector to the right side of the receiver for left hand shooters by removing the lower receiver and moving the selector.
Figure 38
Figure 39
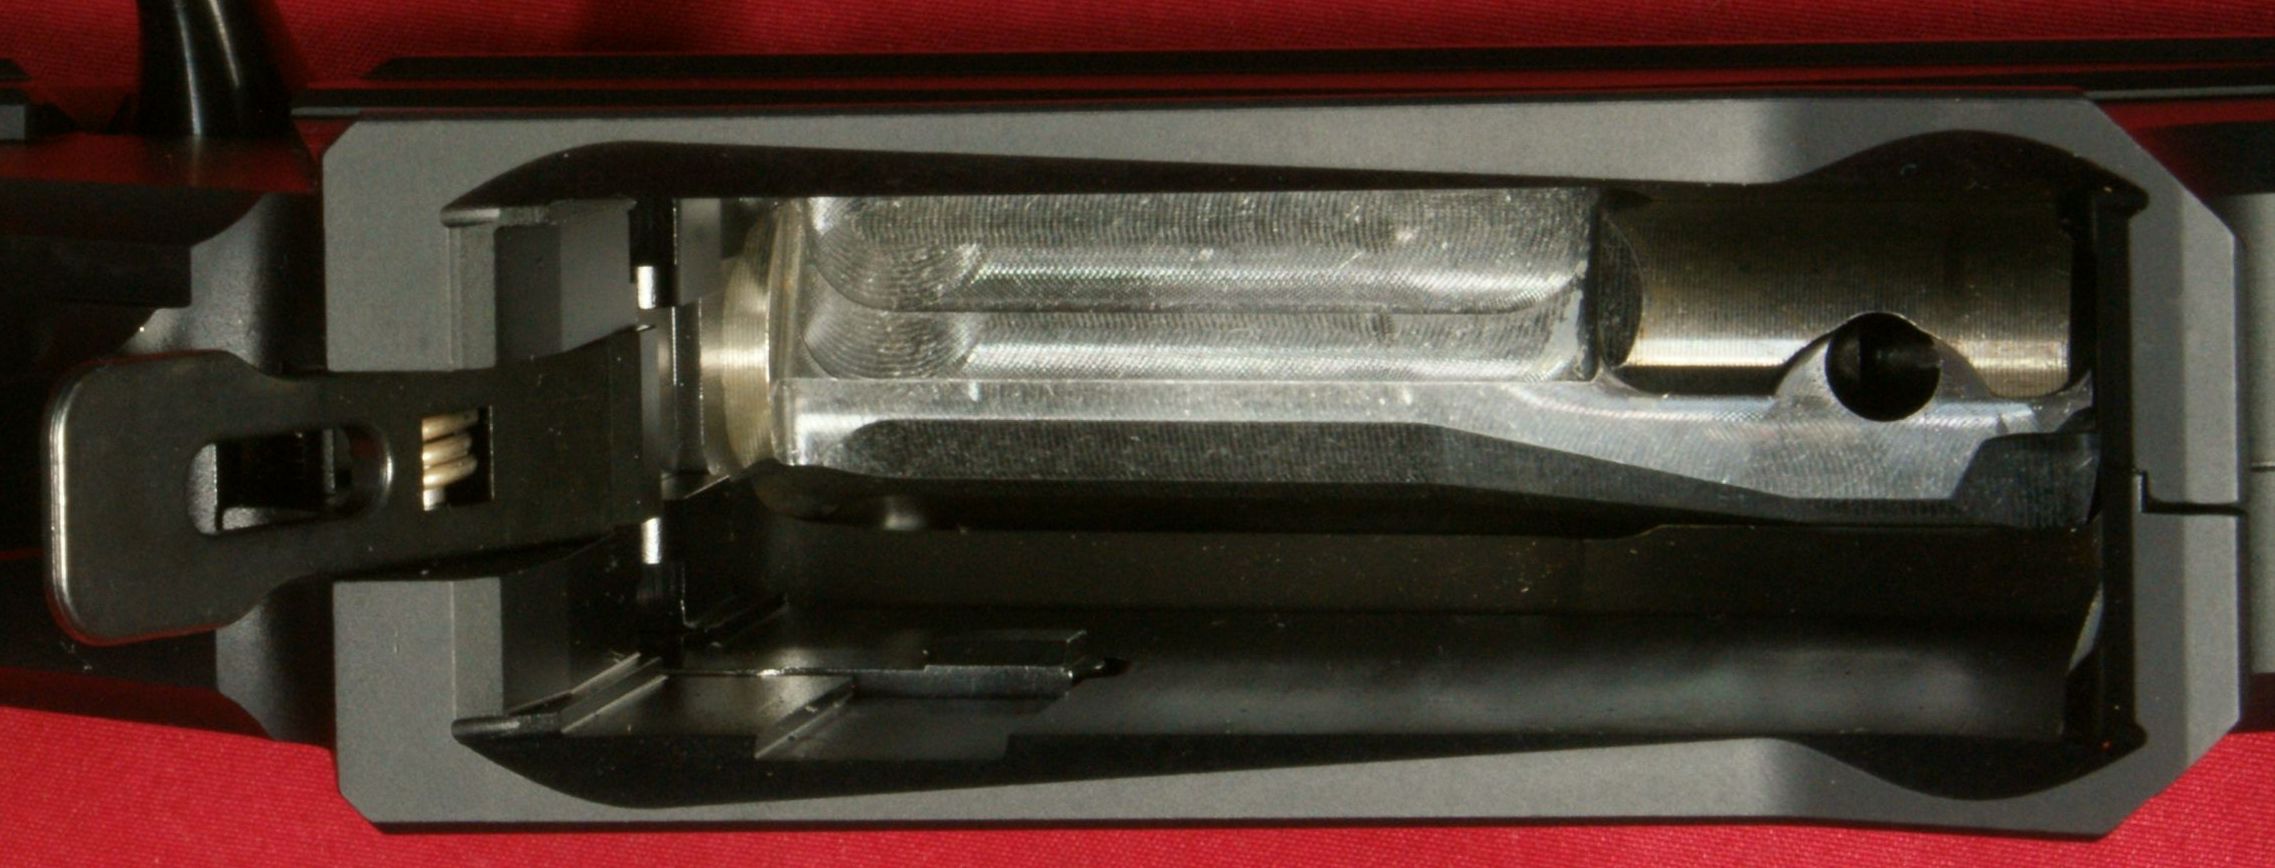
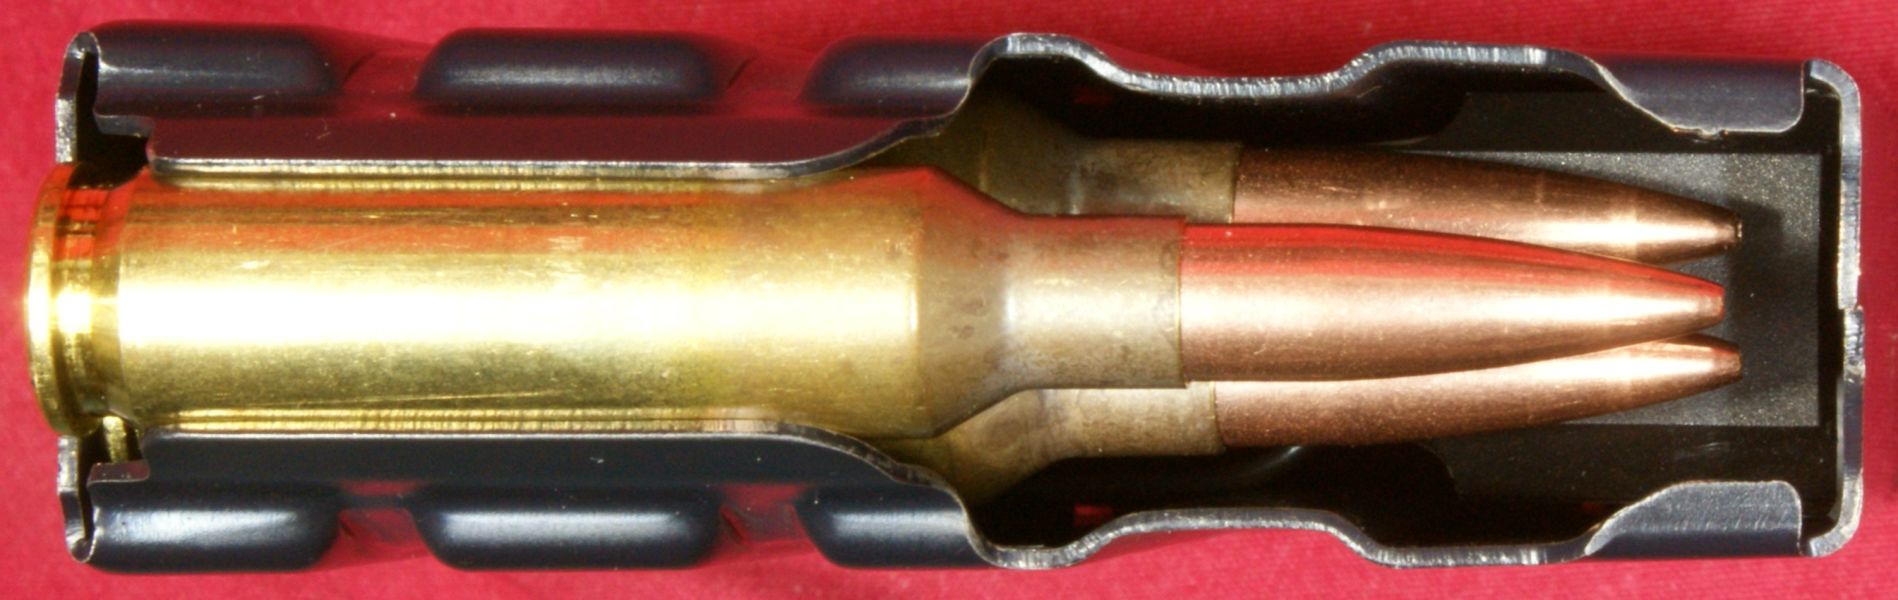
The magazine well has slightly tapered edges to assist with inserting the magazine. The rifle comes with two 10-round Magpul ® PMAGS and I found these magazines to fit nicely inside the well. One of the neat features Ruger designed into the rifle and catch system is their Multi-Magazine Interface which gives the ability to utilized both side catch (M110, SR25, DPMS, Magpul®) and rear catch (AICS) magazines. These 7.62x51 or .308 Win magazines will work with any of the calibers currently available for the Ruger Precision Rifle. In the photo below, you can easily see the side catch and if you look closely at the end of the lever inside the magazine well you can see where the end would catch the AICS magazines. When you press the magazine release, the first portion of movement would release the rear catch magazine and the second portion of movement releases a side catch magazine.
Figure 40
Since some of the magazines have an offset feed and other magazines have a center feed, Ruger also needed to ensure that both magazine types could feed cartridges into the chamber without issue.
Figure 41 - Magpul® PMAG
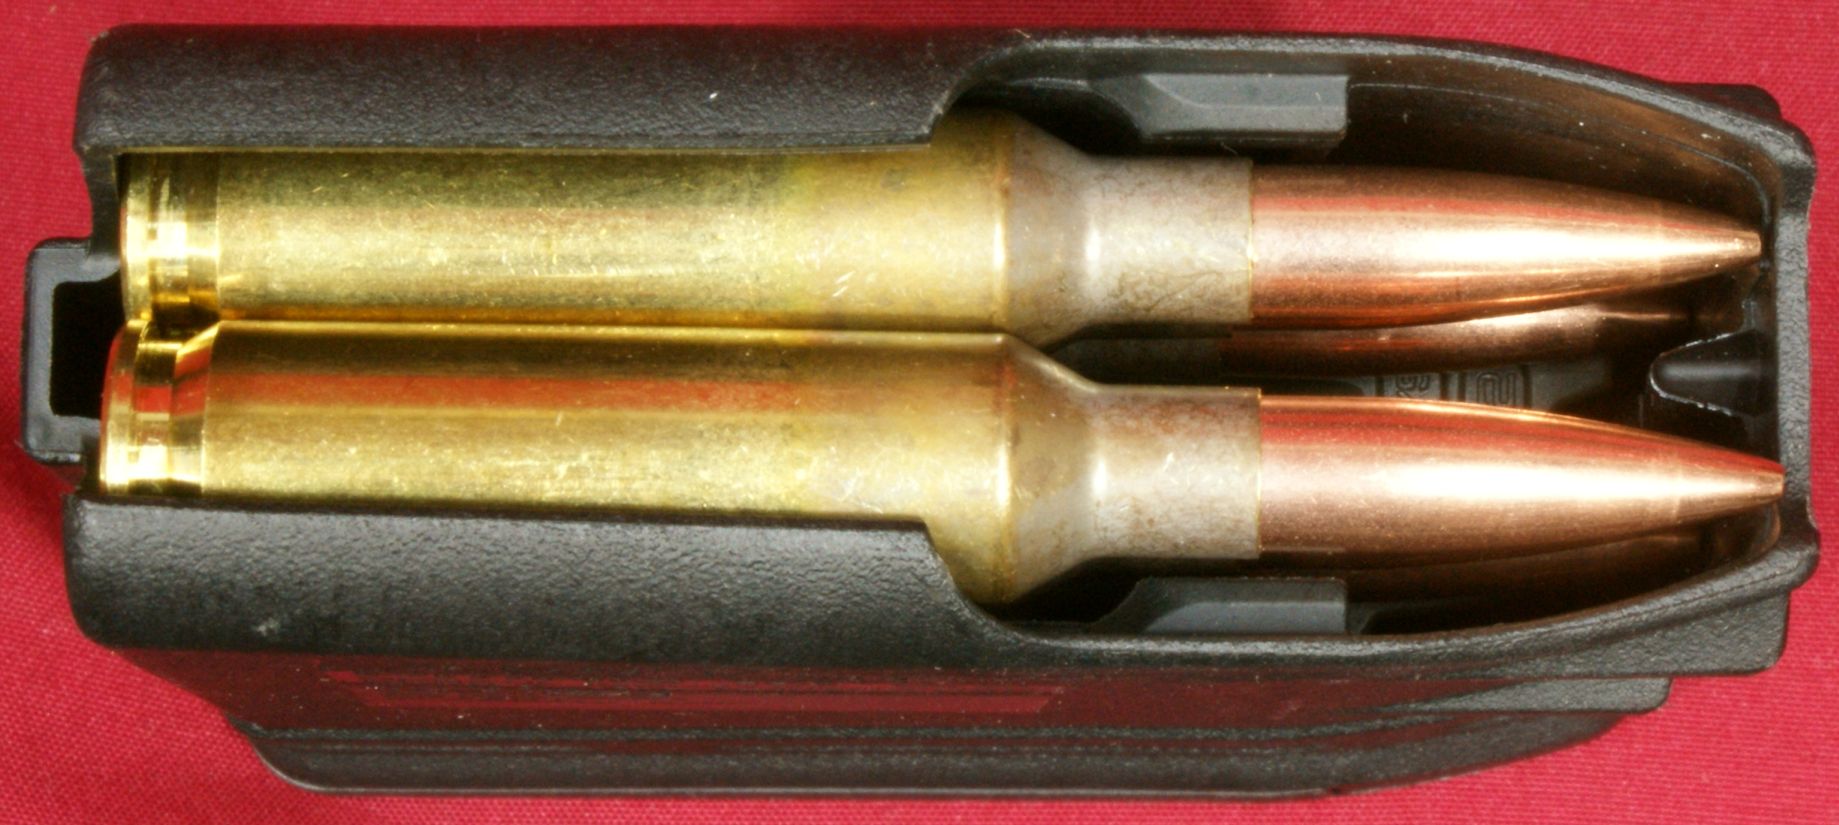
For the offset magazines, the upper receiver has a set of feed ramps machined similar to something like M4 feed ramps on an AR styled rifle.
Figure 42 - Magpul® PMAG
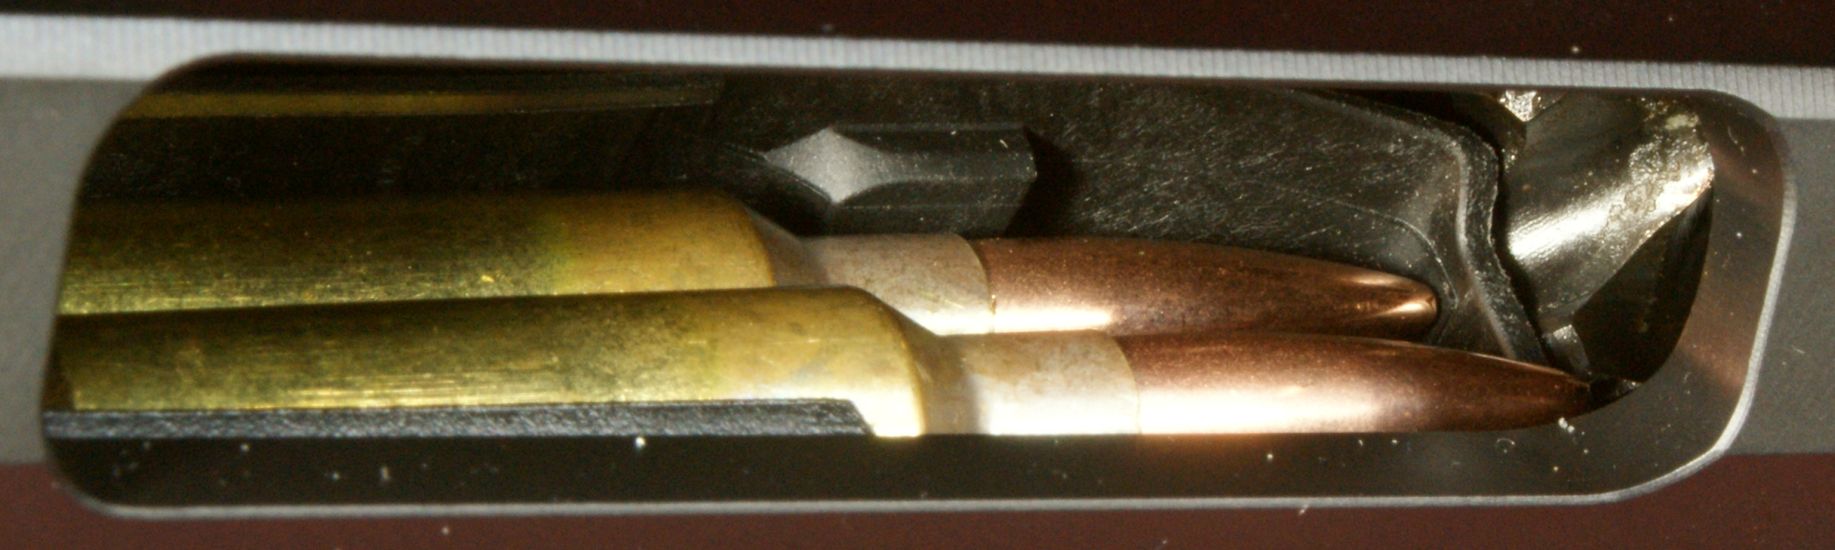
For the center feed magazines, there is another small feed ramp machined on the centerline of the rifle. You can see these feed ramps in the photo below.
Figure 43

Also, another thing worth pointing out is the magazine style differences between the PMAG and this Alpha Type 2 Ten Shot magazine. This Alpha magazine allows a longer case overall length for those wanting to experiment with bullet seating depth. The photo of the PMAG shown above shows that with the PMAG magazine you will need to keep your case length to the specification maximum (2.800") if you plan to use the PMAG.
Figure 44
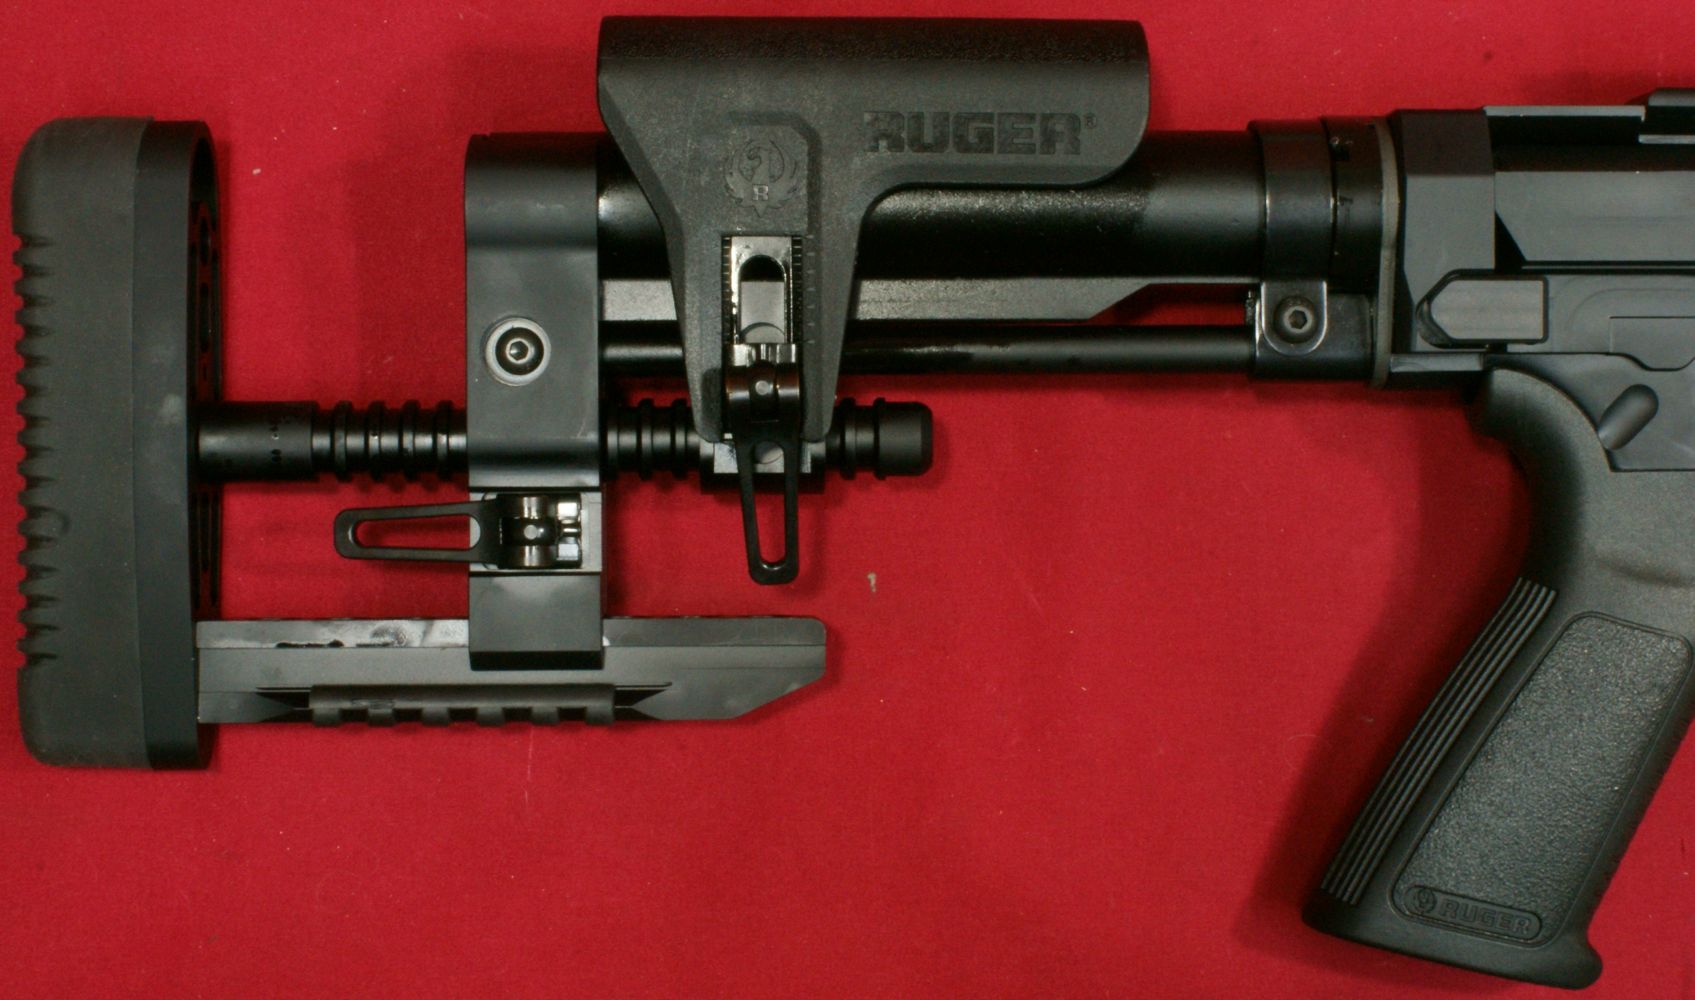
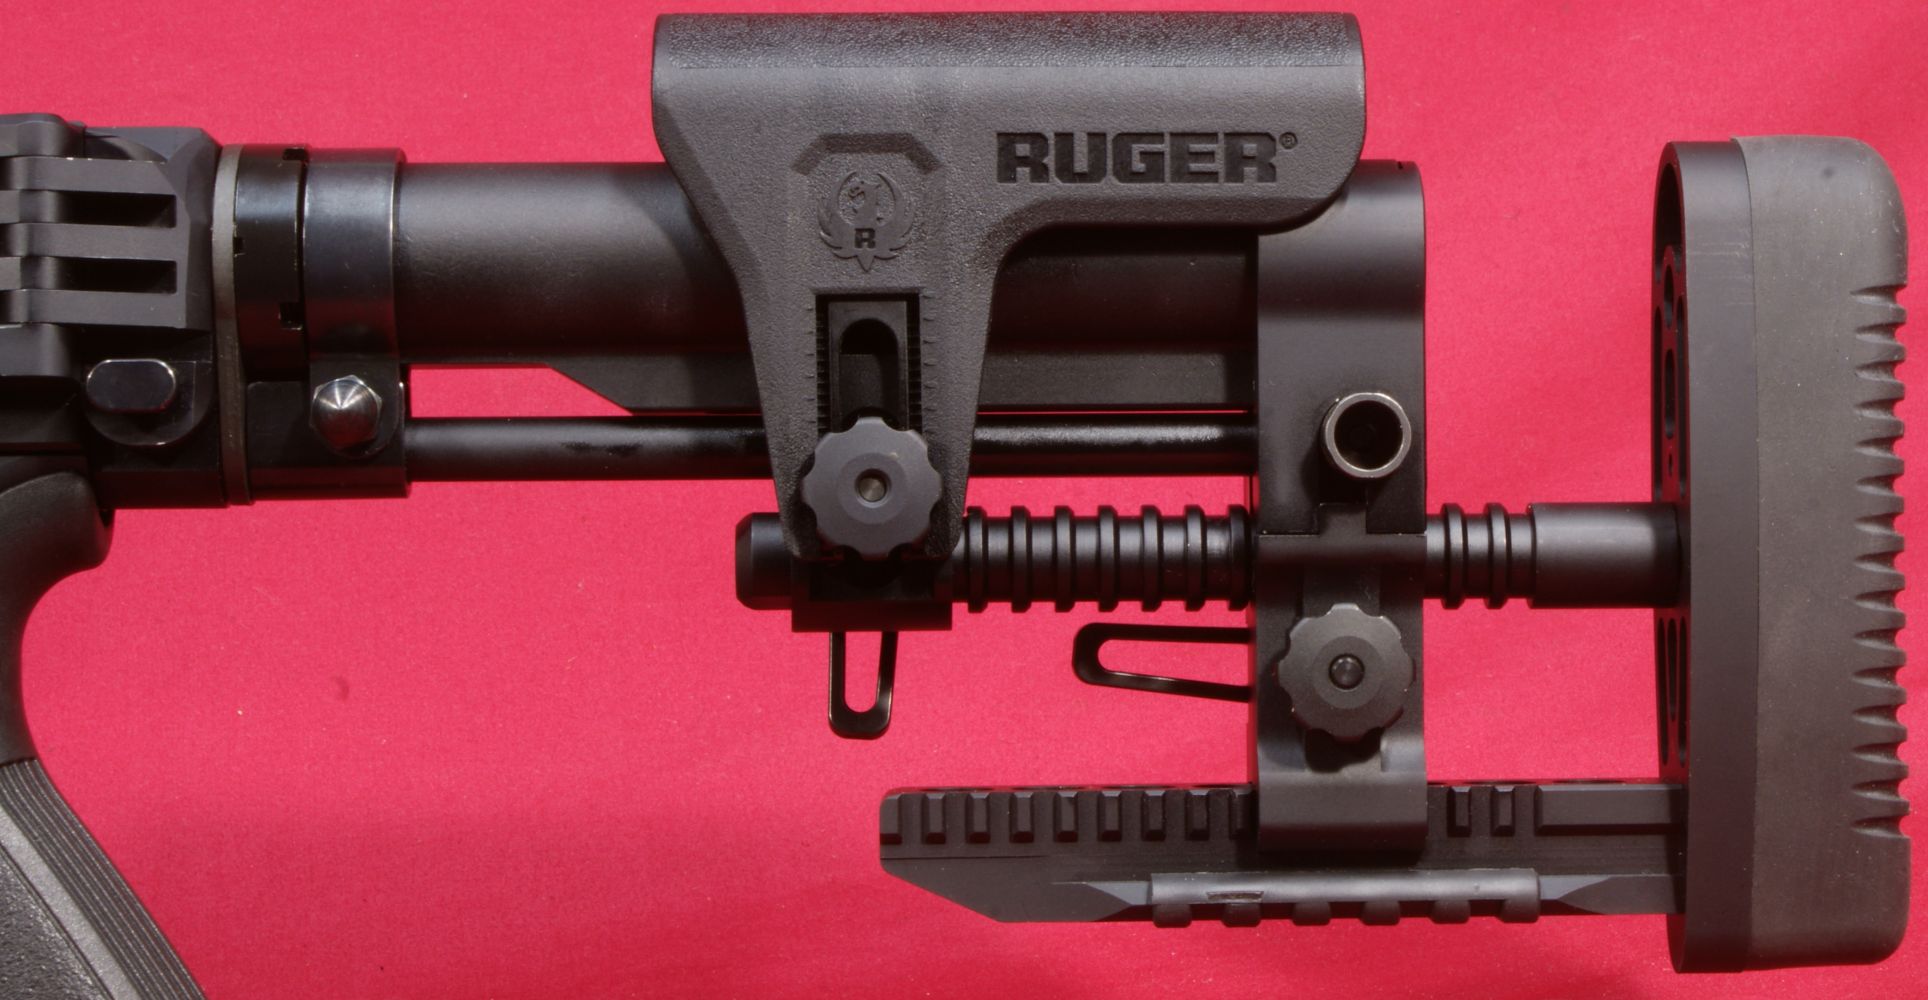
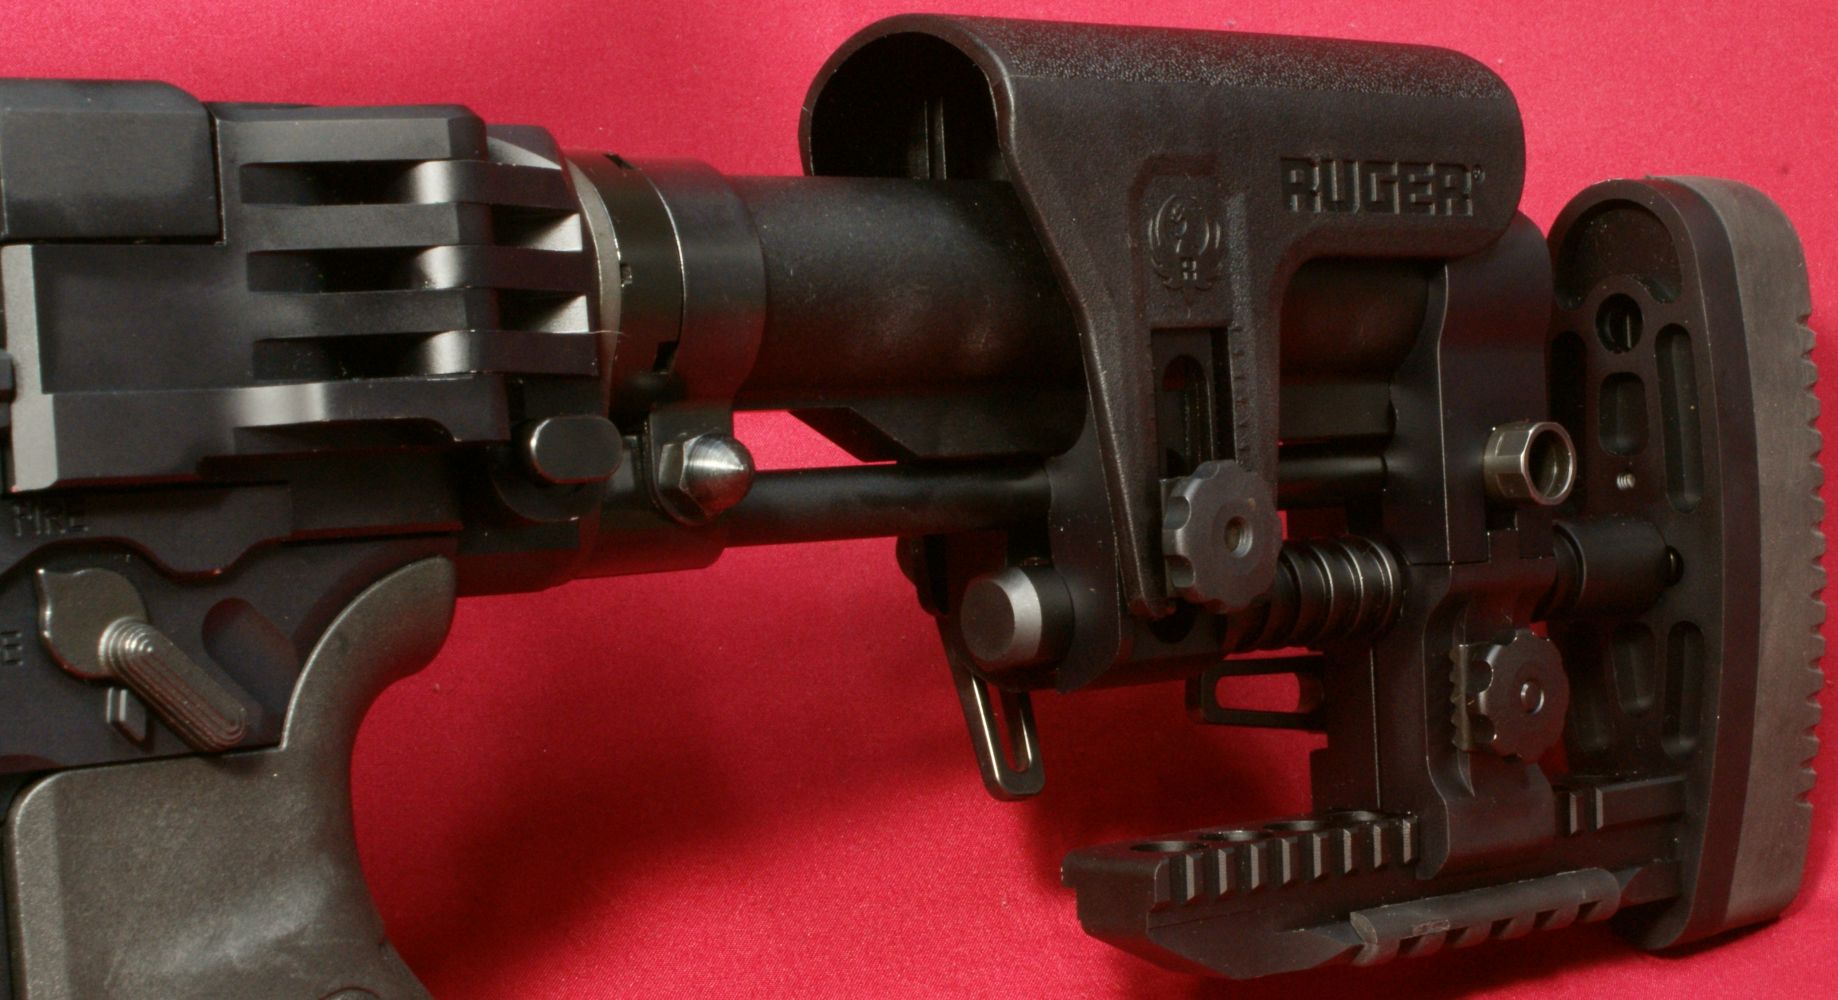
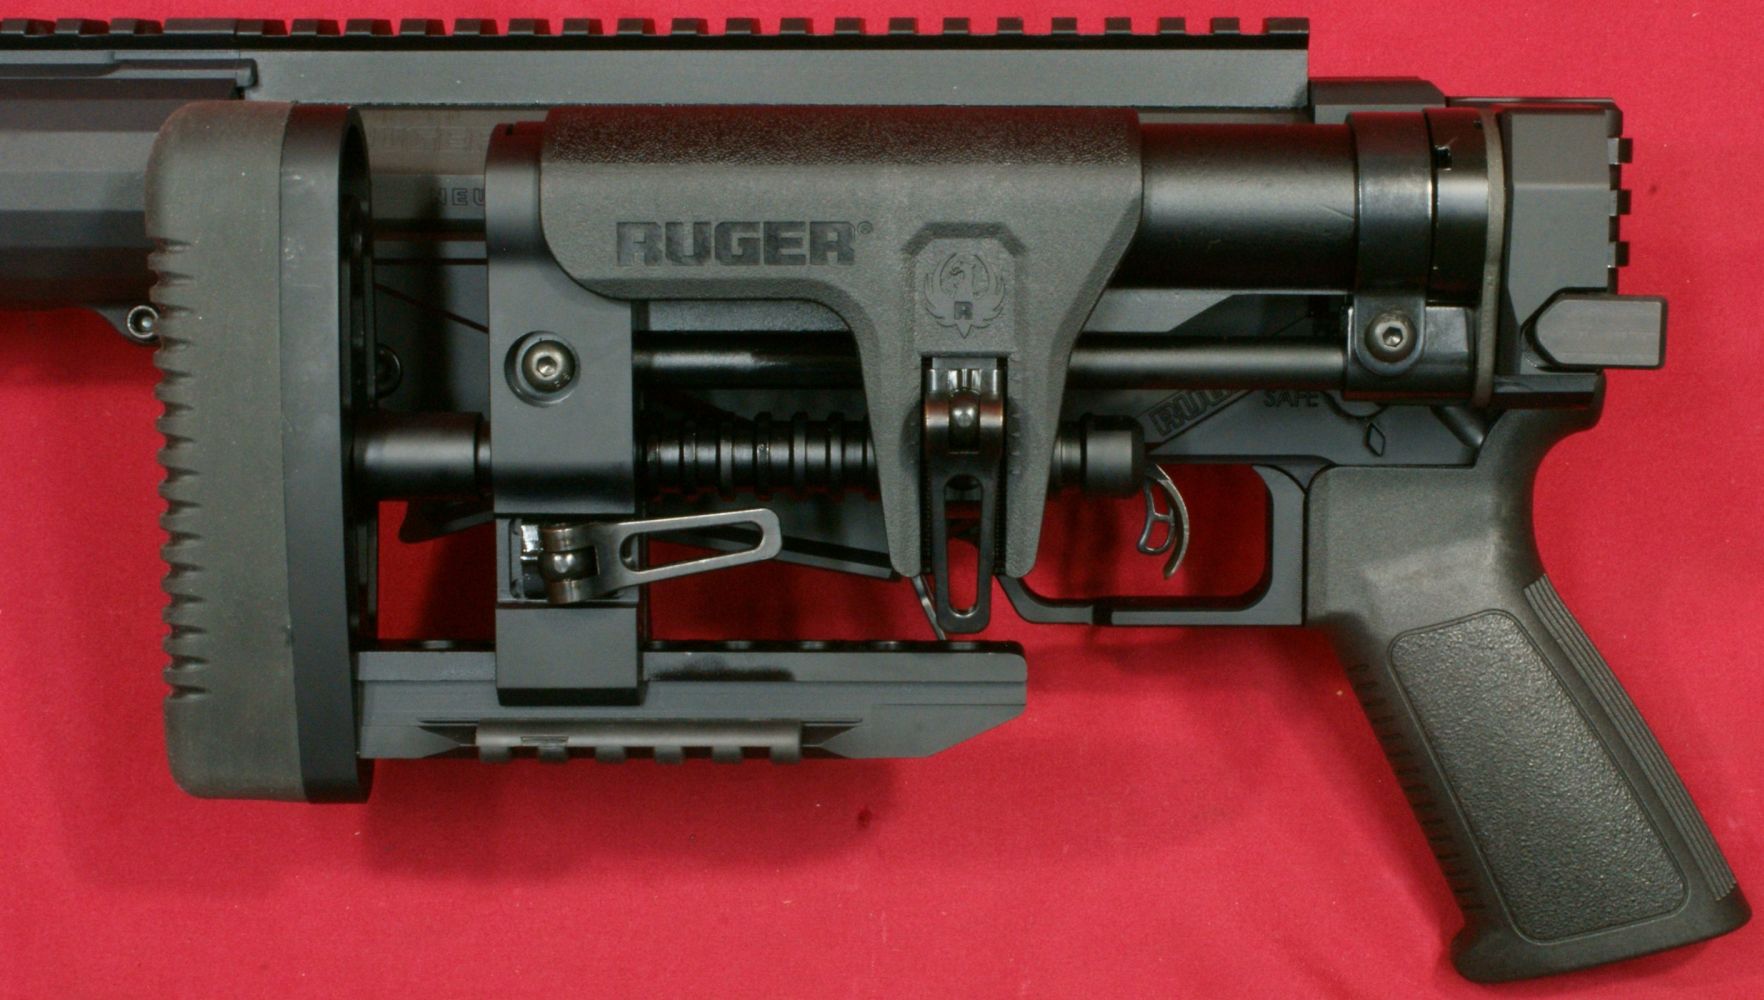
Another great feature Ruger designed into this precision rifle was their new Ruger Precision MSR (Modern Sporting Rifle) stock which rides on a Mil-Spec diameter buffer tube attached to a hinge to allow the stock to fold to the left.
Figure 45
This buttstock is adjustable in length by flipping two cams, repositioning the stock, and then tightening the cams. This allows for a zero freeplay solid recoil path into your shoulder. The length of pull is adjustable from 12" to 15".
Figure 46
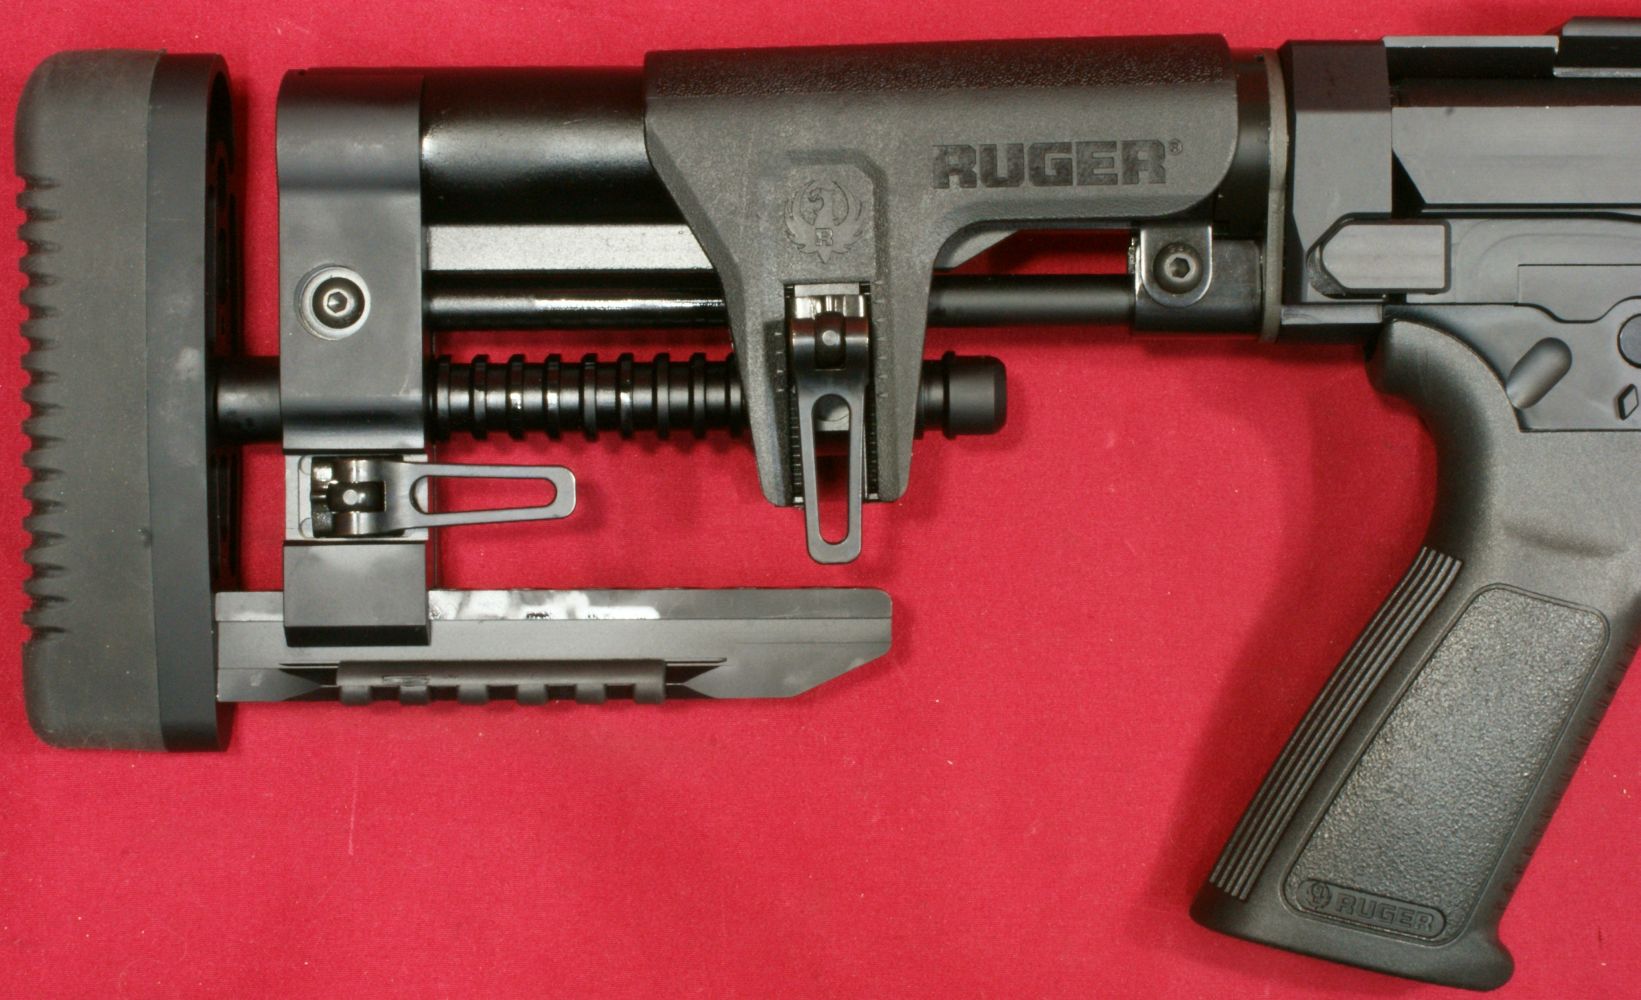
The bottom of the buttstock has a 2.5" 6-slot section of Picatinny rail so that you can use a rail monopod similar to the Accu-Shot PRM. This rail also comes with a plastic rail ladder to minimize abuse to your rear bag if you are not using a monopod. The hole forward of the rail is not a QD socket.
Figure 47
Ruger also provided and adjustable height cheek riser that can be adjusted by loosening the forward cam and raising or lowering the riser to the desired height. The cheek riser can also be flipped around so that it provides more support rear of the cam adjustment area. I found that the riser was best for me in the rear facing position.
Figure 48
Figure 49

The left side of the buttstock has two thumb screws which allow you to adjust the amount of cam pressure required to flip over the cam. There is also a QD socket for attaching a sling swivel.
Figure 50
Ruger also added another QD socket at the top of the front side of the buttpad.
Figure 51
Another feature Ruger designed into this buttstock is that the top of the buttpad can be rotated to right or left positions based on the shooter's preference. To do this, you first remove the buttpad using a 9/64" Allen wrench to loosen the two screws holding the buttpad in place.
Figure 52
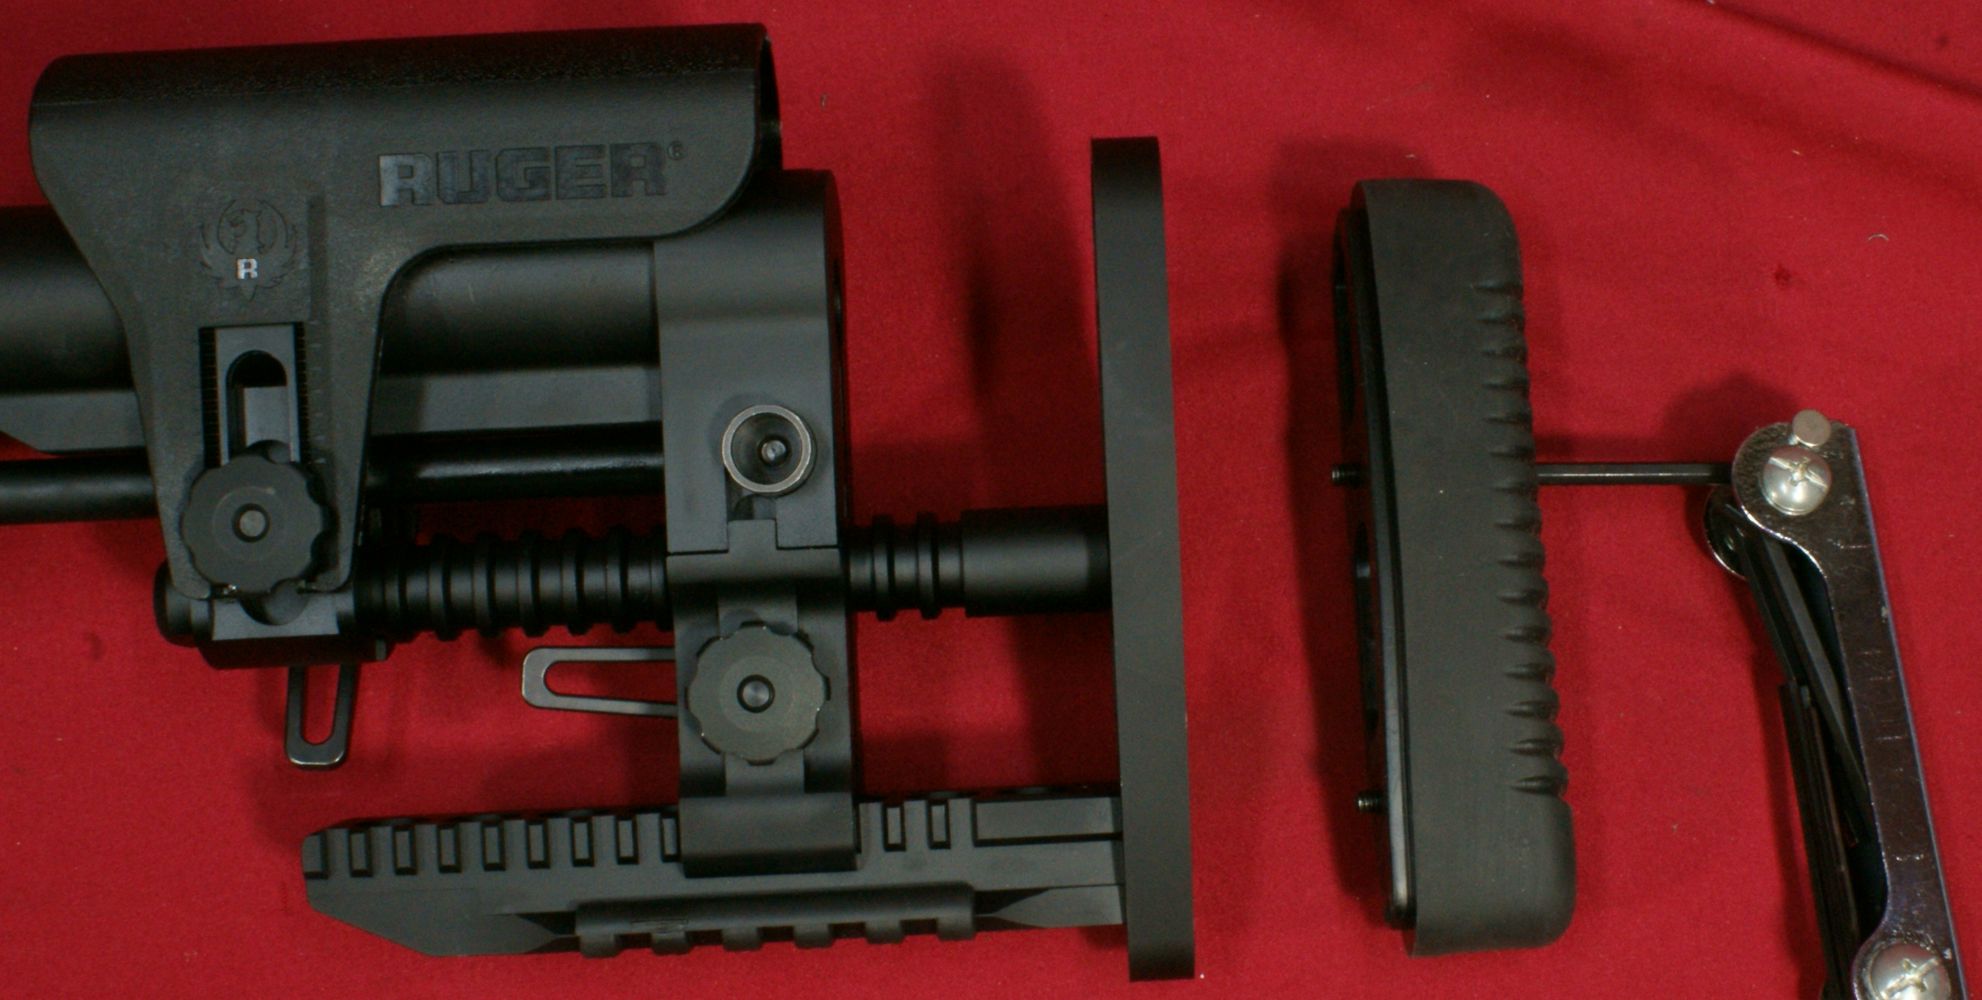
The buttpad (recoil pad) is attached to a recoil pad base plate. The base plate has two screws. You must loosen the bottom screw using a 5/32" Allen wrench so that the base plate can pivot and remove the top screw. With the top screw removed, you can position the top of the base plate towards the right or left. With me being a right handed shooter, I found that the base plate rotated to the the right was more comfortable than rotated to the left. When you figure out which position works best for you, reinstall the upper screws and tighten both screws firmly then reinstall the buttpad.
Figure 53
Figure 54
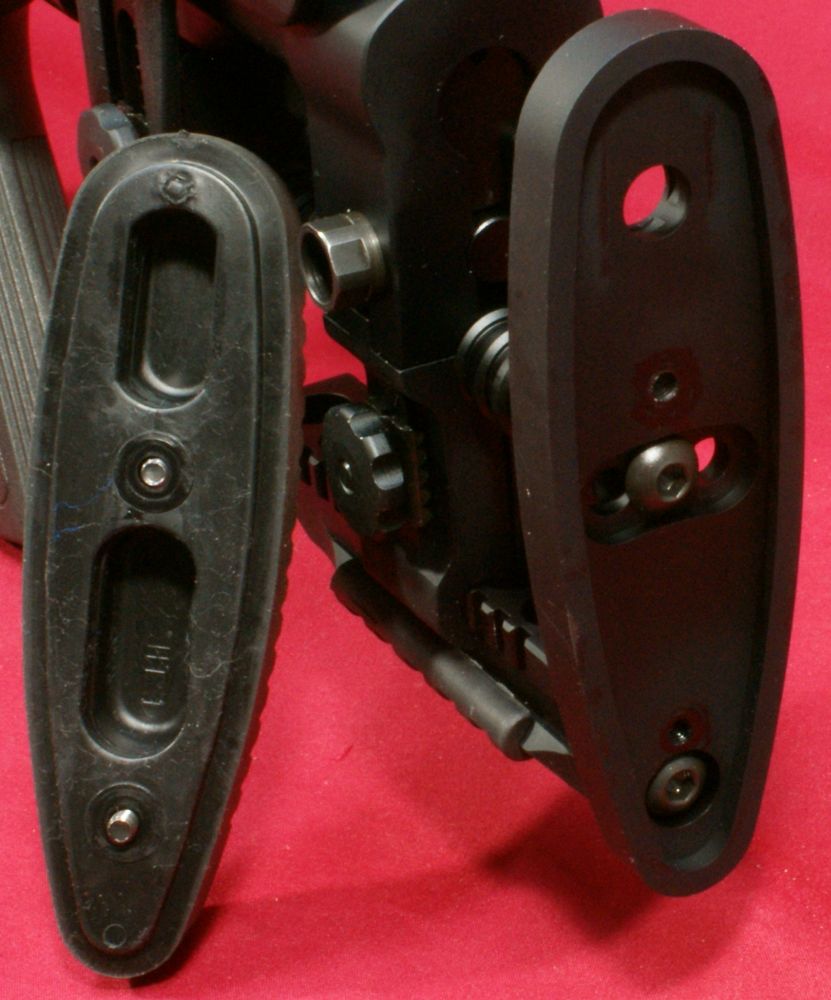
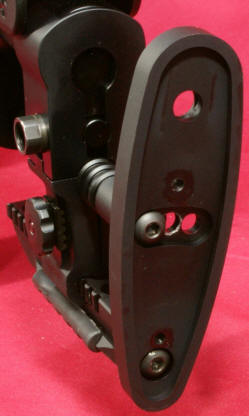
Another clever design is the folding hinge feature on this rifle. The hinge is made from some type of aluminum and has a strong triple lug design with what looks like a stainless steel hinge pin.
Figure 55
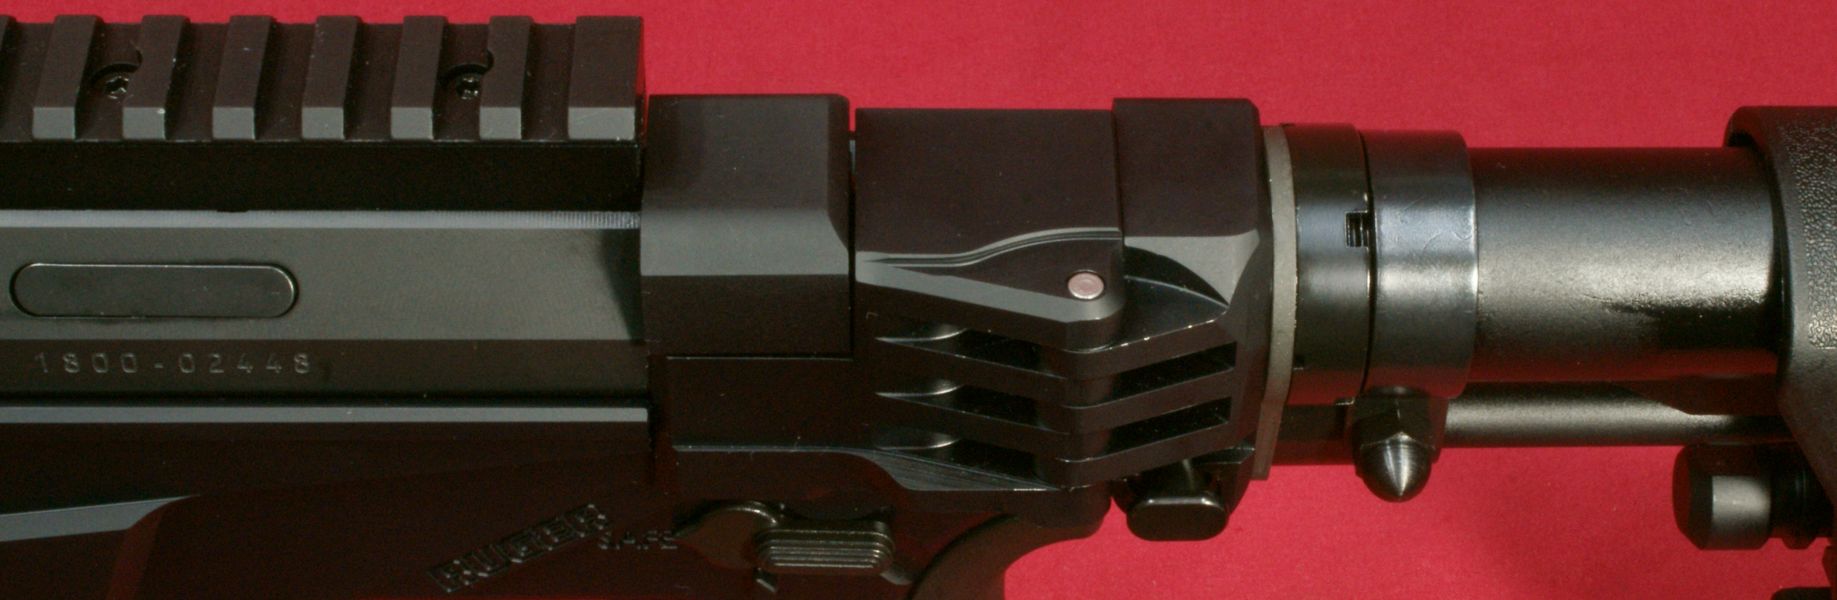
To fold the stock, you press the button on the left side below the hinge.
Figure 56
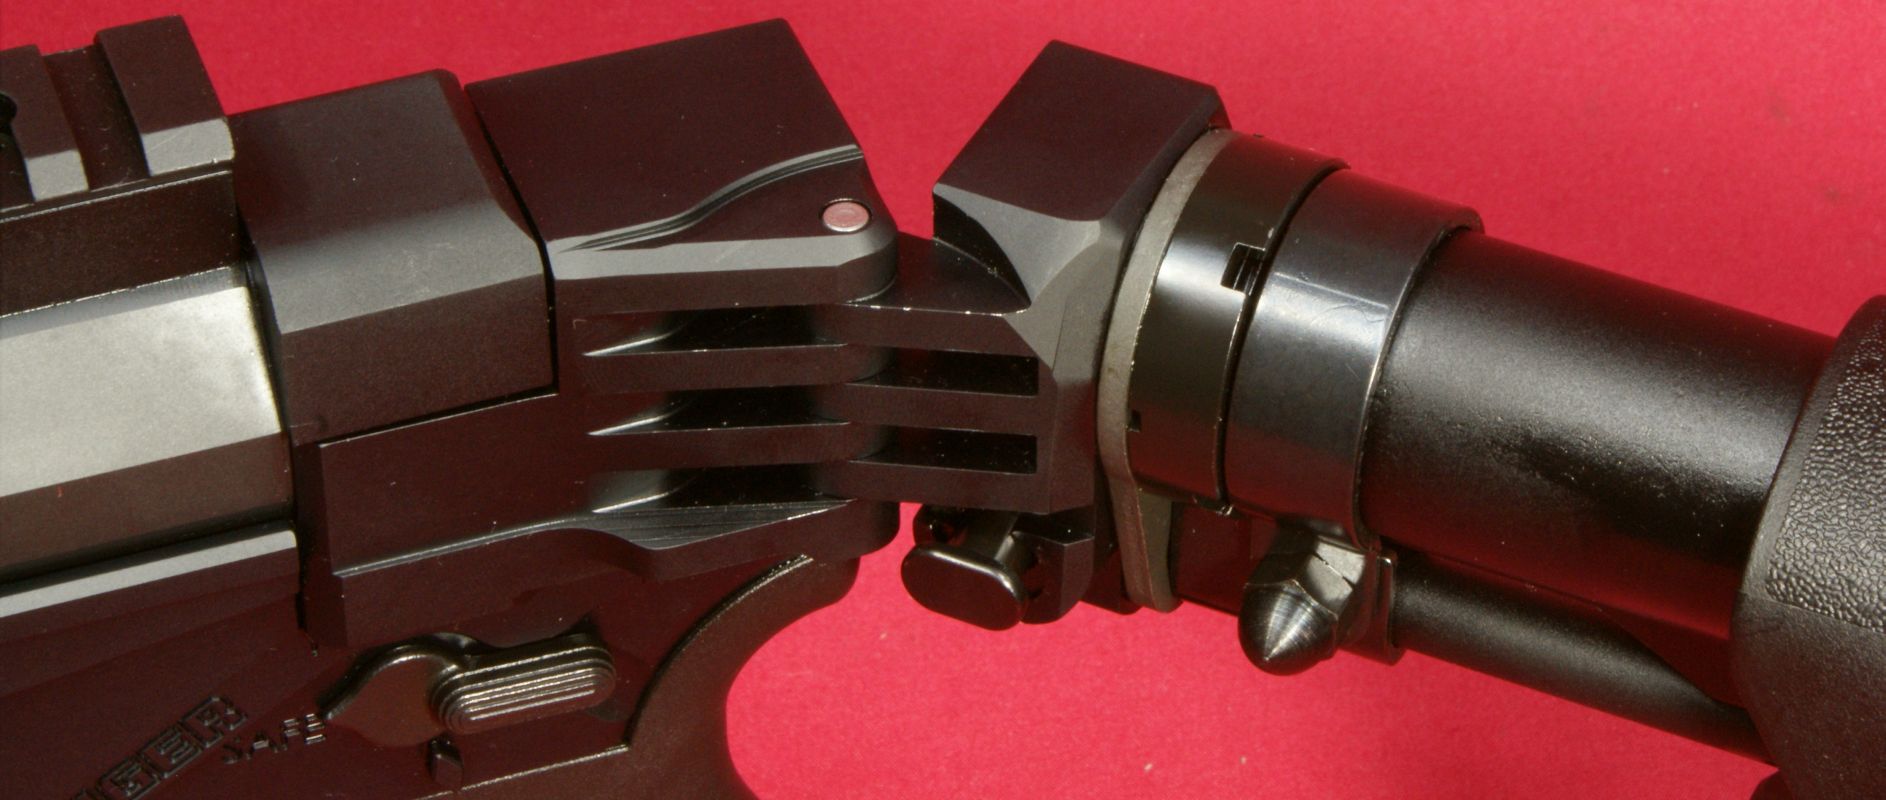
Pressing the button pushes the catch out of the socket on the right side of the rifle.
Figure 57
The buttstock can then fold flat against the left side of the receiver.
Figure 58
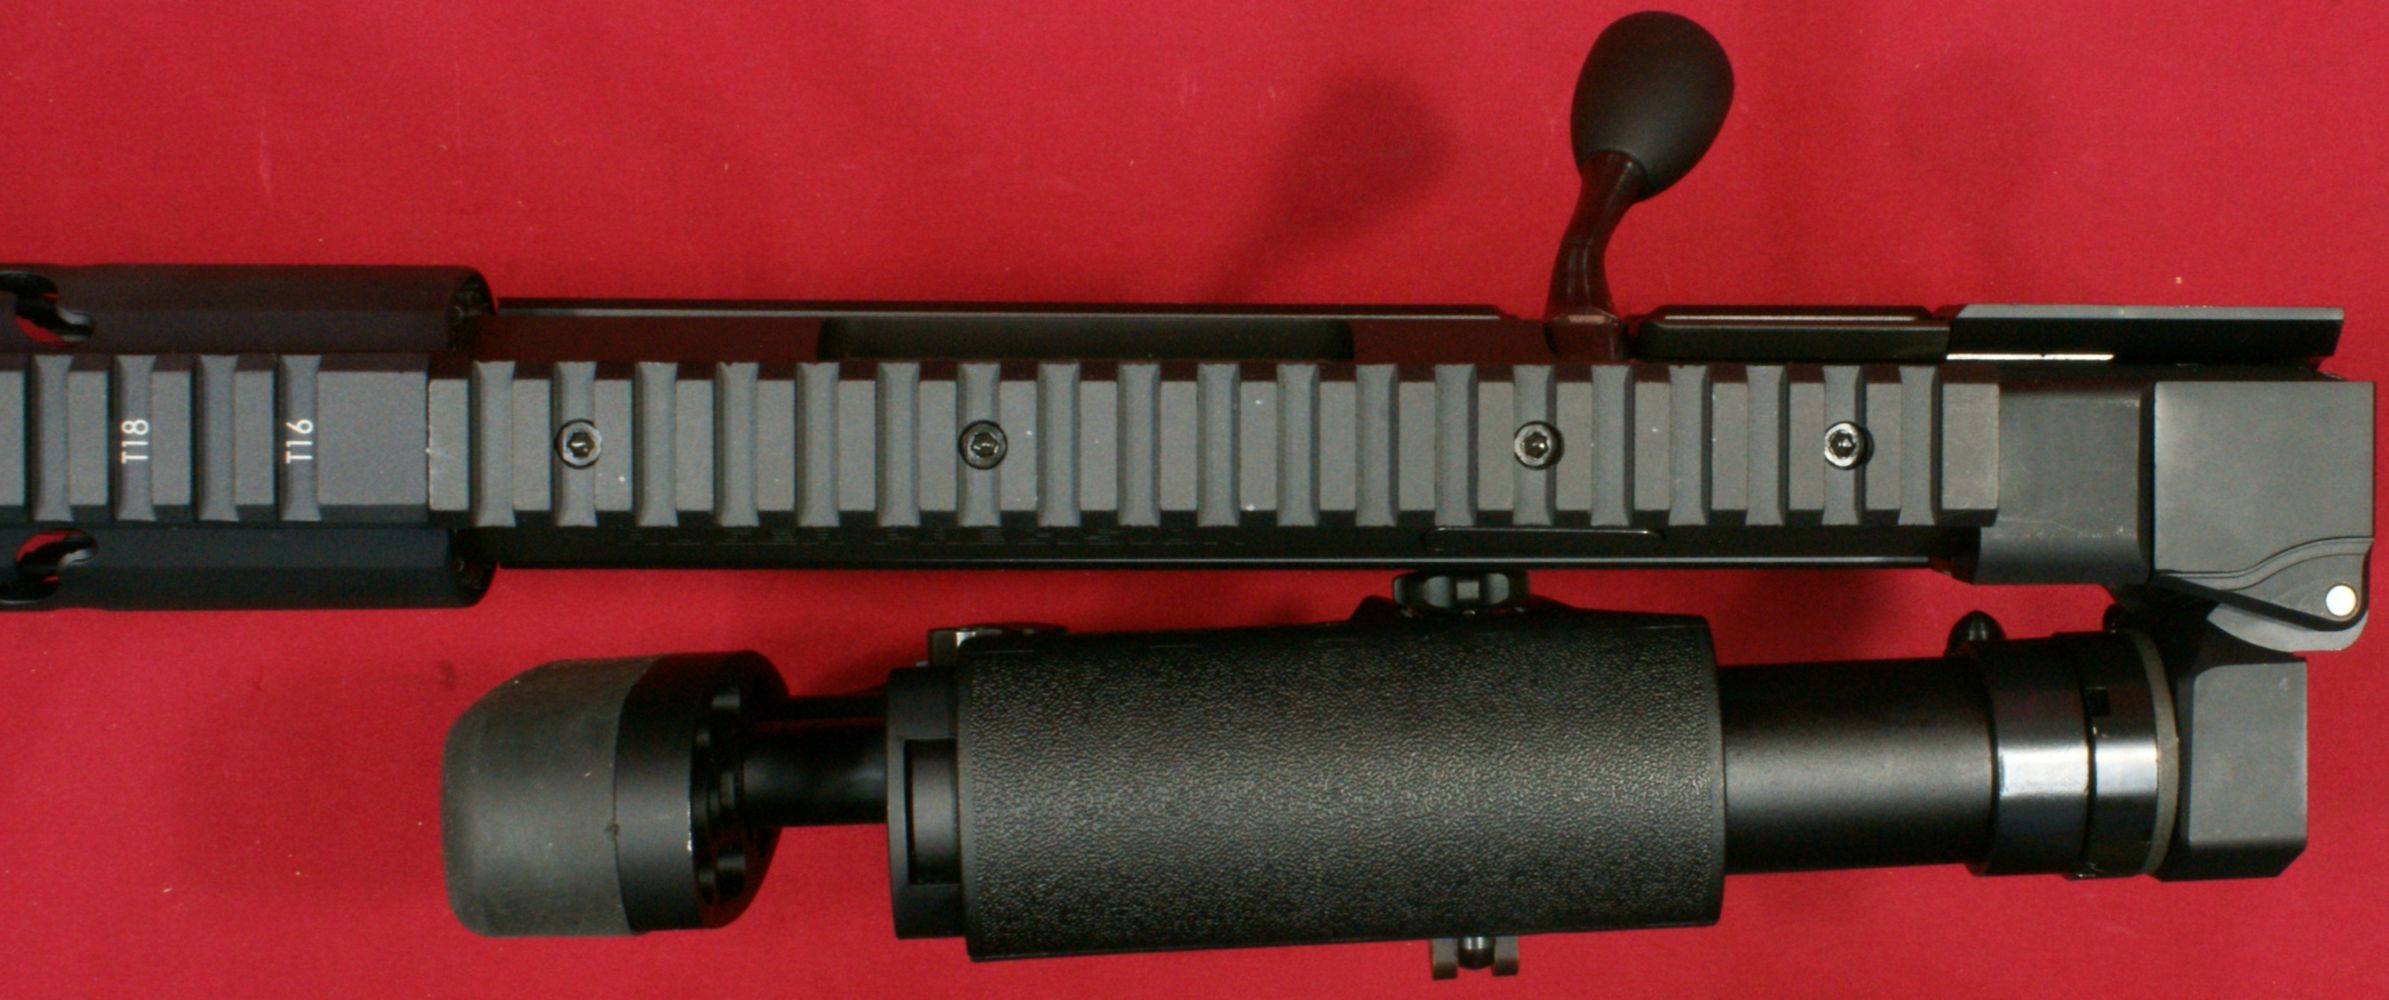
Figure 59
Once the stock is folded, you can then rotate the catch that was on the right side of the stock down (clockwise) to lock the stock in this folded position.
Figure 60
Figure 61
With the stock folded, the rifle has an overall length of about 34.6".
Figure 62
The forward portion of the hinge also has a QD slot below the rear of the bolt. Once again, Ruger did a nice job displaying their logo on the end of the bolt schroud.
Figure 63
I speculate that Ruger decided to go with the folding stock option on this rifle for two reasons. The first is it helps reduce overall length for transport and potentially maneuvering between different shooting positions. The other is that this provides a simple way to remove the bolt without having to have any special tools or going through a lengthy disassembly process. Their in-line recoils system design required something behind the bolt and the folding feature easily gets it out of the way.
Figure 64
Thoughts
Where to start...? I have been studying, photographing, videoing, writing and talking about this rifle for weeks and with every day my fondness for this rifle has only grown. I'm still finding it hard to believe that Ruger could have packed as many features into this rifle and they are only asking an MSRP of $1399. For those who took the 38 minutes to watch the YouTube video and also took the time to go over this part of the review, I thank you for putting up with what might be considered too much detail, but I didn't want to leave anything out. All I can say is that this rifle is so sexy I might have to give her a name and I hope my wife doesn't get too jealous!
Figure 65 - Final Configuration For Range Testing
(Detail in Part 5)
For more detailed photos and commentary, make sure you check out the other parts of this review and feel free to leave comments below. The following links are provided to help you see other parts of this review.
- Ruger Precision Rifle Review: Part 1 - Introduction, Specifications and Summary
- Ruger Precision Rifle Review: Part 2 - What's in the Box
- Ruger Precision Rifle Review: Part 3 - External & Operational Features (this page)
- Ruger Precision Rifle Review: Part 4 - Disassembly & Internal Features
- Ruger Precision Rifle Review: Part 5 - Range Test
Or
If you would like to be notified about future Gunsumer Reports reviews via Facebook, make sure "You Like This" by clicking the Facebook "Like" button at the bottom or top of this page. If it already says "You Like This" beside the button, clicking it again will uncheck the "Like" status and you will not be notified.
| Share on Facebook | |
© 2010, 2011, 2012, 2013, 2014, 2015, 2016, 2017, 2018, 2019, 2020, 2021, 2022, 2023 & 2024 Gunsumer Reports™, All rights reserved.
FTC Disclosure